Law Ruler Integration Guide: 2 of 2 - The API Sync Setup Guide
Welcome to the guide for integrating Law Ruler with our platform! This article will walk you through every step: from connecting your account to syncing cases, sending data back, and troubleshooting — all with clarity and confidence. Let’s go 🚀
Before you begin this step, it is important that you complete the previous step. Is it completed?
💡 Law Ruler Integration Guide 1 of 2: Creating Custom Field Templates by Case Type
Step 1: Connect Your Law Ruler Account to Kayse
Before using the integration, your Law Ruler account must be connected.
How to Connect:
- Go to Settings → Integrations in your dashboard
- Click Law Ruler to open the detail screen
- Enter the required credentials:
- Username
- Password
- Client Root (the firm subdomain from your CRM URL, for example
yourfirmfromhttps://yourfirm.lawruler.com) - Client Secret
- Key
- Click Connect to complete the connection
The connection dialog now includes helper text for each credential so admins can confirm which value belongs in each field before saving.
Integration Toggle Descriptions
Each toggle in the Law Ruler integration detail screen includes a short description explaining what it controls. For example:
- Enable Integration — pause or resume all syncing without disconnecting
- Receive data from LawRuler — pull new cases, leads, and messages from Law Ruler into Kayse on each sync
- Send data to LawRuler — push data from Kayse back to Law Ruler (choose specific data types below the toggle)
- Send mapped fields / messages / call records / documents — control which outbound data types are sent
- Sync case statuses — keep statuses in sync so a change in either system updates the other automatically
Setup Checklist
The detail screen also includes a built-in checklist to help admins work through setup in the safest order:
- Open the CRM webhook screen from the link in Kayse and paste the generated webhook URL into API URL
- Add optional parameters such as
list_idwhen you want one webhook to route records into a specific Kayse list - Link case types in the CRM Mappings tab before relying on mapped field sync
- Turn on Enable Integration, Receive data, any needed outbound options, and Sync case statuses last
Sync Health And Field Preview
The detail screen shows:
- Sync health timestamps for the last integration sync, the last successful status pull, and the last successful status push
- Available field preview when one specific case type is selected in the outbound settings, so admins can review the CRM field key, input type, and form section before creating mappings
If multiple case types are selected, use the CRM Mappings tab to review the full field list instead of the single-case-type preview.
Step 2: Set Up Webhook in Law Ruler
This webhook allows Law Ruler to push real-time case and client updates to our system. Here is a video walkthrough on setting up your Law Ruler webhook.
This needs to be performed inside your Law Ruler system in the Setup > Webhooks screen.
How to Configure:
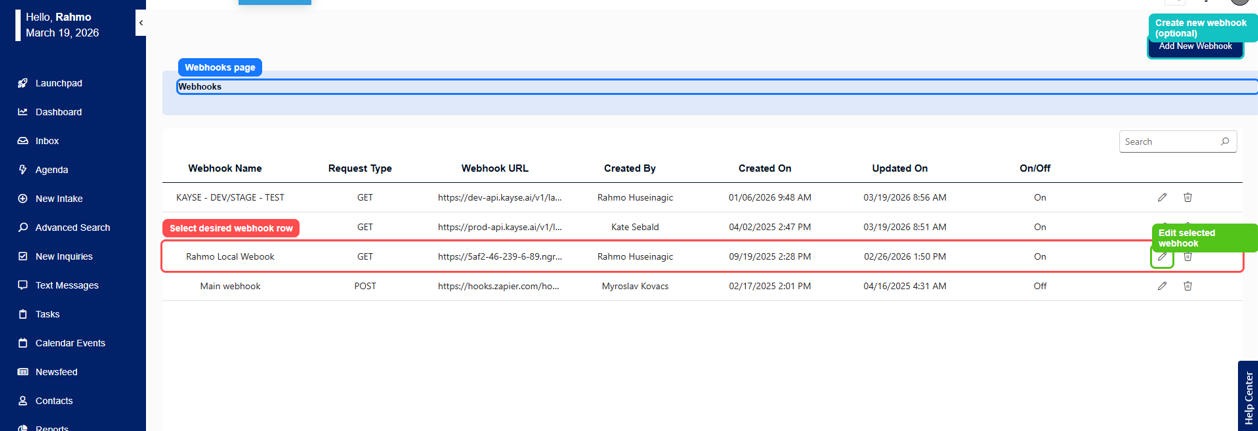
- In Law Ruler, go to Setup > Webhooks
- Select the webhook row you want to use, or create a new one first
- Click Edit selected webhook
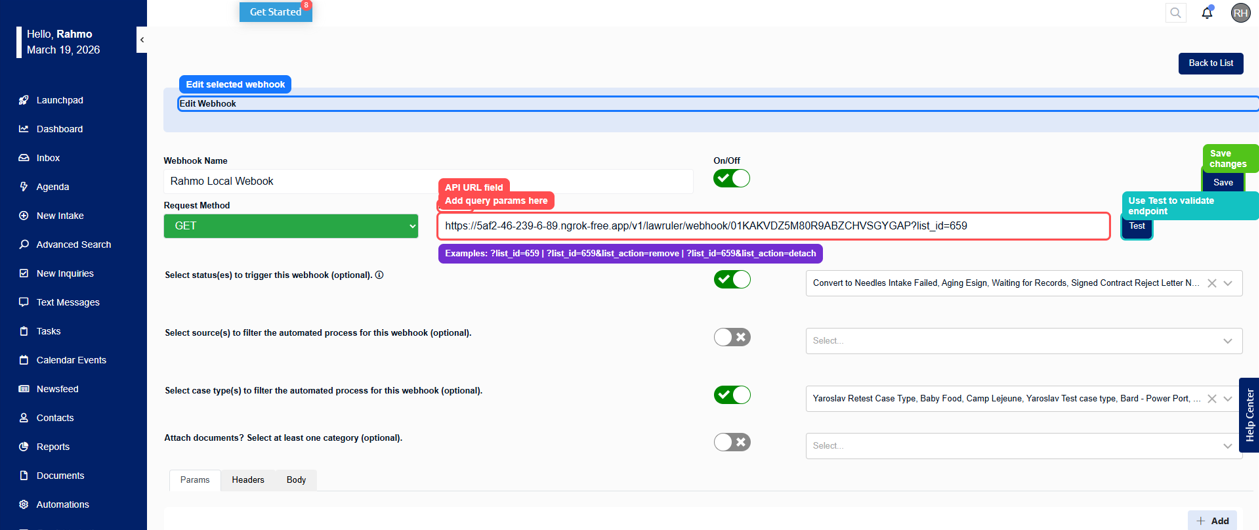
- Paste the webhook URL provided by our platform into API URL
- Select relevant options:
- Choose Case Types and Statuses to sync
- Fill out the webhook form: it must contain required fields like Lead ID, Contact ID, First Name, Last Name, Email, etc.
- You may also see dropdowns or lists of fields — make sure to select and map the ones that are required by our system.
- Save your changes
When editing the webhook, the most important field is API URL. This is where the Kayse-generated webhook URL goes. You can also add query parameters such as list_id, list_action, or campaign_id directly in that URL.
⚠️ All required fields must be provided. If even one field is missing, the request will be rejected.
Optional Webhook URL Parameters
You can append optional query parameters to the webhook URL to control how synced records are handled in Kayse:
list_id— attach synced records to a specific list (use the List ID from the Lists page). Example:&list_id=123list_name— specify a list by name instead of IDlist_action— control the list operation:add,attach,detach, orremoveremove_from_list— set totrueto remove the record from the specified listcampaign_id— associate synced records with a specific campaign
These parameters can be found and configured in the Law Ruler integration detail screen under Settings → Integrations → Law Ruler.
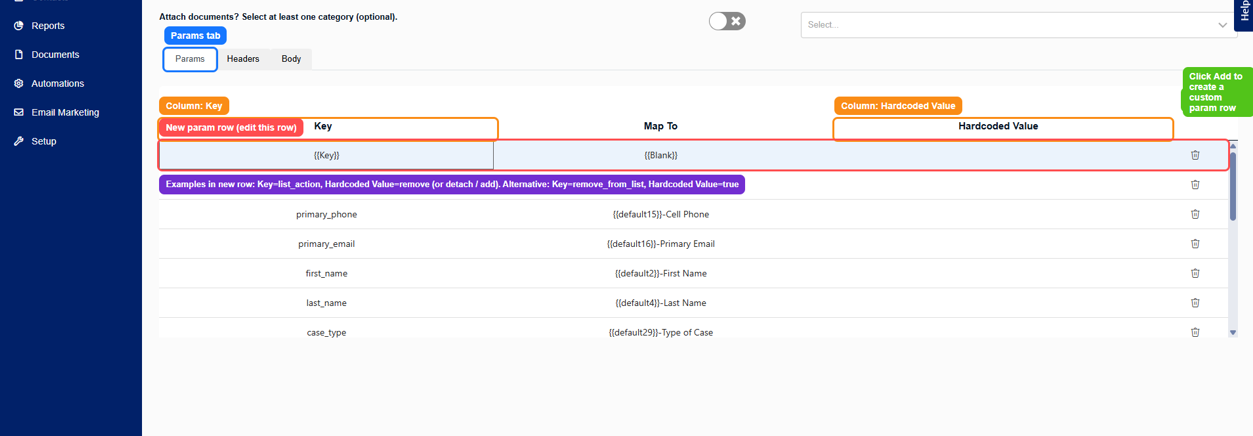
If you prefer, you can also set action values in the Law Ruler Params tab instead of embedding every parameter directly in the webhook URL.
- Open Params
- Click Add
- Add either:
Key = list_action,Hardcoded Value = remove(ordetach/add)- or
Key = remove_from_list,Hardcoded Value = true
- Save the webhook
✅ Once done, Law Ruler will begin sending updates for the selected case types and statuses via webhook.
Step 3: How Law Ruler < >Kayse Data Sync Works
Our system both receives and sends data to/from Law Ruler. Here’s how it works:
➕ Receiving Data from Law Ruler
There are two primary channels:
- Webhook Updates (Real-Time):
- Triggered when case status changes in Law Ruler to update data in Kayse
- Sends real-time updates including:
- Case name, type, status
- Client first/last name, email, phone
- Linked IDs (external identifiers)
- Scheduled Note Sync (Hourly):
- Syncs messages/notes related to cases
- Happens every hour via background service (CRON job)
⚠️ Not all field changes trigger webhook updates.
If users change a description or field without status change, the webhook may not fire.
In such cases, users should click Send via Webhook in Law Ruler manually.
⬅️ What Data We Import
Once integrated, our system pulls in:
- Cases: name, description, case type, status, internal/external IDs
- Clients: name, email, phone number, address, timezone, etc.
- Notes: messages and internal communication items tied to the case
Imported data is stored in our system and associated with external source ID (typically the Lead ID from Law Ruler).
This ID allows us to match future webhook updates to the correct cases and clients.
Using list_id and Auto-Add Rules In Kayse
If you use list_id in the webhook URL, Kayse can route webhook records into a specific Kayse list. You can find that value in the List ID column on the Lists page.

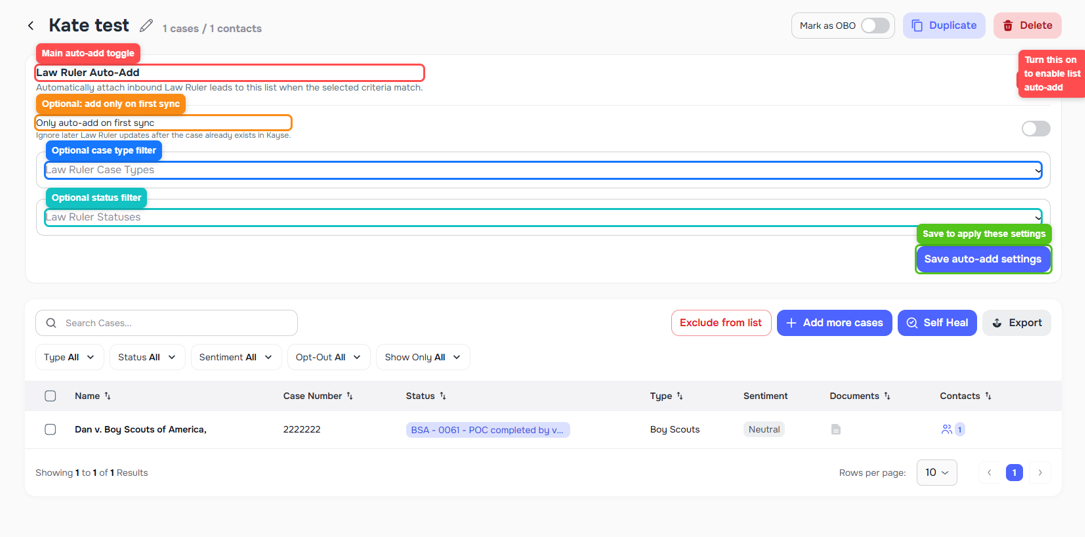
If you do not want one webhook per list, you can keep a general webhook and use Law Ruler Auto-Add rules inside each Kayse list instead. In that setup:
- Law Ruler Auto-Add turns rule-based list routing on or off
- Only auto-add on first sync adds the case only when it first arrives in Kayse
- Law Ruler Case Types and Law Ruler Statuses are optional filters
- Save auto-add settings applies the rule changes
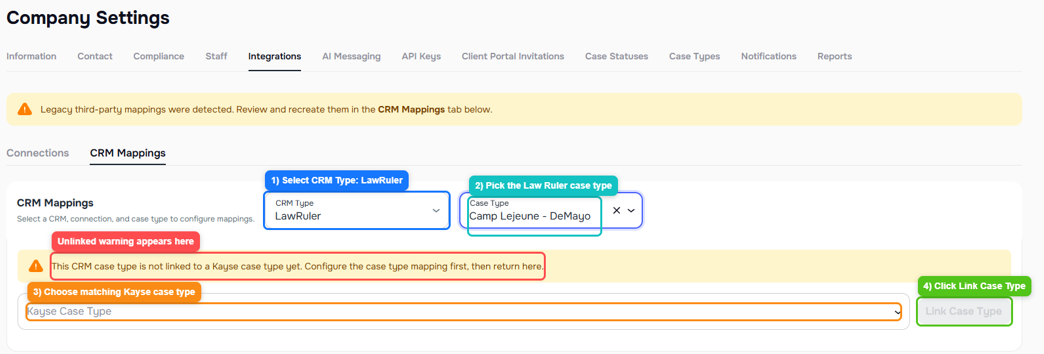
Link Case Types In CRM Mappings Before Field Setup
Before you rely on mapped-field sync or use the field preview in the Law Ruler detail screen, make sure the Law Ruler case type is linked to a Kayse case type in the CRM Mappings tab (Settings → Integrations → Law Ruler → CRM Mappings).
If a case type is not linked yet, Kayse will show a warning and the mapping setup for that case type will stay blocked until you finish the link.
➡️ Sending Data to Law Ruler
The following actions in our platform automatically push data to Law Ruler:
📞After each successful AI Call > Kayse sends the following data to Law Ruler
- Messages (email, SMS, in-app — all appear as notes in Law Ruler of the type Client Communications)
- Call Records (call summary + call transcripts are sent to the notes section)
- Uploaded Documents (sent immediately to Law Ruler’s document storage to the /recordings folder)
Important: the Send documents to LawRuler option sends files from Kayse out to the CRM. It does not download existing CRM documents back into Kayse.
⚠️ All outbound items are stored as notes, not in Communication tabs (SMS/Email).
This applies to messages, calls, documents.
Some document types (e.g. PNG, JPG) are fully supported. CSV and Cyrillic-named files may fail silently — these use cases are under review. If you find this happening, please contact Law Ruler support and advise them of the problematic file names that might not be accepted such as WAV. As a workaround,
💡Kayse renames MP3 files as WAV so they are accepted by Law Ruler, but there could be other disallowed file extensions.
Additional Data Sent After AI Call Campaigns
When an AI-driven call (Voice AI Campaign) is completed, our system automatically sends a structured data package to Law Ruler, linked to the corresponding Lead ID.
1️⃣ API Call
A backend request is made to the Law Ruler endpoint: [Law Ruler Endpoint]/api-legalrcampaign.aspx
Query Parameters include:
LeadID — ID from the call
Key — API token for authentication
OverriddenLead — set to true
Tags — set to "Kayse"
Status — based on post-call result
CellPhone — (optional) when Sync enriched phones is enabled in Law Ruler integration settings, Kayse sends the enriched phone number (from phone enrichment) as the lead's CellPhone when a call succeeds and the number used has that source (e.g. “Qualified – Intake Completed”, “Sent e-Sign”, “Review Needed”)
Custom Fields — all keys starting with _custom are transformed to query parameters prefixed with Custom For example: FirstName = John LastName = Johnson Custom1234: Yes Custom1235: 1/1/2000 Custom1236: No
Call Summary: We spoke to John about his Zantac case and discussed what is going on with the case. John answered all questions and the call ended on a positive note.
Call Transcript: Agent 00:01 Hi, you've reached Jennifer, an AI assistant with Krause & Kinsman Law Firm. Am I speaking with Michael?
Michael 00:09 Yes.
Agent 00:13 Great, Michael! I have some important news for you. There is now a settlement available in the Zantac case, which is excellent news and could result in you receiving compensation. Before we proceed with the details, I need to verify your birth year. Could you please confirm your year of birth?
Michael 00:30 What are the documents I need to submit?
Agent 00:36 I’d be happy to explain the documents required, but first, I need to verify your birth year to ensure I’m speaking with the right person. Could you please confirm your year of birth?
#END EXAMPLE
🔹 All values are converted to strings (booleans, integers, etc.)
2️⃣ Notes Sent to Law Ruler
📝 Two notes are added to Law Ruler under the “Client Communication” category:
🟪 Call Analysis Summary
Includes:
- Call Summary and Call Transcription (if available)
- Campaign Opted Out status (if true)
- Voice Calls Opted Out status (if true)
- Wrong Number status (if true)
- Disconnection Reason (for failed calls)
- All custom analysis data with _custom prefix
🟪 Full Call Transcript (for successful calls only)
The full transcript is formatted as:
[AGENT]: Hello, this is Kayse…
[CLIENT]: Yes, I'm listening…
…
3️⃣ Call Recording Upload to Law Ruler
An audio recording is uploaded to Law Ruler in the /recordings folder and associated with the correct lead.
File Name format:
Kayse VoiceAI Recording – [CampaignName] ([Timestamp]).mp3
If no campaign: Kayse VoiceAI Recording ([Timestamp]).mp3 Metadata includes:
Lead ID
Recording URL
File Form Name: “Recording”
⏱️ Timestamps and Lead Binding
All data — including API call, notes, and recording — is linked to the specific Lead ID and includes exact timestamps for proper chronological ordering in Law Ruler.
Step 4: Importing Cases from Law Ruler (Manual)
You can also manually import case and client data:
- Export from Law Ruler:
- Go to the export tool in Law Ruler and download client+case data
- In our platform:
- Navigate to Cases > Import
- Paste or upload:
- ⚠️ Lead ID (used as External Source ID)
- ⚠️ Contact ID (this is REQUIRED or can cause data concerns if it is not there if you have multiple cases with the same name)
- ⚠️ Case Type, Status, and any additional case metadata such as custom fields.
Our system will use this to match and track future webhook updates.
️ Step 5: Troubleshooting Tips
Webhook not triggering after update?
- ✅ Confirm that case status was changed — that’s what triggers the webhook
- ✅ Or click Send via Webhook manually in Law Ruler
Message not visible in Law Ruler’s Communication tab?
- 🔹 Messages appear in the Notes section — not under SMS/Email tabs
File uploaded but not visible?
- 🔹 Some formats (CSV, special encodings) may not be supported
- 🔹 Try using PNG/JPEG — test before deploying to production
Re-enabling Case Status Sync
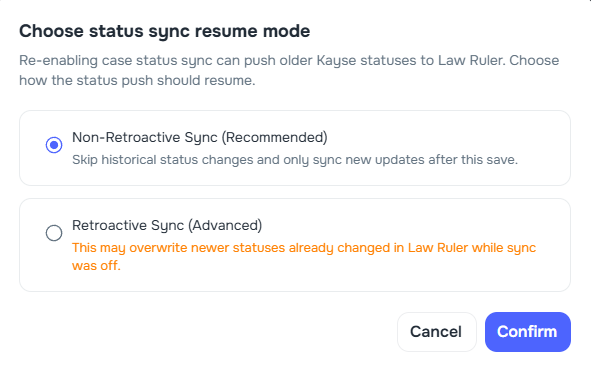
If you previously had case status sync turned on, disabled it, and are now re-enabling it, a confirmation dialog will appear asking you to choose a resume mode:
- Non-Retroactive Sync (Recommended) — skips any status changes that occurred in Kayse while sync was off and only pushes new updates going forward.
- Retroactive Sync (Advanced) — replays all status changes that were queued while sync was off. ⚠️ This may overwrite newer statuses that were already changed directly in Law Ruler during the time sync was disabled.
This dialog only appears when the system detects that status sync was previously active and has since been turned off. If status sync has never been used before, the setting is applied immediately without a confirmation prompt.
FAQ
Q: How often is data synced from Law Ruler?
A: Webhook data (status-triggered) is real-time. Notes/messages are synced hourly.
Q: Can I trigger an update manually?
A: Yes — either change the case status or click Send via Webhook in Law Ruler.
Q: Where do messages from our platform appear in Law Ruler?
A: Under the Notes tab only.
Q: Can I modify webhook settings later (e.g. case types)?
A: Yes — you can adjust case types/statuses at any time from Law Ruler without breaking the connection.
Need help? Contact our support team anytime ✨
Happy integrating!
Keywords: LawRuler, Law Ruler