What Are AI Campaigns?
AI Campaigns help your team reach out to clients automatically using AI voice calls, SMS, email messaging, and smart follow-ups.
AI Campaigns save time, improve speed, and help law firms stay connected with clients at scale.
With AI Campaigns you can:
- ✔️ Call hundreds or thousands of clients automatically
- ✔️ Send reminders through SMS or email
- ✔️ Collect information using Forms + Smart Tasks
- ✔️ Track progress and see who completed what
- ✔️ Review results in a clean and simple dashboard
AI Campaigns give you a powerful way to stay organized and move cases forward faster.
What You’ll Learn in This Article
In this guide, we’ll walk through everything you need to launch and manage an AI Campaign:
- ✔️ How to create a List (required for campaigns)
- How to provide a call flow/FAQ/intake training document for disqualification and call handling
- ✔️ How to create an AI Campaign step-by-step
- ✔️ How Forms & Smart Tasks work inside campaigns
- ✔️ How to set up Runs, time windows, and channels
- ✔️ How to read metrics and track results
- ✔️ What each tab inside a Campaign means
- ✔️ Best practices and tips for success
Let’s get started! 🚀
️ 1. Creating a List (required before creating a campaign) and Including a Call Flow/Intake Script
A List is a group of cases that your AI Campaign will work with.
You must create a List before you can create a campaign.
You can create a List:
- from the Lists page, or
- from the Cases page using bulk actions.
Call Flow/Intake Script/Qualification Rules ✅ IMPORTANT: In addition to the list, you should also provide a separate call flow/intake script/FAQ document as lists are usually just client data and do not contain call flow or qualification/DQ rules.
💡Pretend you are giving a new intake rep your training document/FAQ for a new case type or campaign and provide that to use to build each AI for you.
Knowledgebase Documents and Websites
📖 Knowledgebase Documents and Websites: You can also provide links to any knowledge websites or documents inside of each agent that is built.
If there is a court website for each docket, then share that as well. For example, for Camp Lejeune, we could include one or all of the court websites so the AI can talk about recent happenings in the case if someone asks on a call, if you would like to include that context.
1.1 Create a List from the Lists page
- Go to the Lists page in the sidebar.
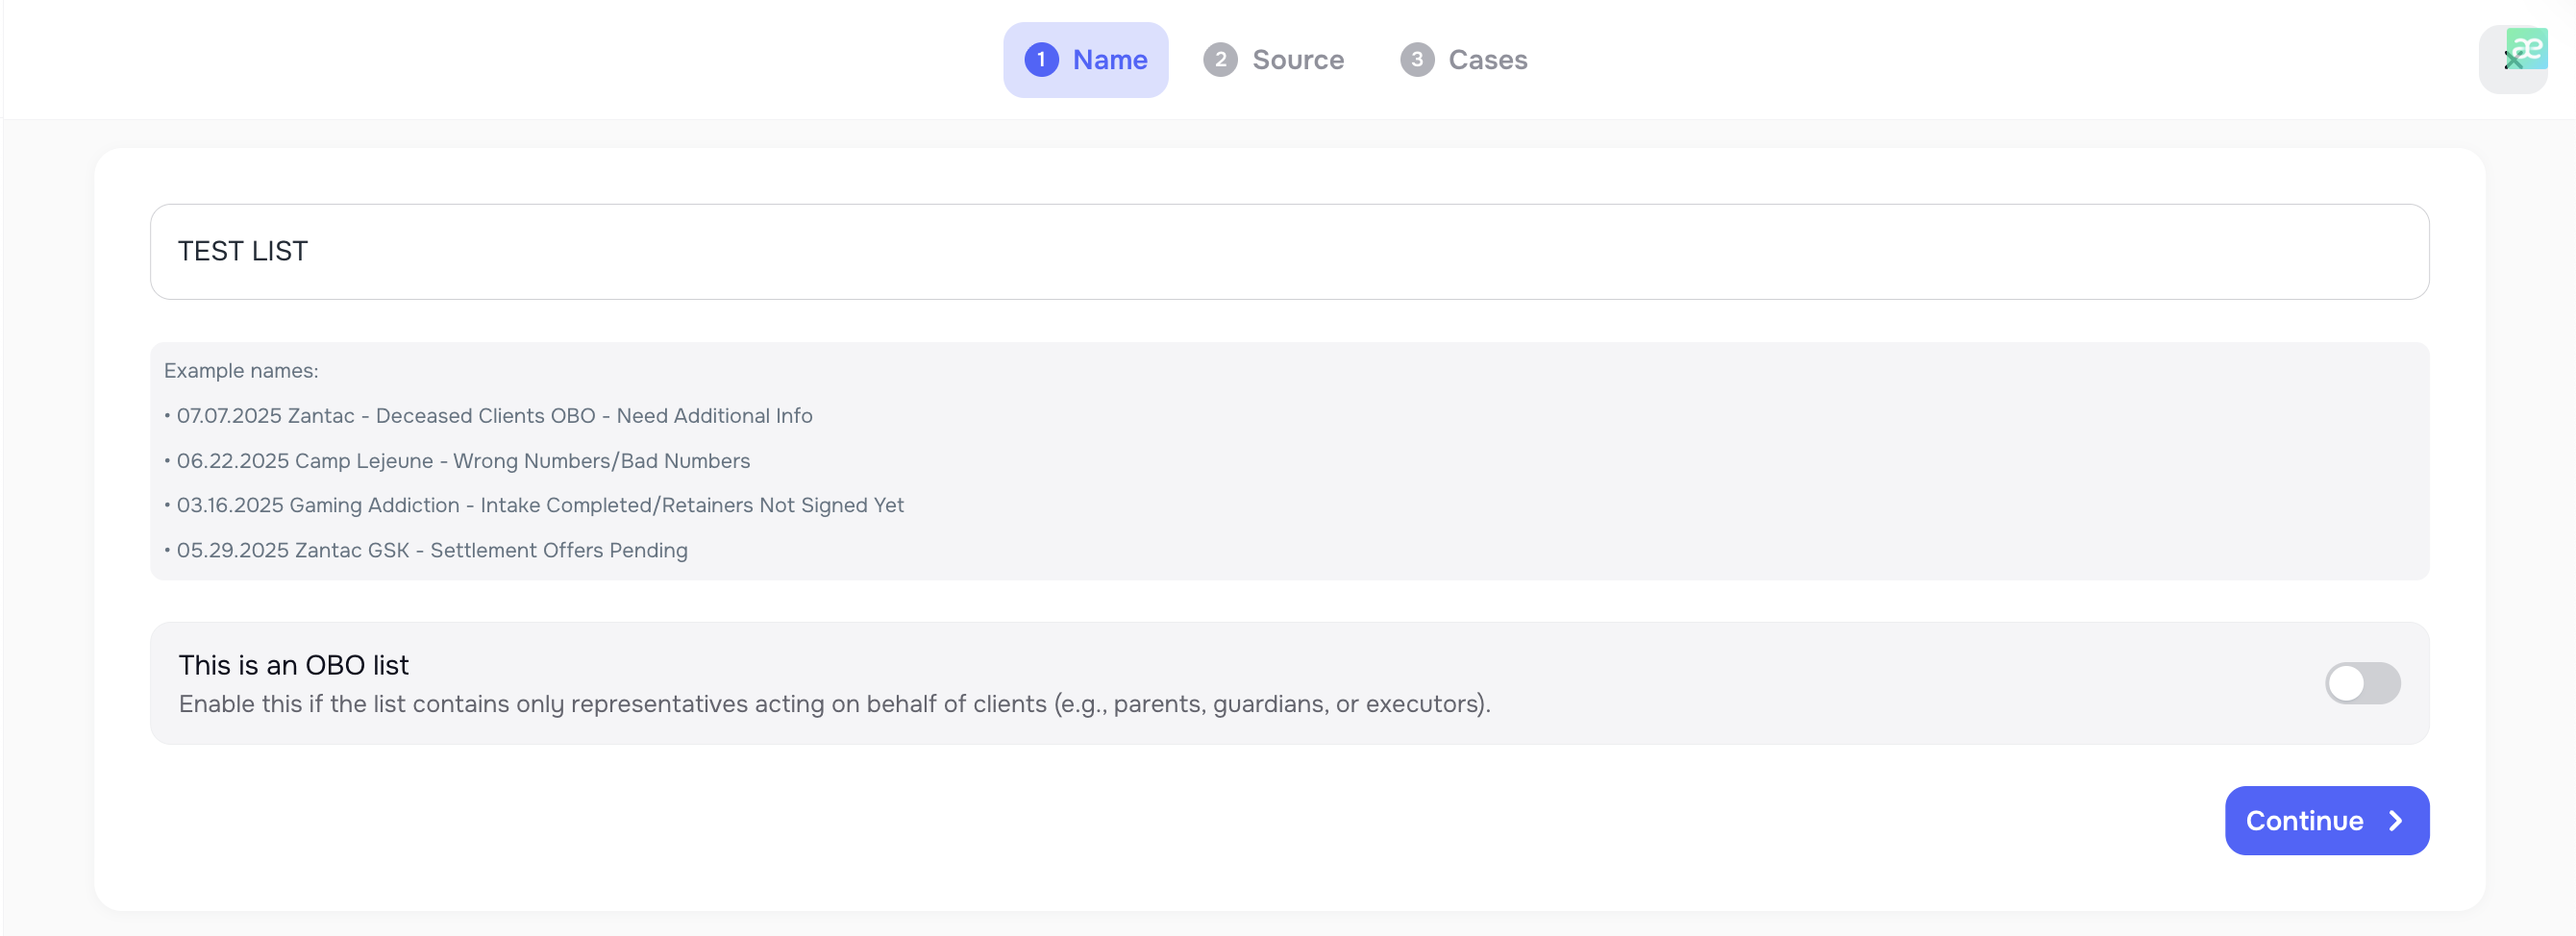
- Click ➕ Create List.
- Enter a List name.
- Choose whether the List is OBO or non-OBO.
- If the List is marked as OBO, all cases added to this list will be treated as “on behalf of” cases in reporting and campaigns.
- Click Continue.
On the next step, you choose how to fill the list:
- from existing cases, or
- by importing a file.
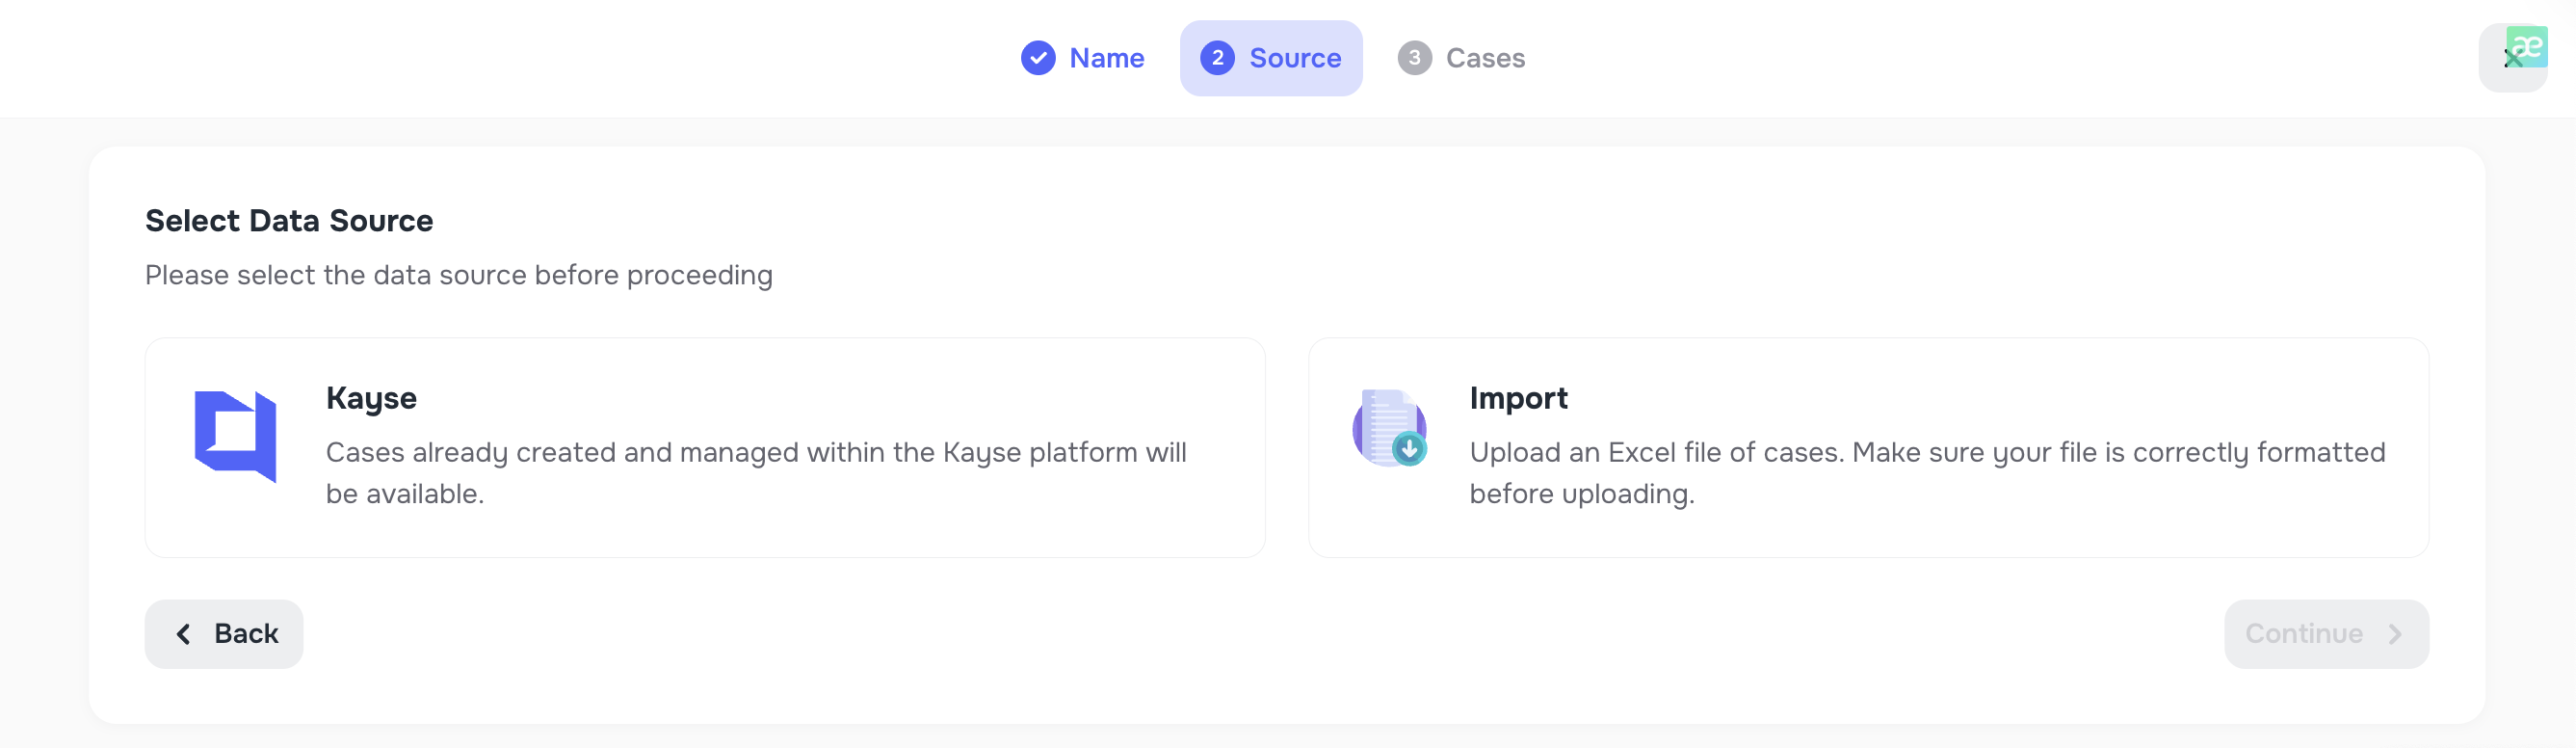
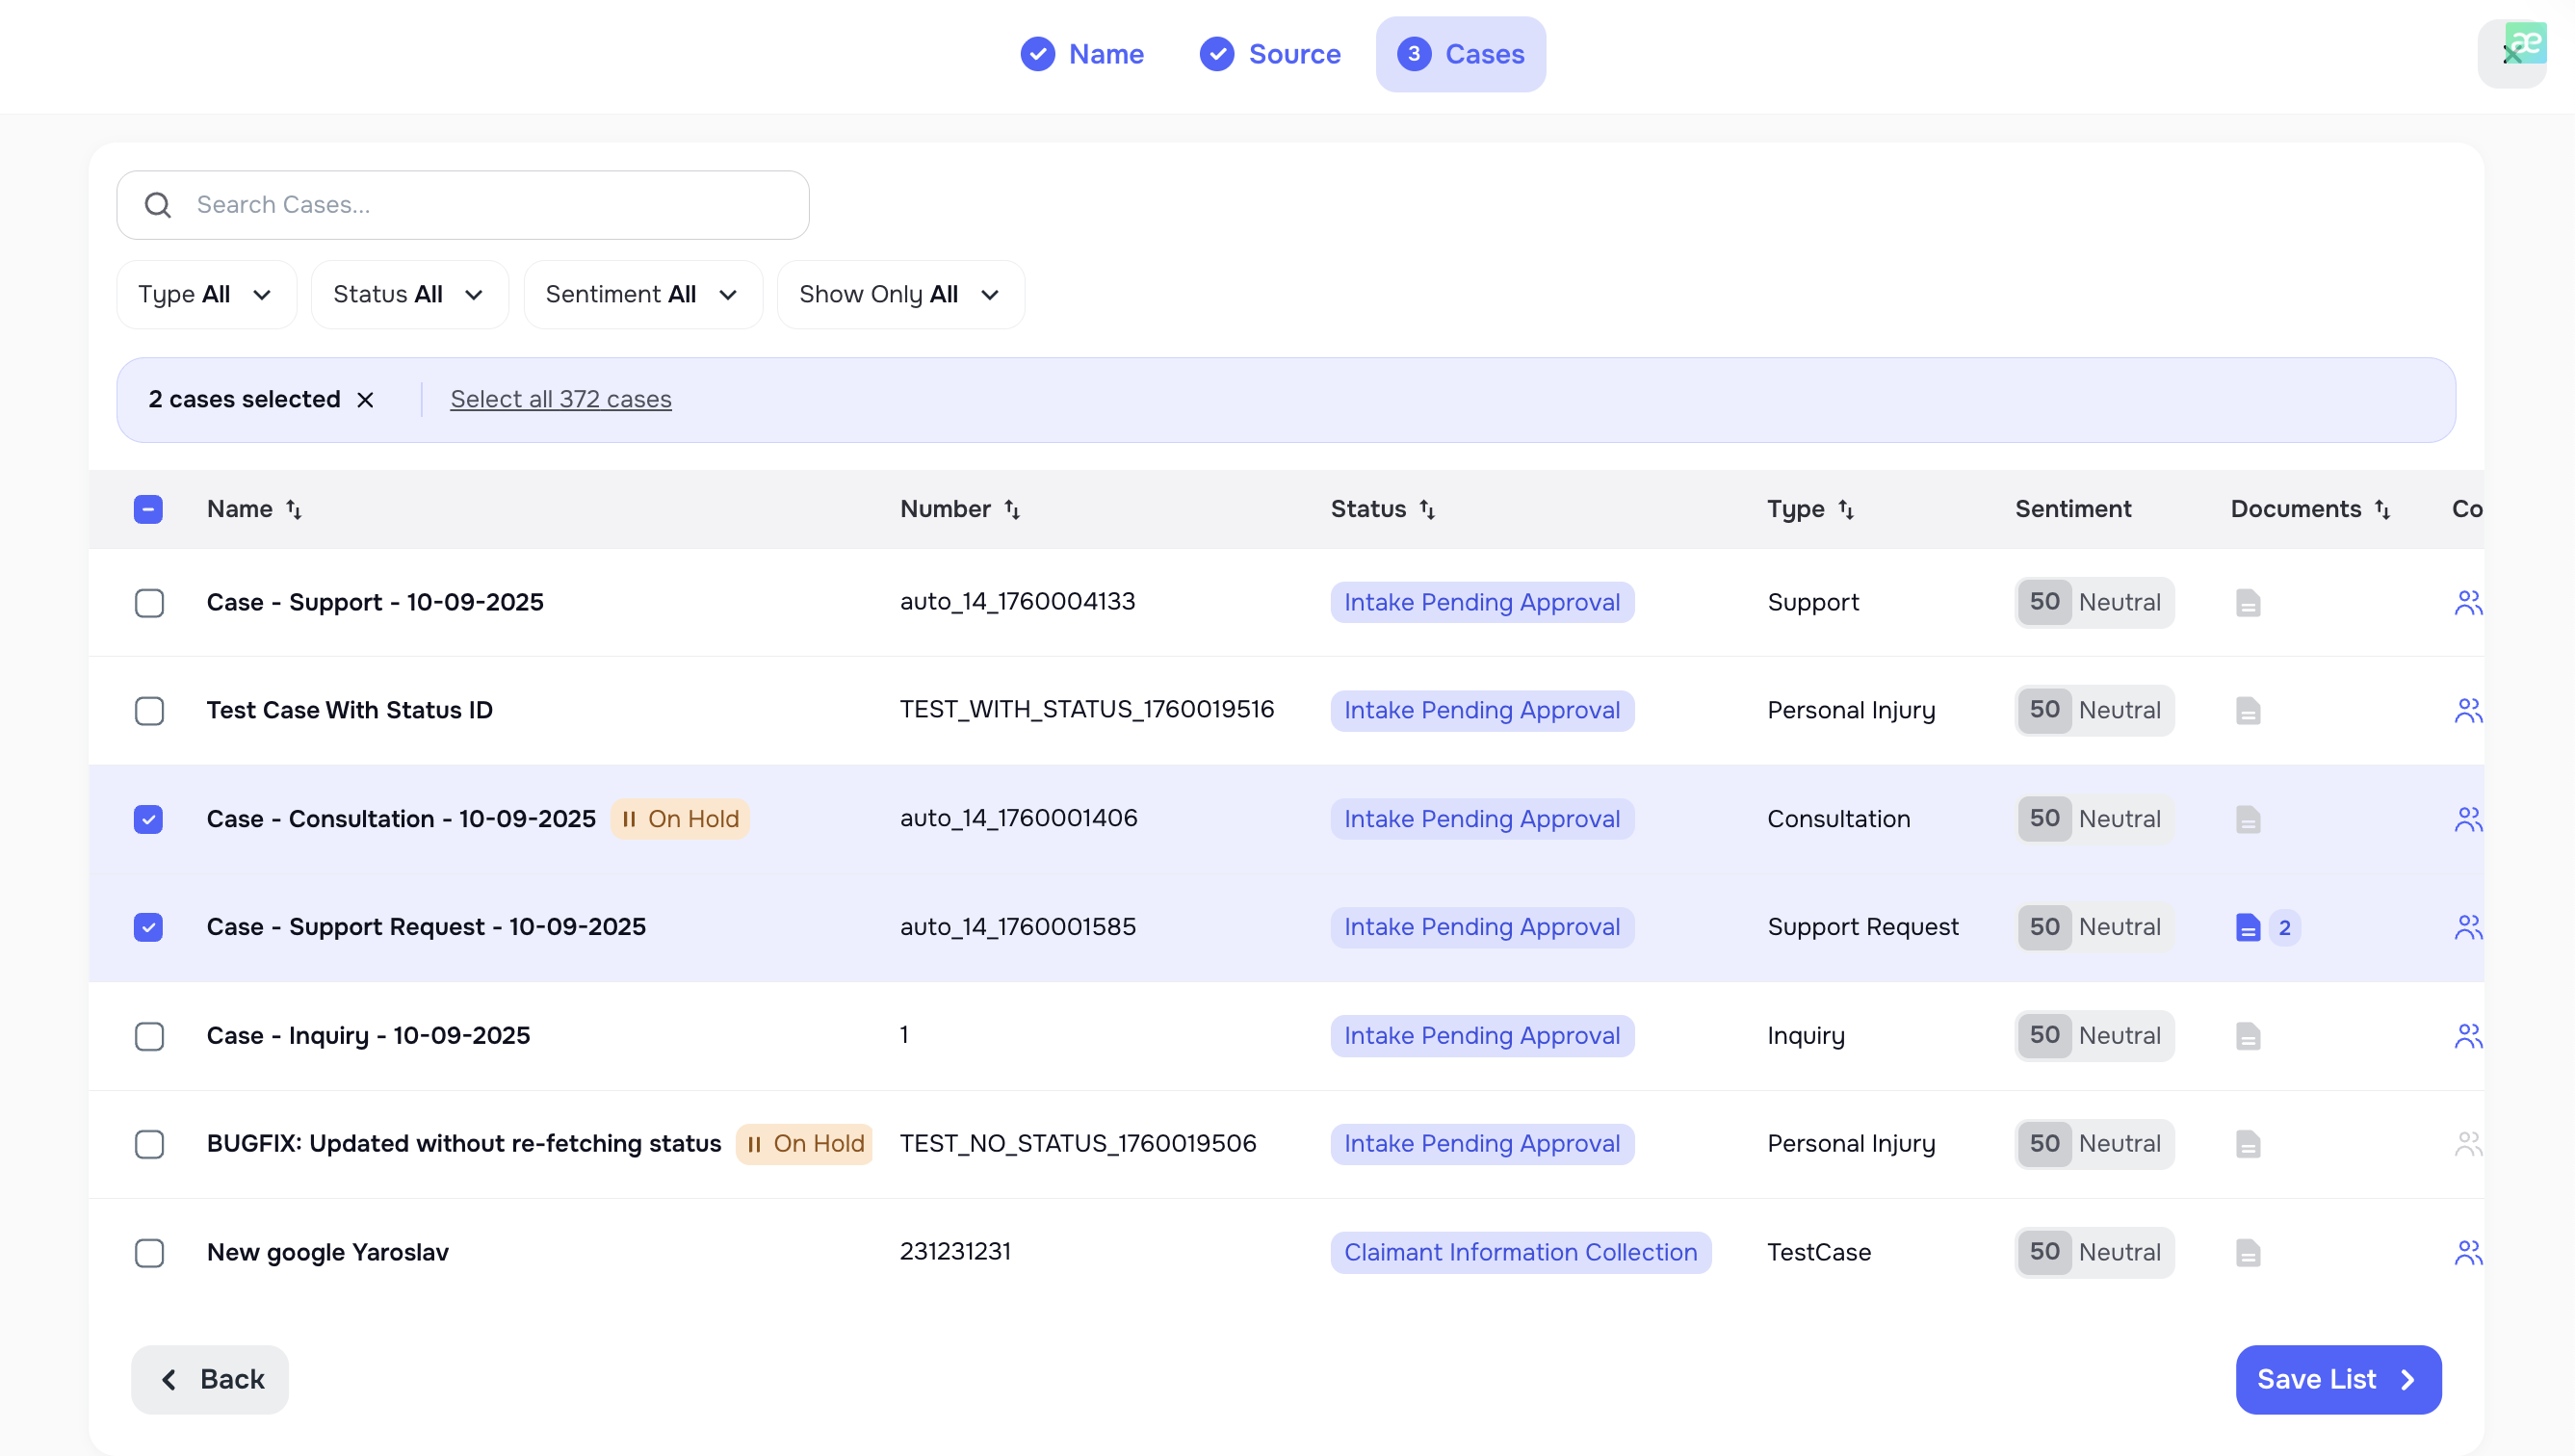
Option A — Build a List from existing cases
- On the “Data source” step, select Cases.
- Click Continue.
- Select one or more cases from the list.
- Click Save List.
A new List is created with exactly those cases.
Option B — Build a List using Import (CSV / Excel)
If you choose Import as the source, the system will guide you through several import steps: Upload → Manage duplicates → Mapping → Import status.
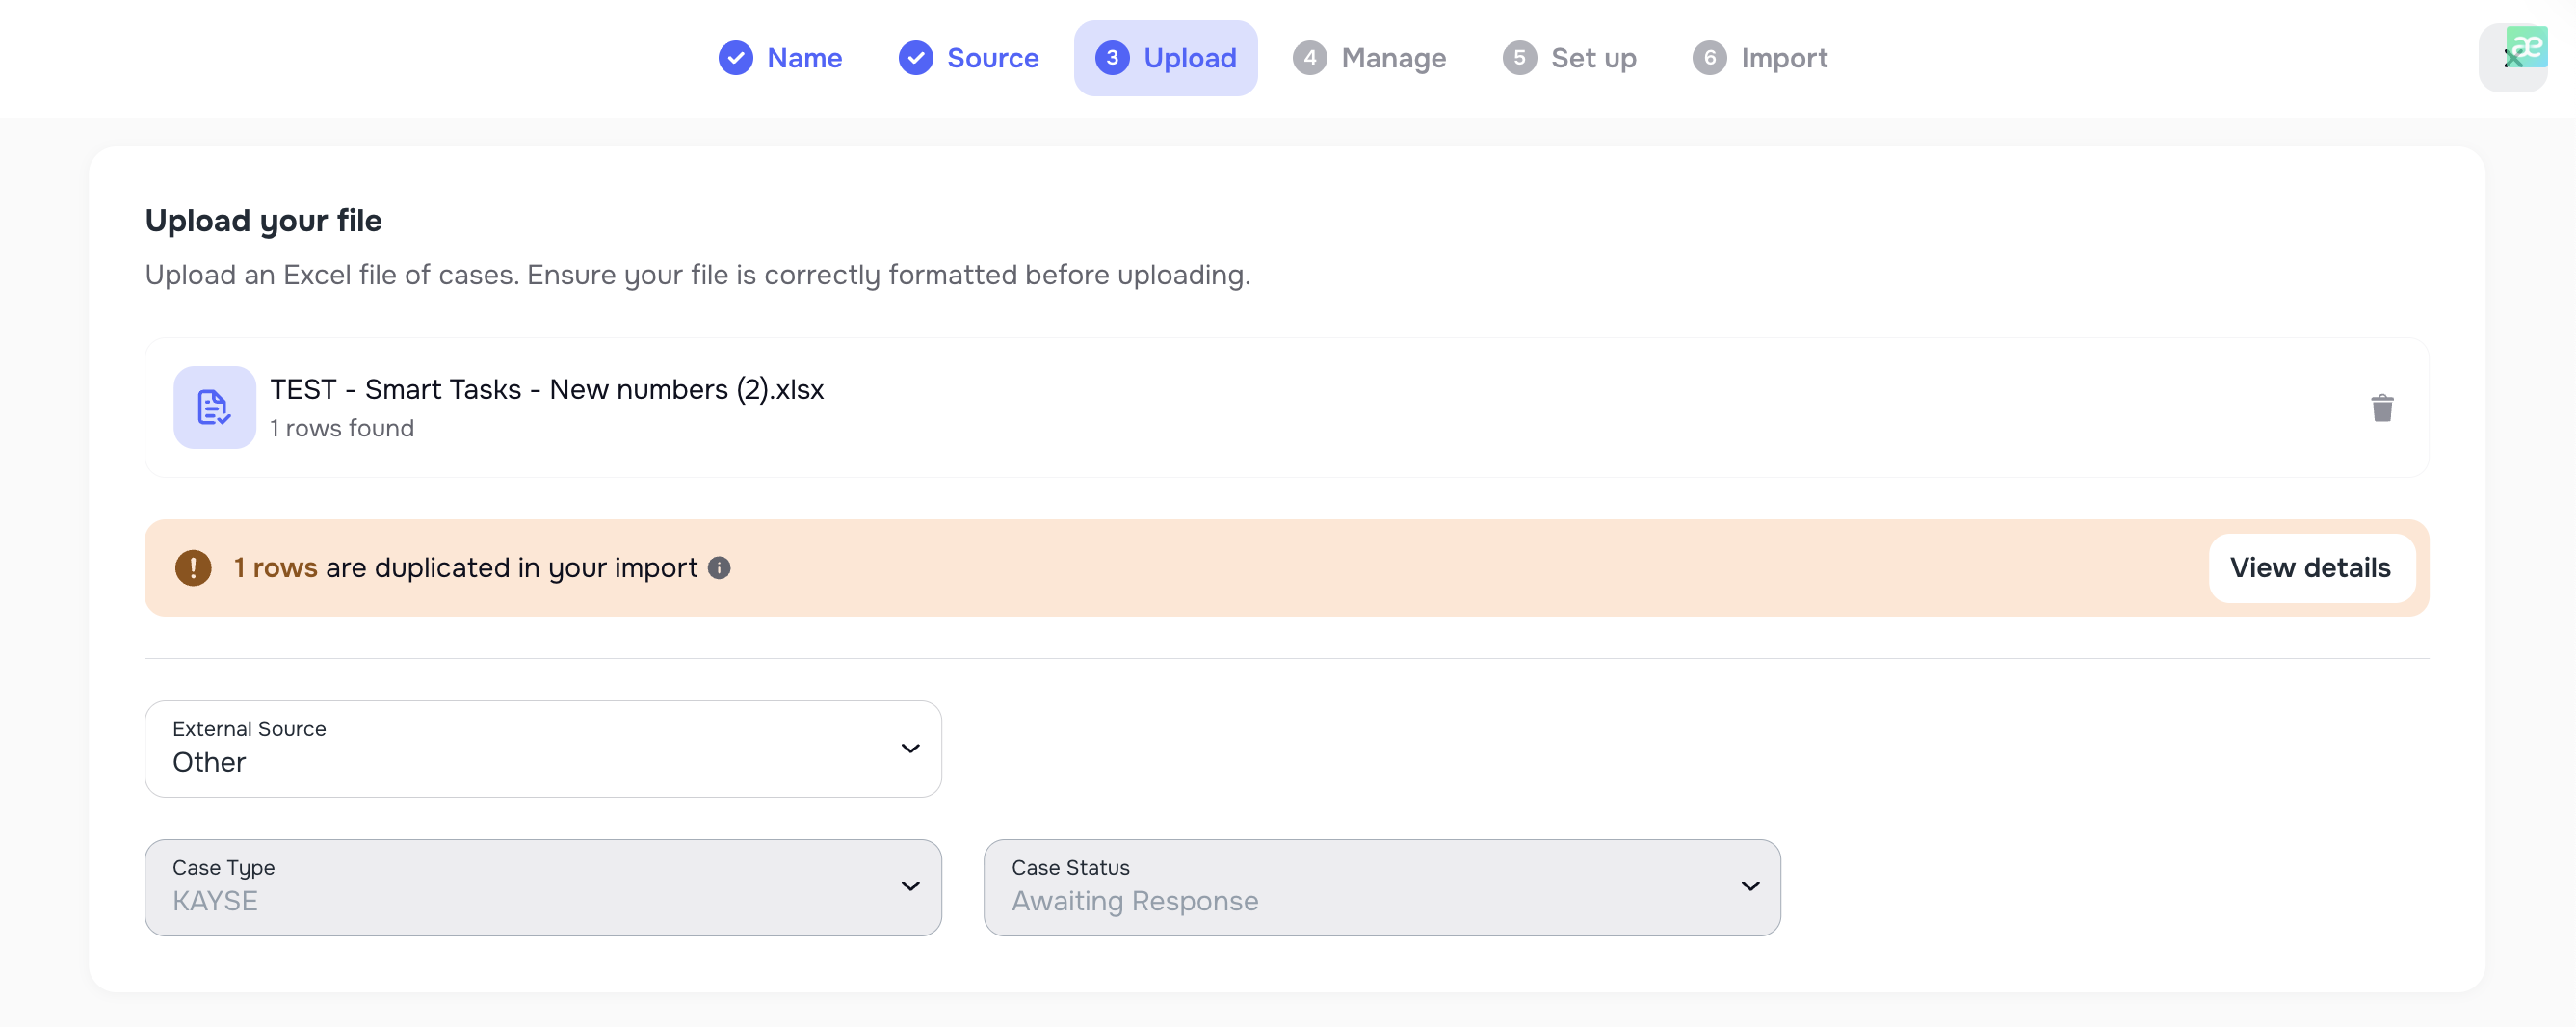
Step 1 — Upload
- Choose Import as the data source.
- Click Continue.
- On the import step:
- Select or create the Case Type,
- Select or create the Case Status,
- Upload your Excel file.
- The system validates the file and detects potential duplicates.
- Click Continue to go to the next step.
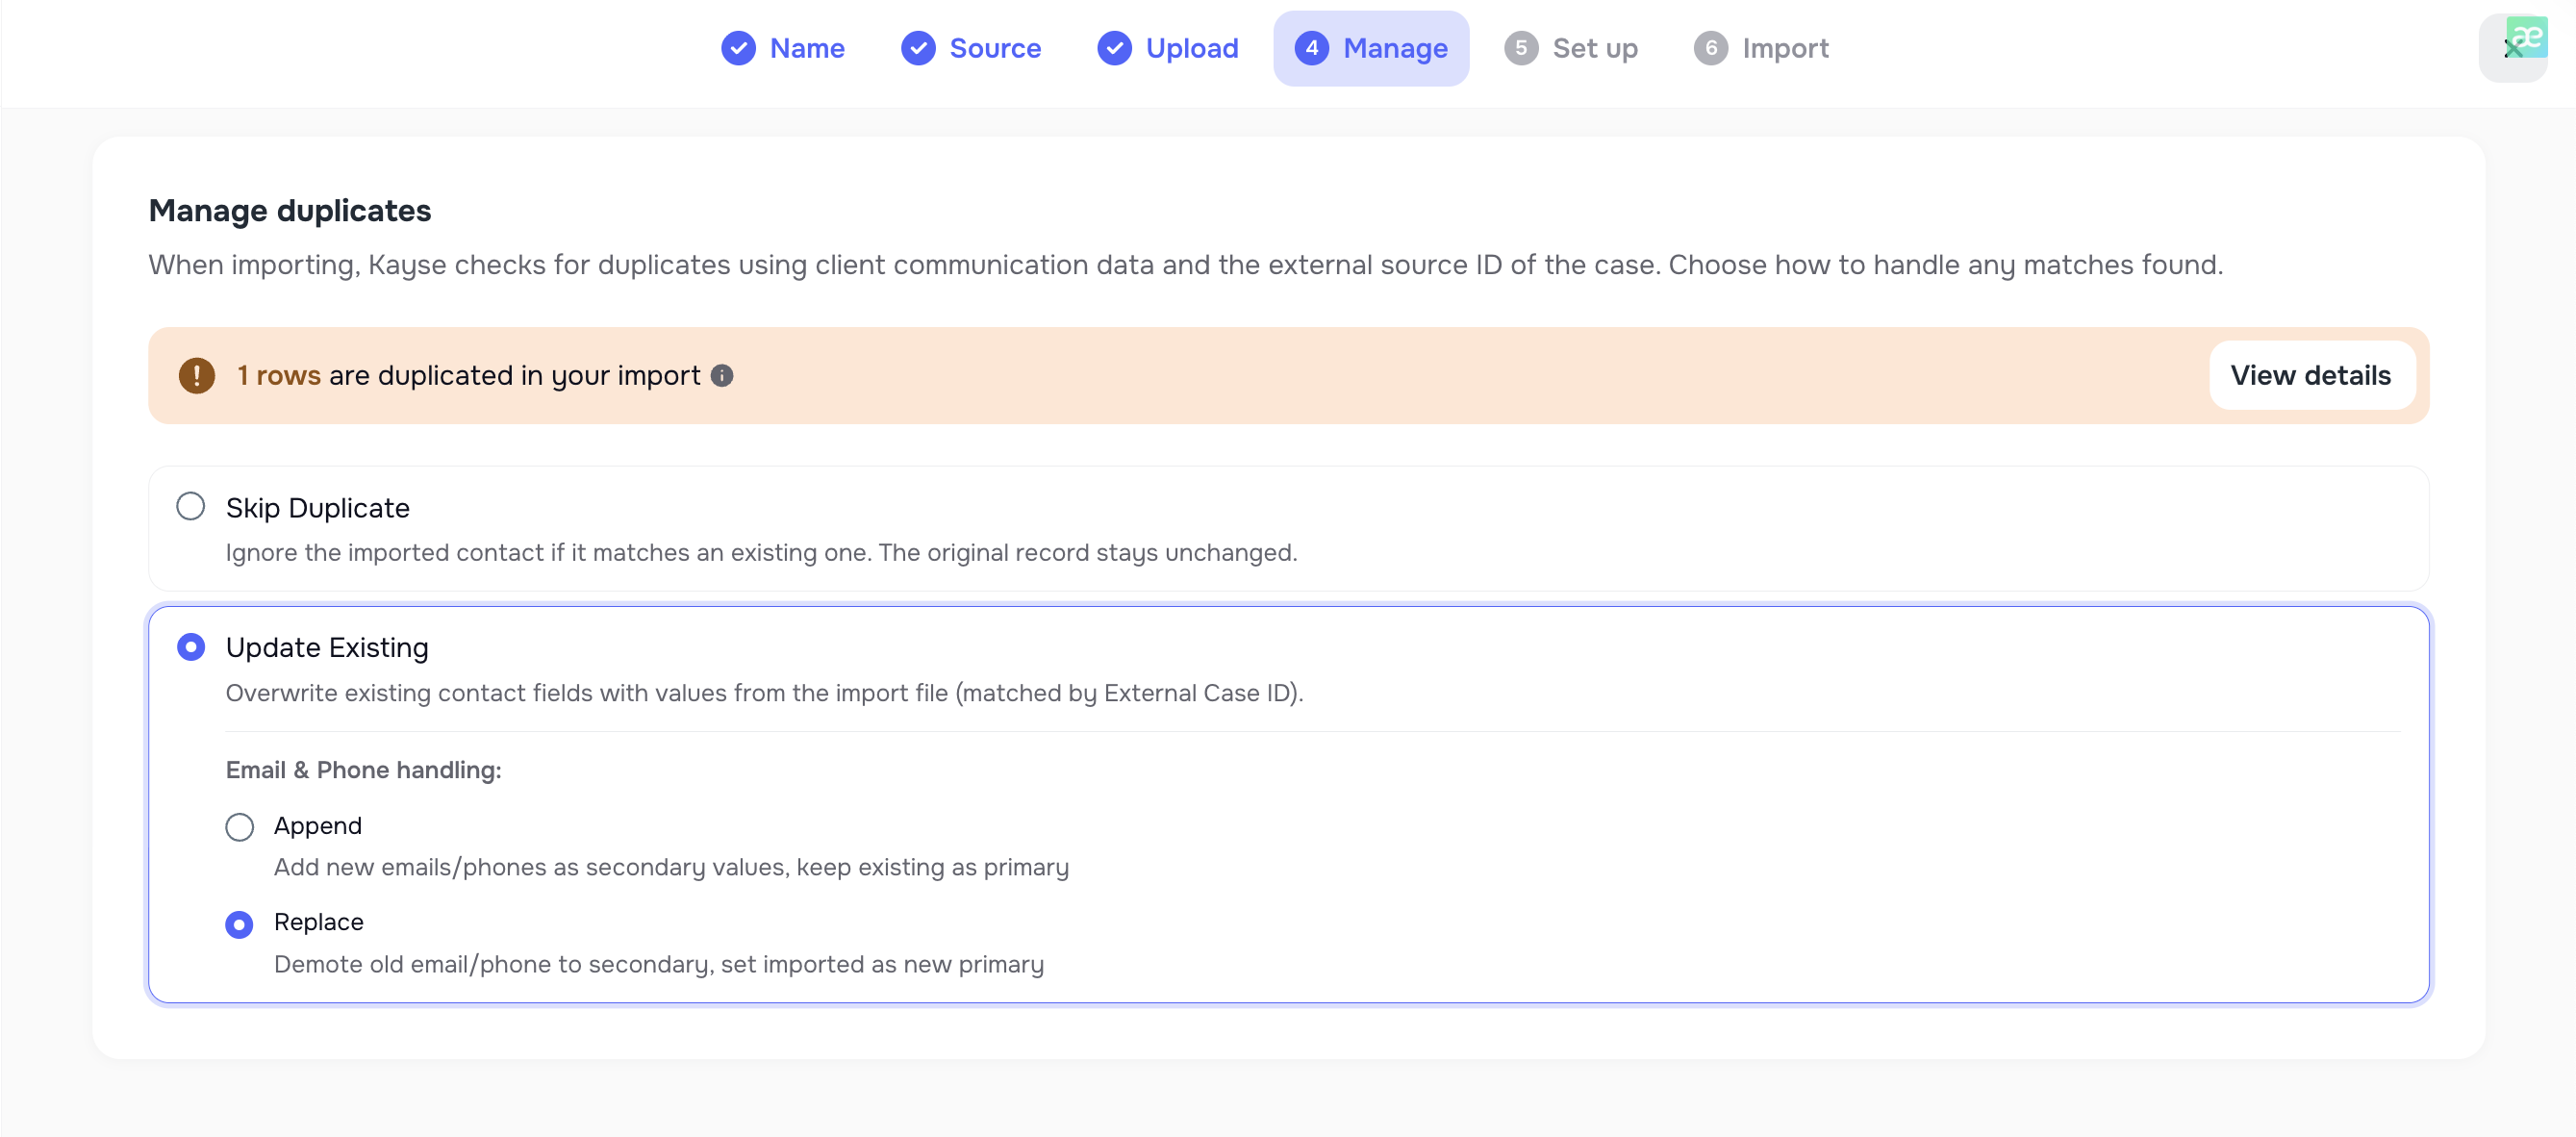
Step 2 — Manage Duplicates
On the Manage Duplicates step you have two main options:
- Skip duplicate
- Imported contacts that match existing records will be ignored.
- No changes will be made to existing cases.
- Update existing
- If an imported contact matches an existing case by external case ID and contact ID (if it exists), the system updates that record.
- There are extra options for phone numbers and emails:
- add new phone numbers/email, or
- replace existing phone numbers/emails.
You choose the strategy that fits your workflow.
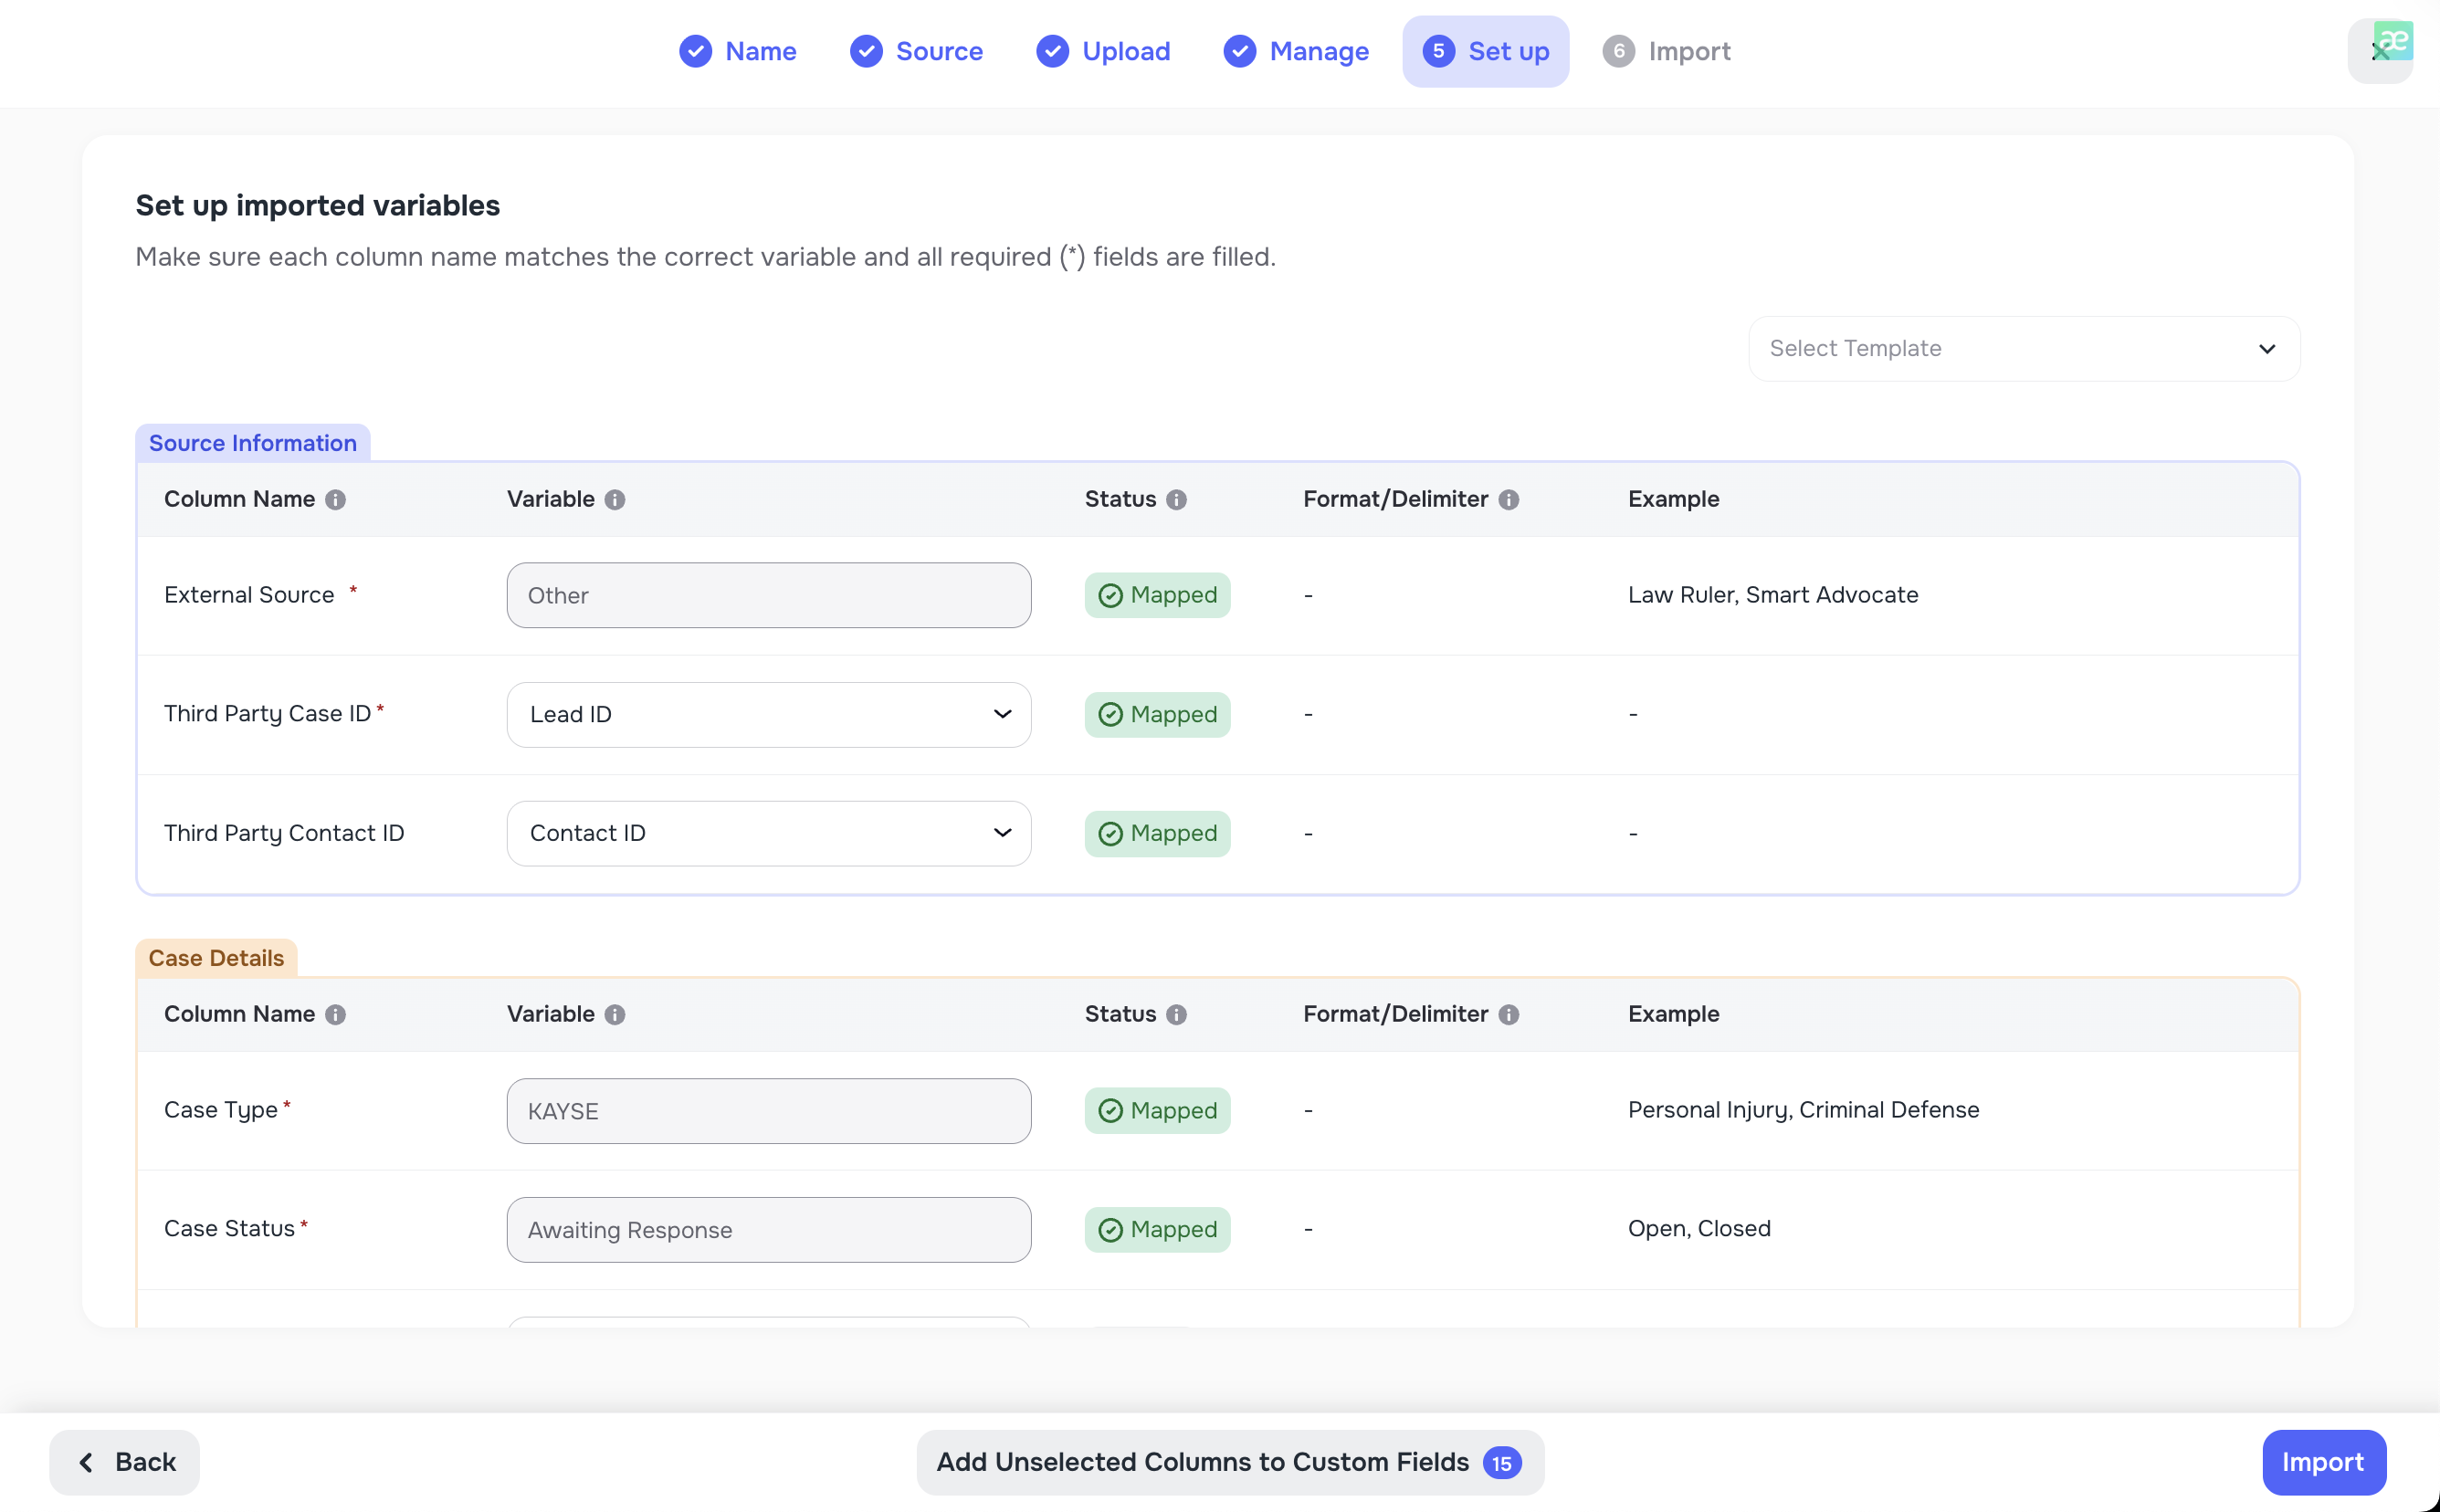
Step 3 — Mapping fields
Next, you map the columns from your file to Kayse fields:
- Case Details
- Primary Contact fields
Examples:
- “First Name” → Primary contact first name
- “Mobile” → Primary contact phone
- “CaseID” → Case external ID
After mapping all required fields, click Continue.
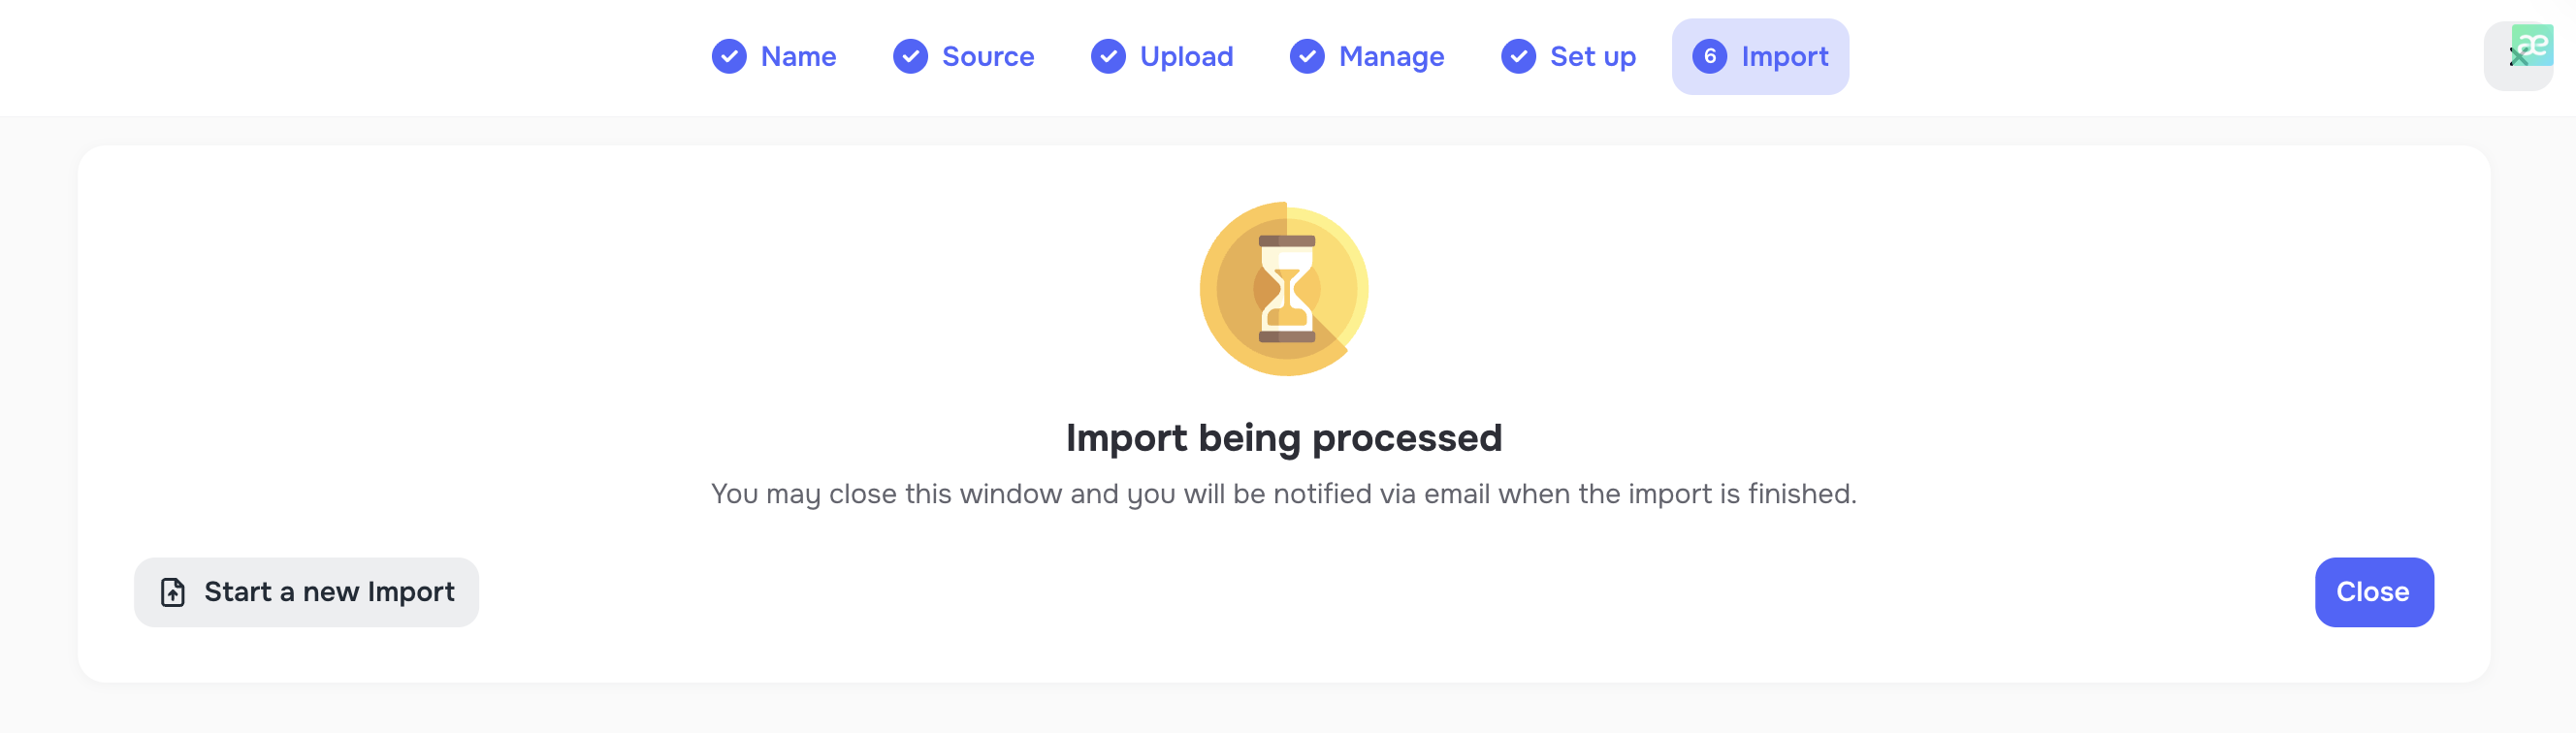
Step 4 — Import & results
After you confirm mapping:
- The system processes the file and imports valid rows.
- When the import is finished, the user receives a notification that the import is ready.
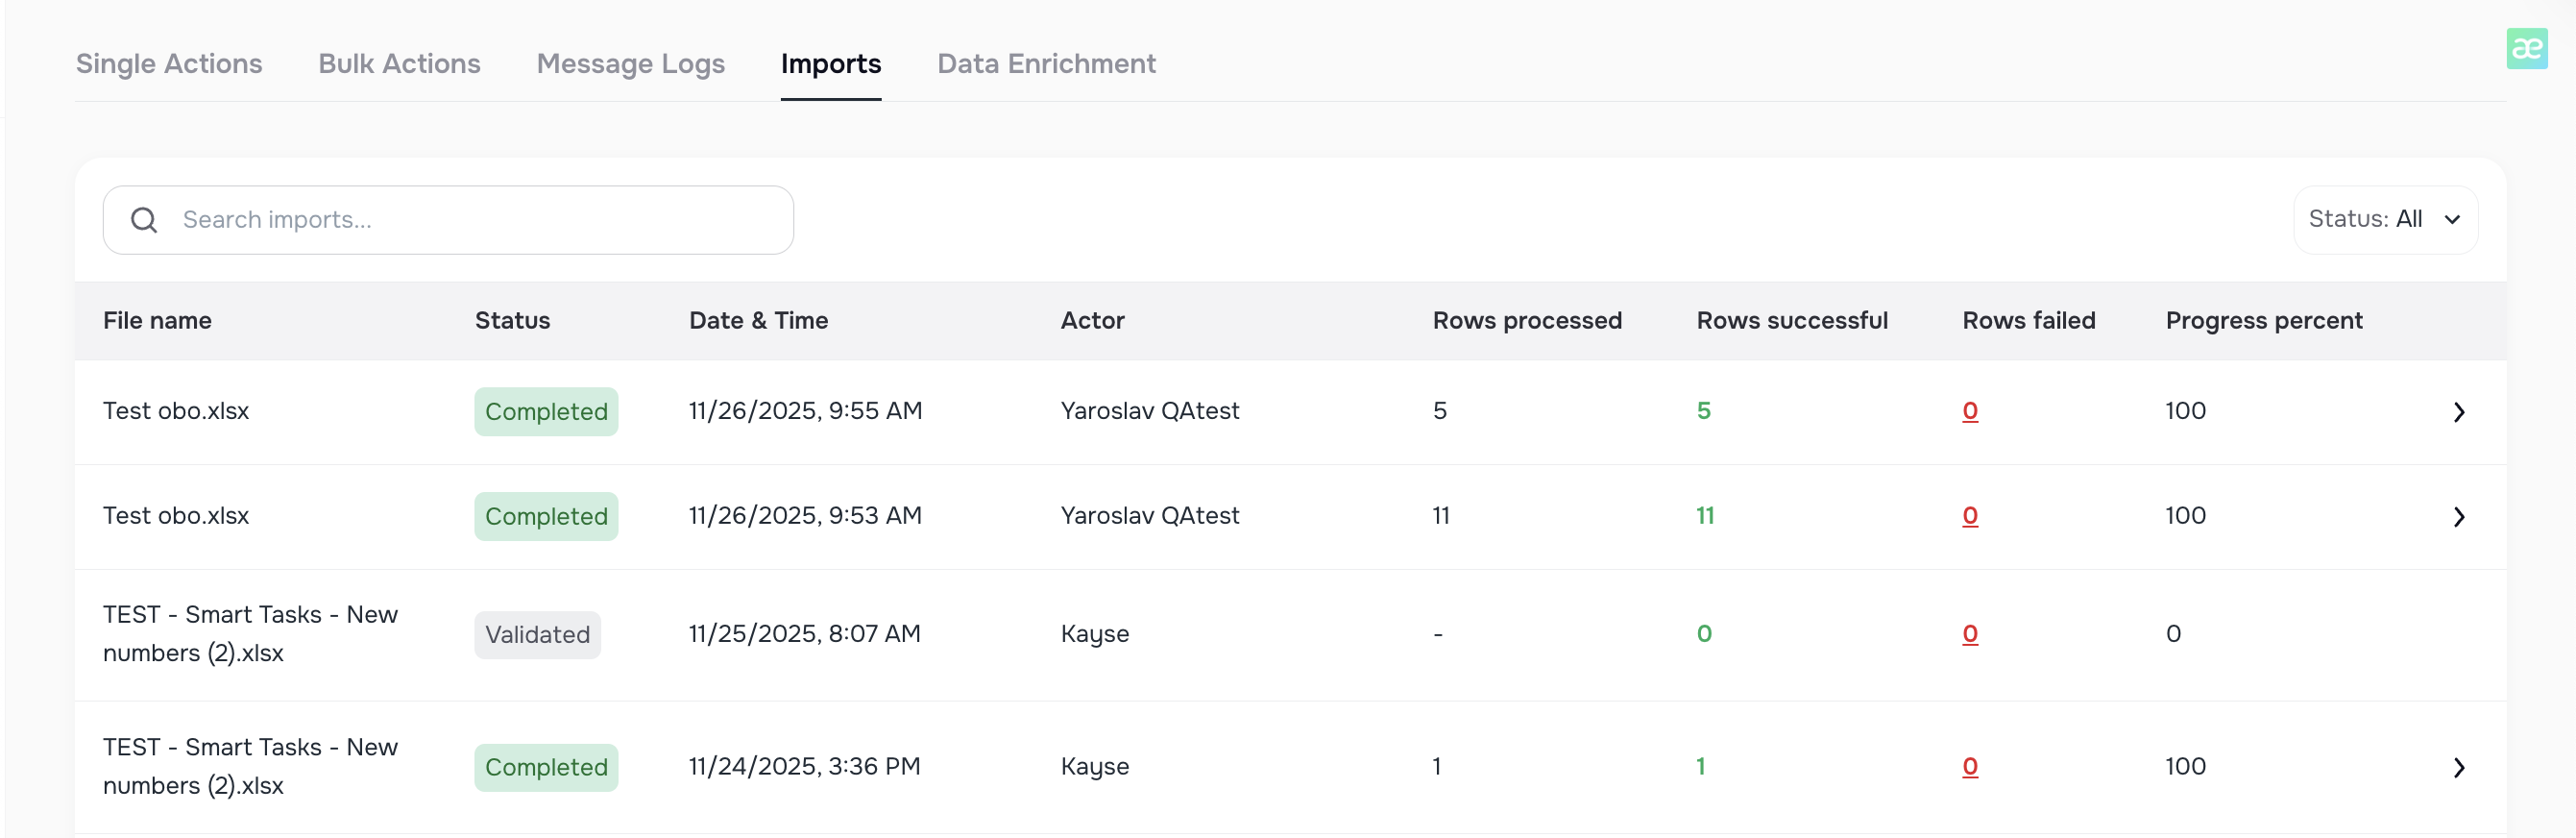
- You can open the Import log / Import status to see:
- total rows,
- how many were imported successfully,
- how many failed,
- and the reasons for failure.
Your new List is now ready and can be used in AI Campaigns.
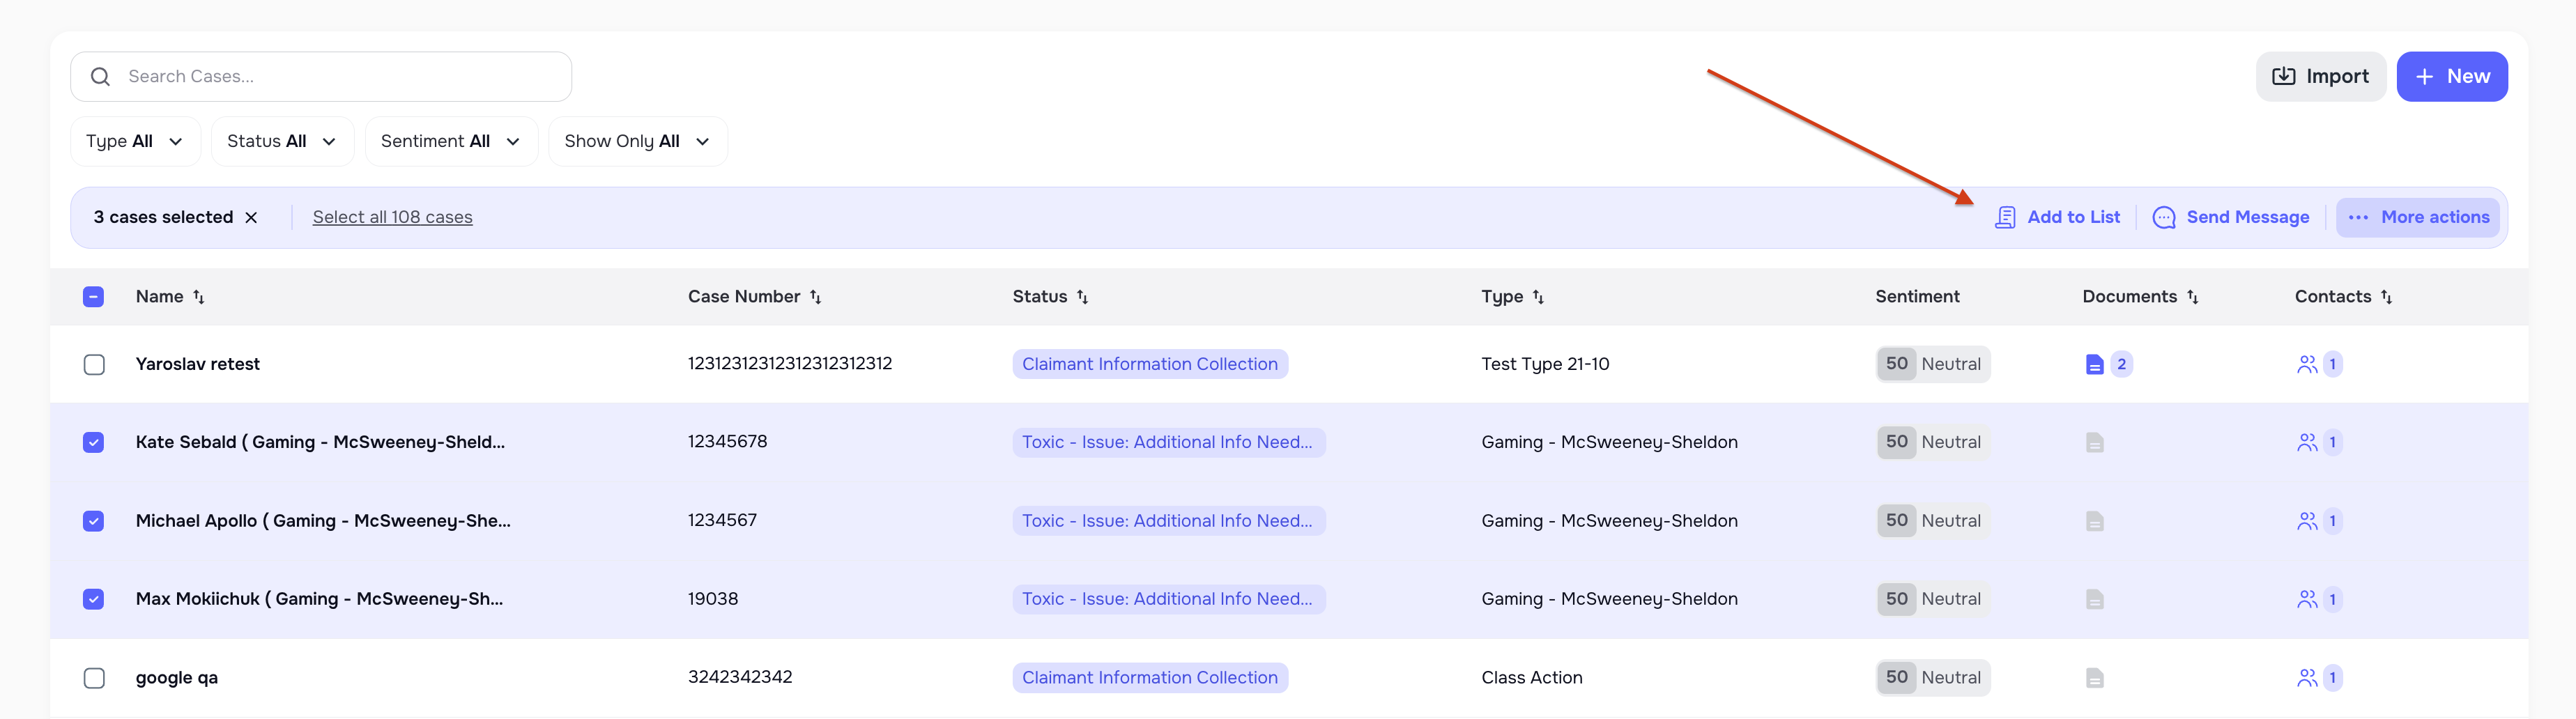
1.2 Create a List from the Cases page (bulk action)
You can also create or update a List directly from the Cases screen.
- Open the Cases page.
- Select two or more cases.
- Open the Bulk actions menu.
- Choose Add to List.
- In the modal, you can pick an existing List and add the selected cases to it.
This is useful when you quickly identify a group of cases that should be handled by the same campaign.
List best practices
- Use clear names:
- “🚑 Missing Medical Updates – Feb 2025”
- “📞 Callback Requests – Week 10”
- Keep data clean (valid phone numbers & emails).
- Avoid mixing very different case types in one list, unless that’s intentional.
- After import, always review the Import log before starting a campaign.
- If your firm uses multiple brand names, set the Company Name override on the list so all communications go out under the correct name.
1.3 Variable Overrides on a List
When creating or editing a List, you can optionally set Variable Overrides for the Company Name and/or Case Type. These overrides replace the company defaults in all campaign communications (voice calls, SMS, emails, and AI-generated content) that use the list.
This is helpful when:
- Your firm operates under multiple brand names and you want a specific list to use a different name.
- A list targets a specific case type that should be described differently from the default.
To set overrides:
- Open a List and go to the details view (or create a new List).
- In the Variable Overrides section, enter values for Company Name and/or Case Type.
- Leave the fields blank to keep the company defaults.
- Save.
When you later select this list for a campaign, the campaign details screen will show a Variable Overrides notice so you can see which values are being overridden. The overrides apply to all outbound channels: AI voice calls, SMS, email sender name, email body, and AI-generated campaign templates.
2. Creating an AI Campaign (step-by-step)
Once your List is ready, you can create an AI Campaign.
🧱 Step 1 — Open Campaign creation
- Go to the AI Campaigns page.
- Click ➕ Create Campaign.
- Enter a Campaign name.
- Choose whether the campaign is OBO or non-OBO (same logic as for lists).
- Click Continue.

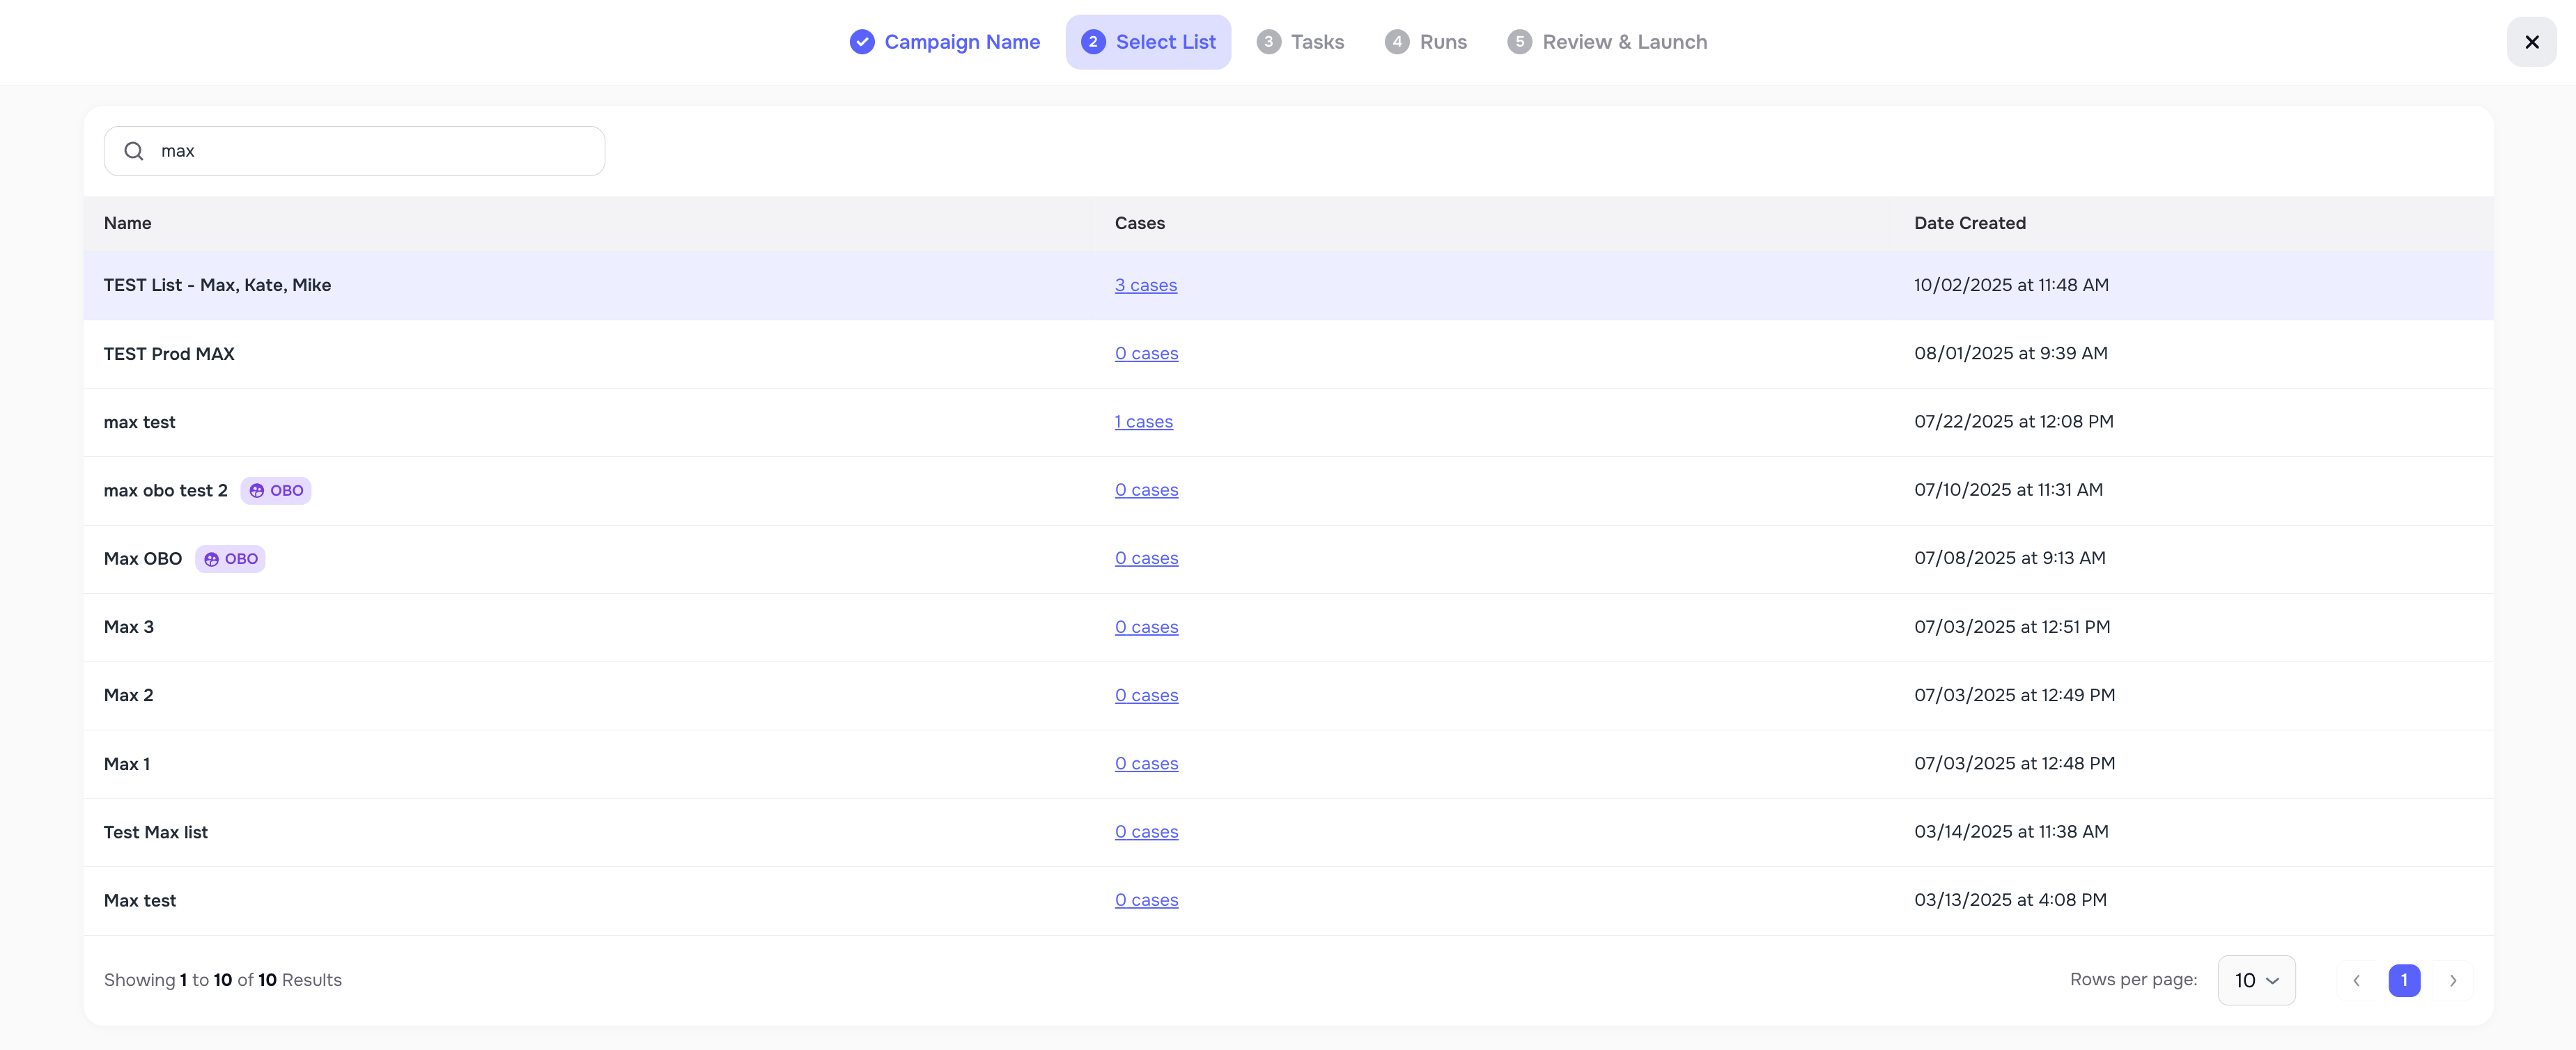
🧱 Step 2 — Select a List
On the next step, select the List you created:
- You’ll see all available Lists.
- You can view basic info like name and number of cases.
Select a List and click Continue.
🔎 Note: AI Campaigns always work only with cases from the selected List.
If the selected list has Variable Overrides configured (Company Name or Case Type), those overrides will be shown on the campaign details page. All outgoing communications for this campaign will use the overridden values instead of the company defaults.
🧱 Step 3 — Decide: “Skip tasks” or “Attach a form”
At this step you define whether the campaign will use Forms & Smart Tasks. 
Option A — Create a New Form or Choose from the Library (with Smart Tasks)
Choose this if your campaign collects information from clients.
When you create a form from scratch:
- Add an internal Form Title - Form Title is internal only — clients will not see it.
- Define an internal Form description if needed.
- Specify the required time to complete the Form (meaning: all tasks inside it)
When you attach a form:
- The system creates a new copy of the form for this campaignfrom your already existing templates under the Tasks page.
- This protects other campaigns and existing forms from changes.
- The copy is frozen. Any changes made to the original form later will not affect the form used in this campaign.
- All Smart Tasks inside that form are linked to the cases from your List when the Campaign is created.
- Clients can complete tasks via:
- Voice Call,
- Mobile Client Portal App,
- or a Secure web link.
- Progress and completion will show in:
- the Tasks tab inside the campaign, and
- the case view for each client.

Option B — Skip tasks
Choose this if your campaign:
- does not need clients to fill in a form,
- is only used for updates, reminders, or simple messages.
Skip Tasks mode does not create any Smart Tasks for the campaign. Clients will not receive forms, task lists, or portal steps — only calls or messages depending on your Run settings.
ℹ️ Detailed behavior of Forms & Smart Tasks is described in the separate 🧩 Smart Tasks & Forms in Kayse. In this article, we focus on how they behave inside AI Campaigns.

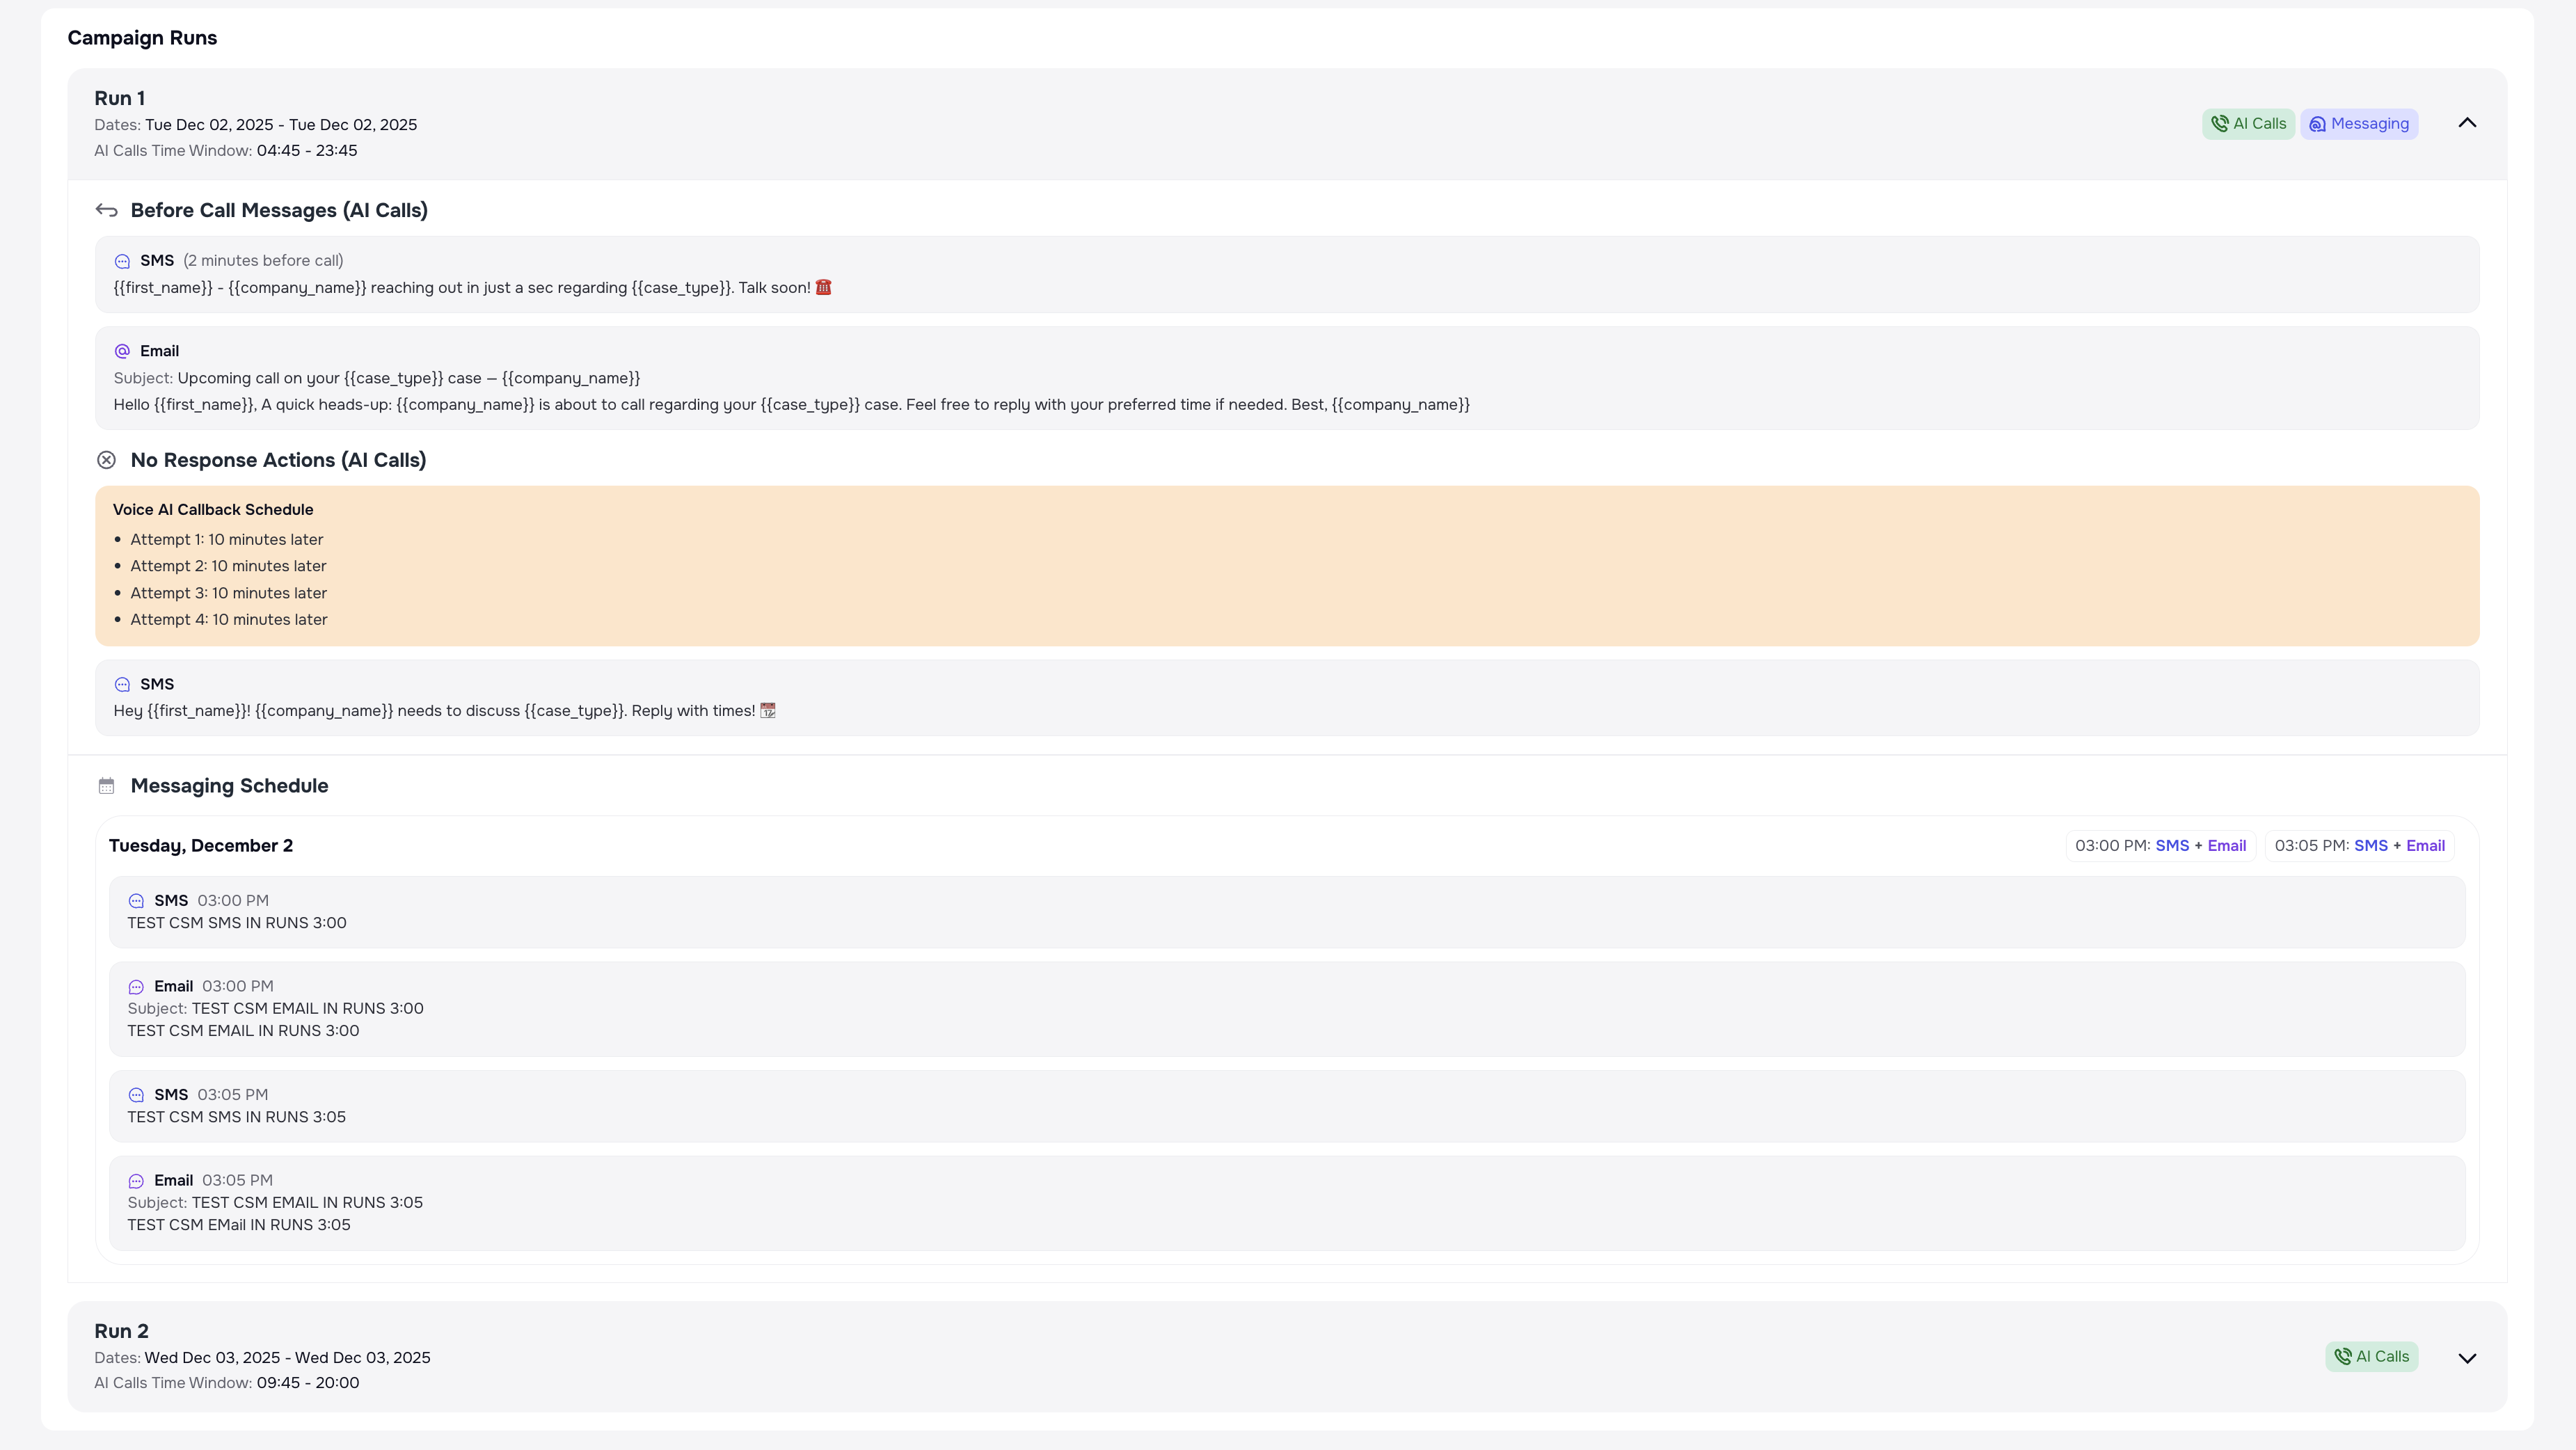
🧱 Step 4 — when and how the campaign works
Runs define the schedule and behavior of your campaign.
One campaign can have multiple Runs.
Each Run has its own:
- selected days,
- time windows,
- channels (calls, messaging),
- messaging schedule,
- retry and callback rules.
Only one Run can be active on a given day. 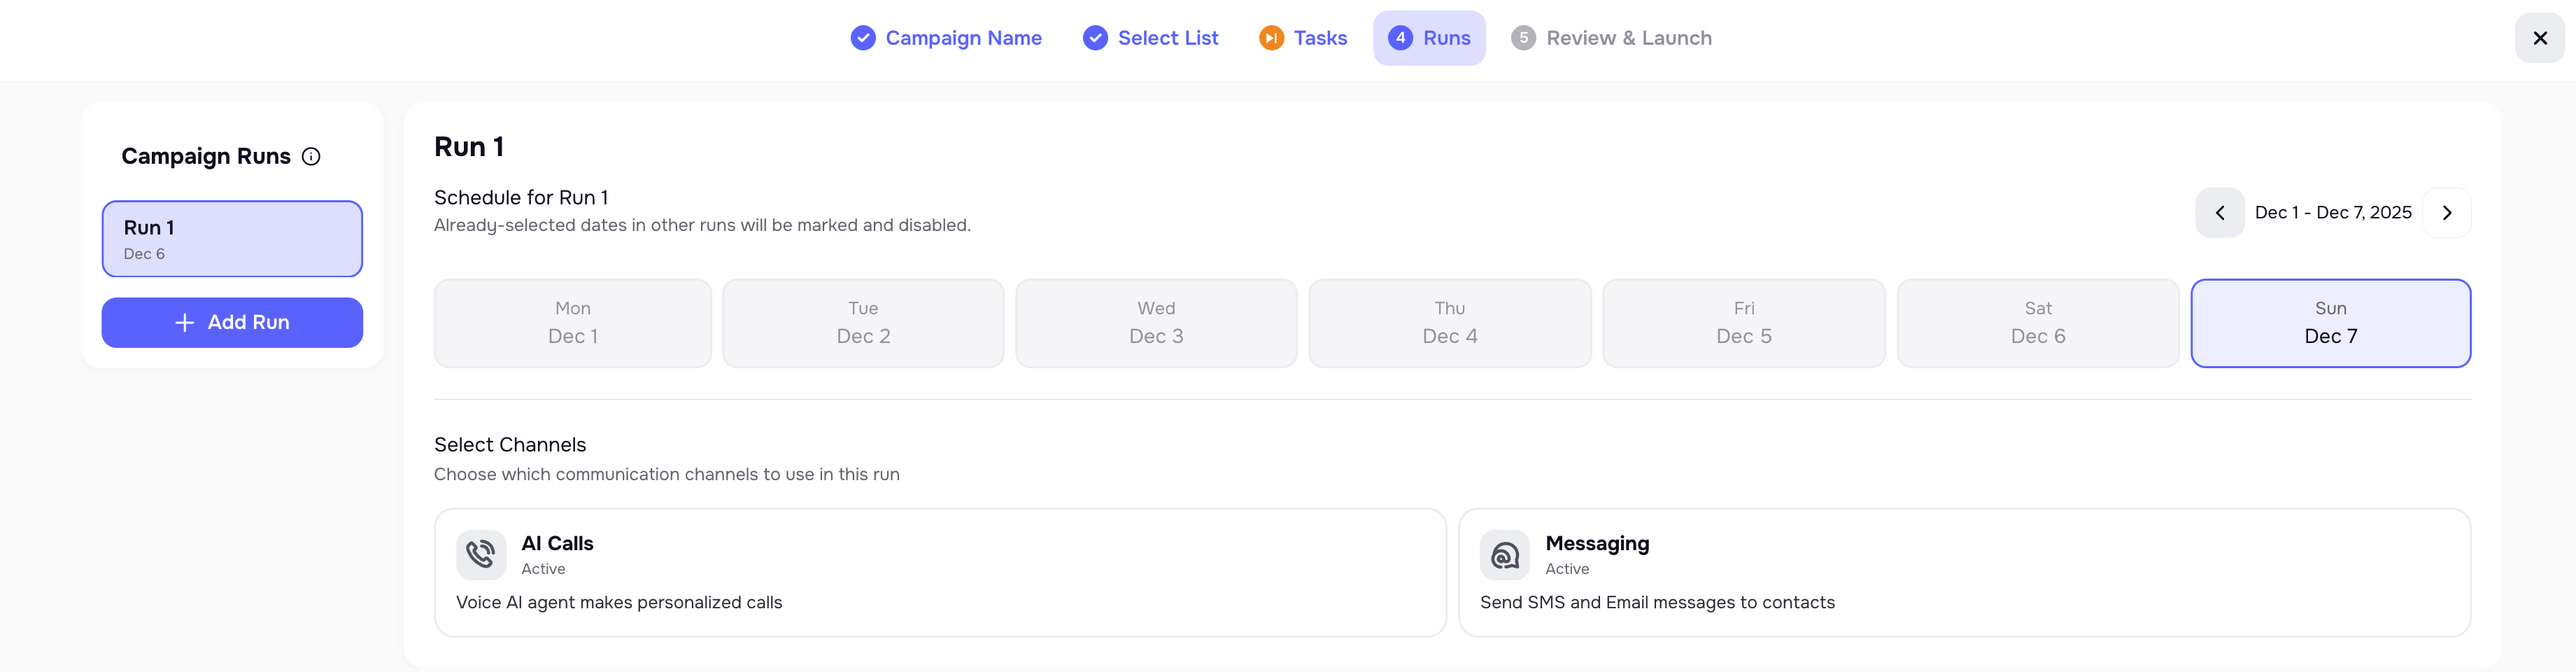
📅 4.1 Run days
For each Run you choose which days it will operate.
Examples:
- Run 1: Tuesday & Wednesday
- Run 2: Thursday only
Days already used in previous Runs cannot be reused in the same campaign.
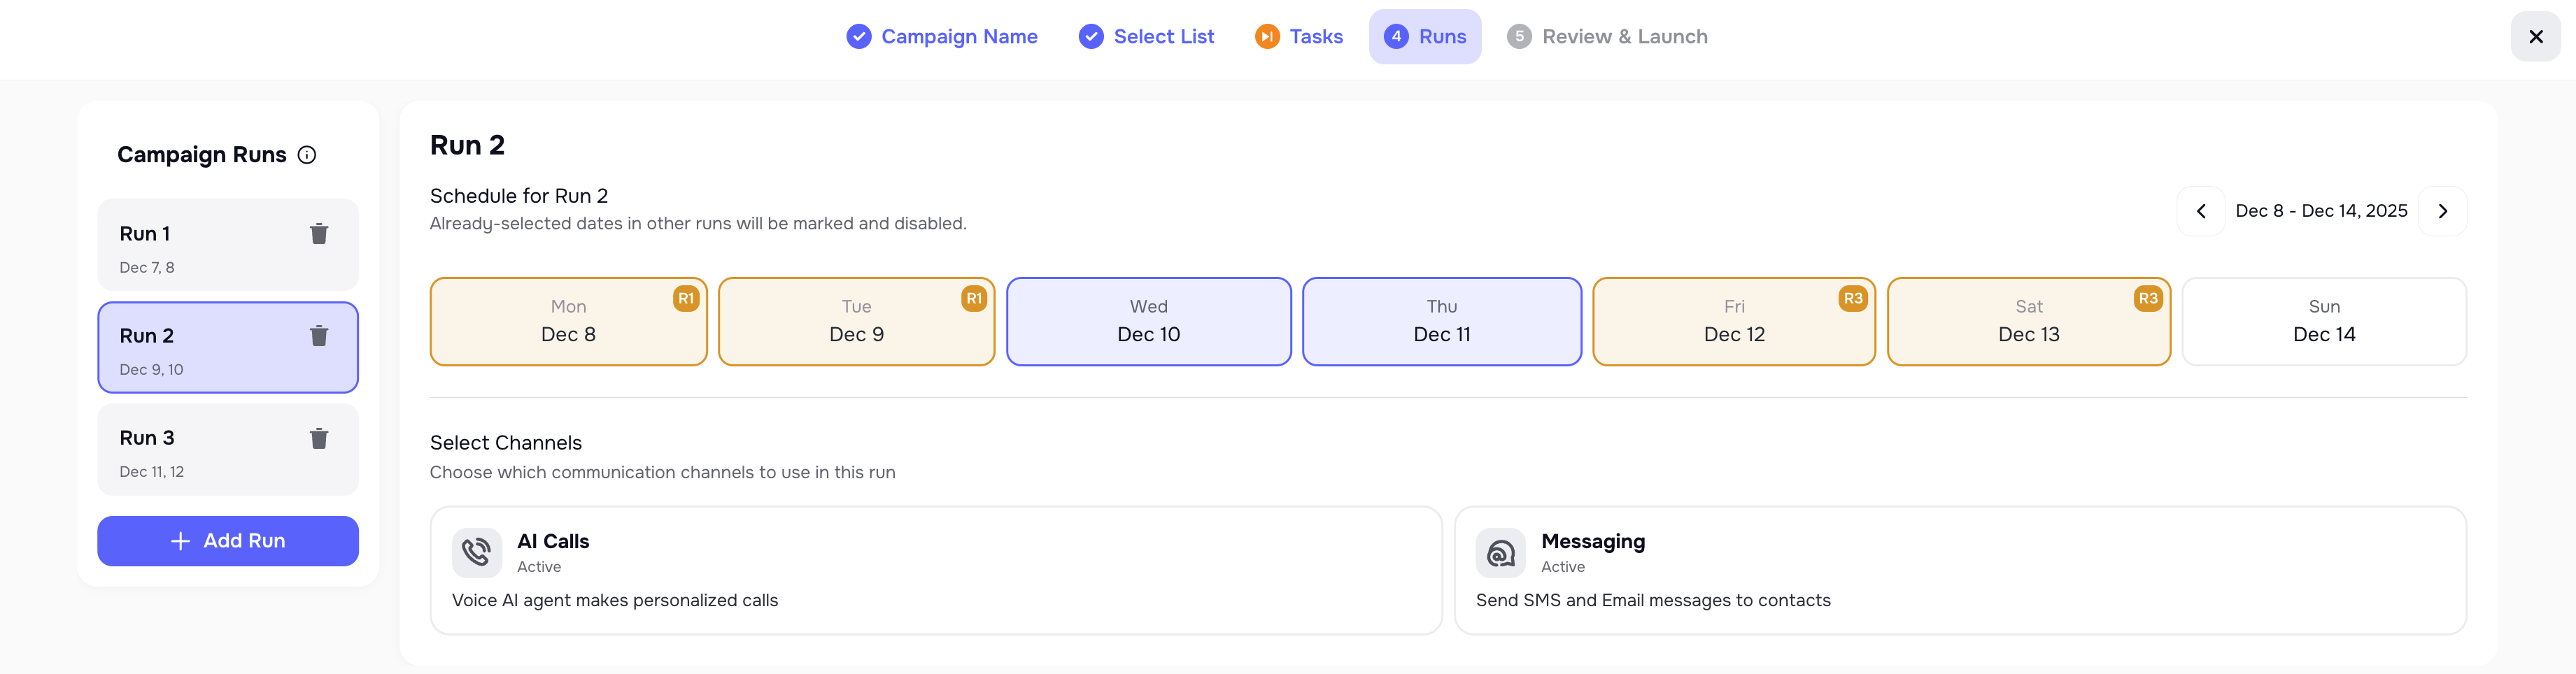
4.2 Channels inside a Run
For each Run, you choose channels that will be used:
- 📞 AI calls
- 💬 Messaging
You can:
- run calls and messaging together, or
- use messaging-only runs (for follow-ups), or
- calls-only runs.

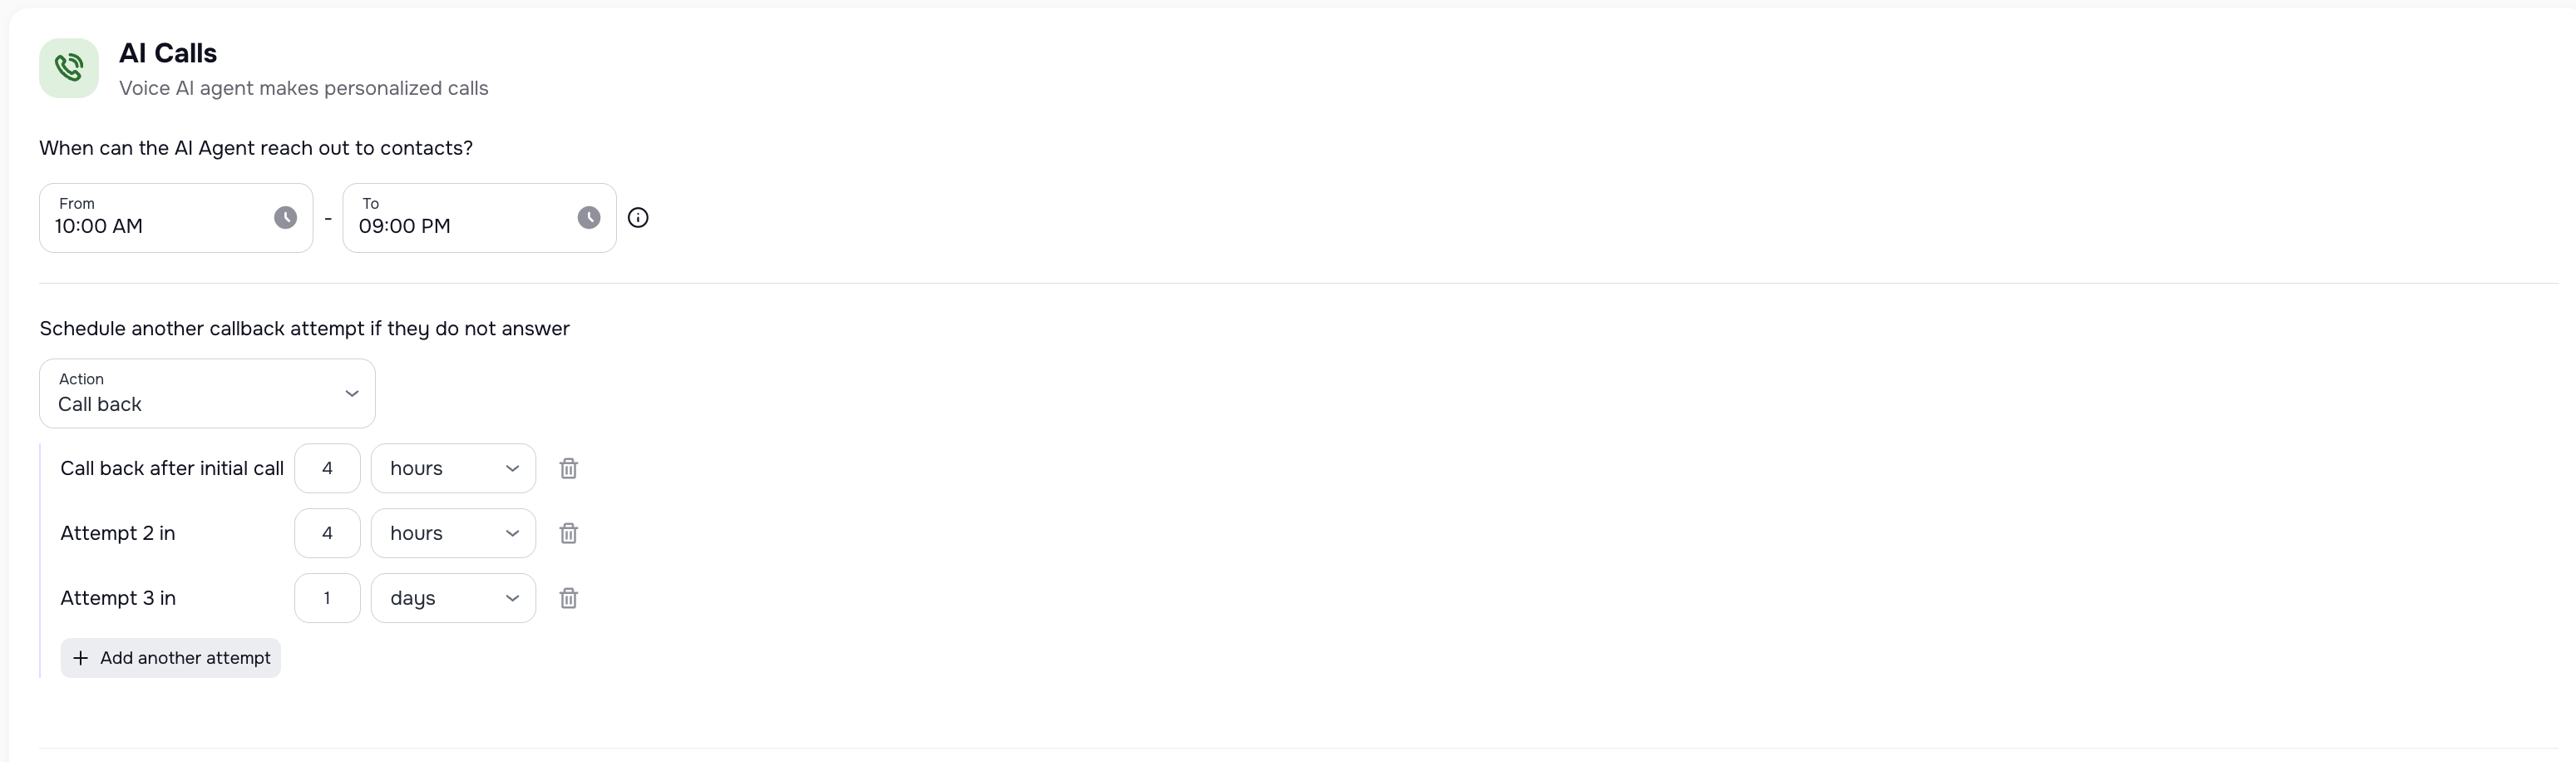
🕒 4.3 Call time window
Here you set when calls are allowed during the day.
The system respects the client’s local time zone when calling (based on your internal logic).
For example:
- 10:00 AM – 9:00 PM local time
Calls outside this window will not be placed.

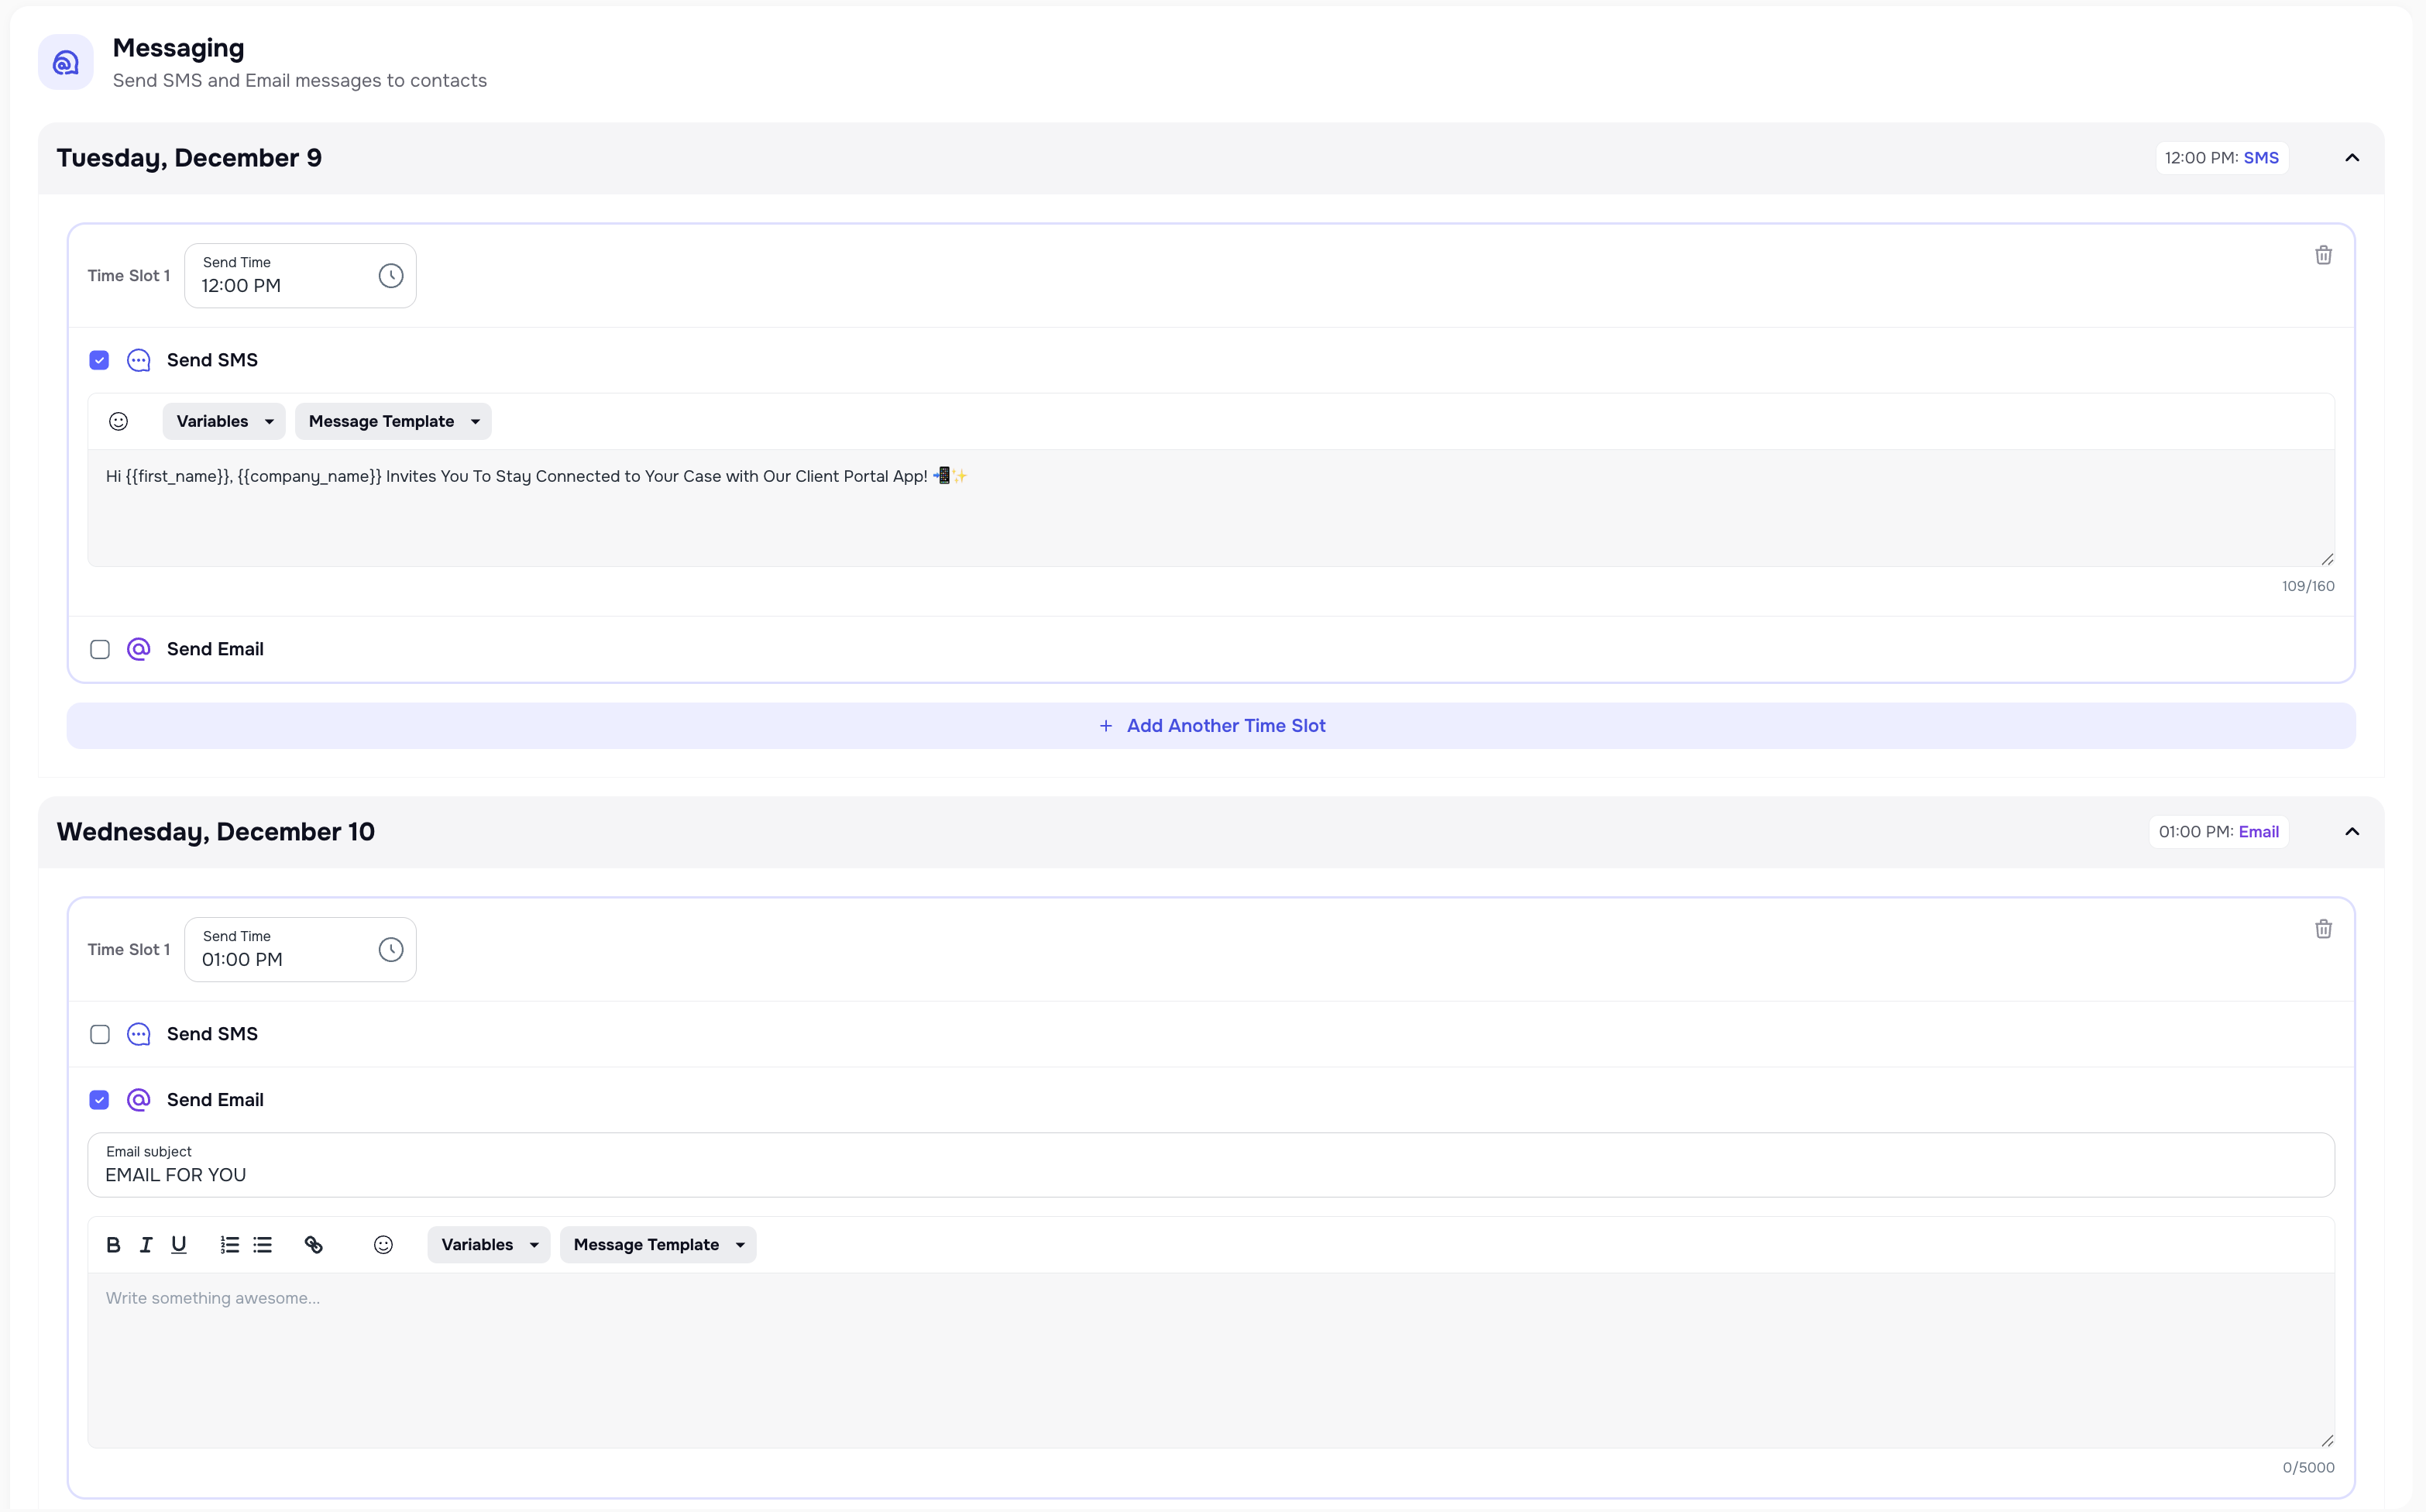
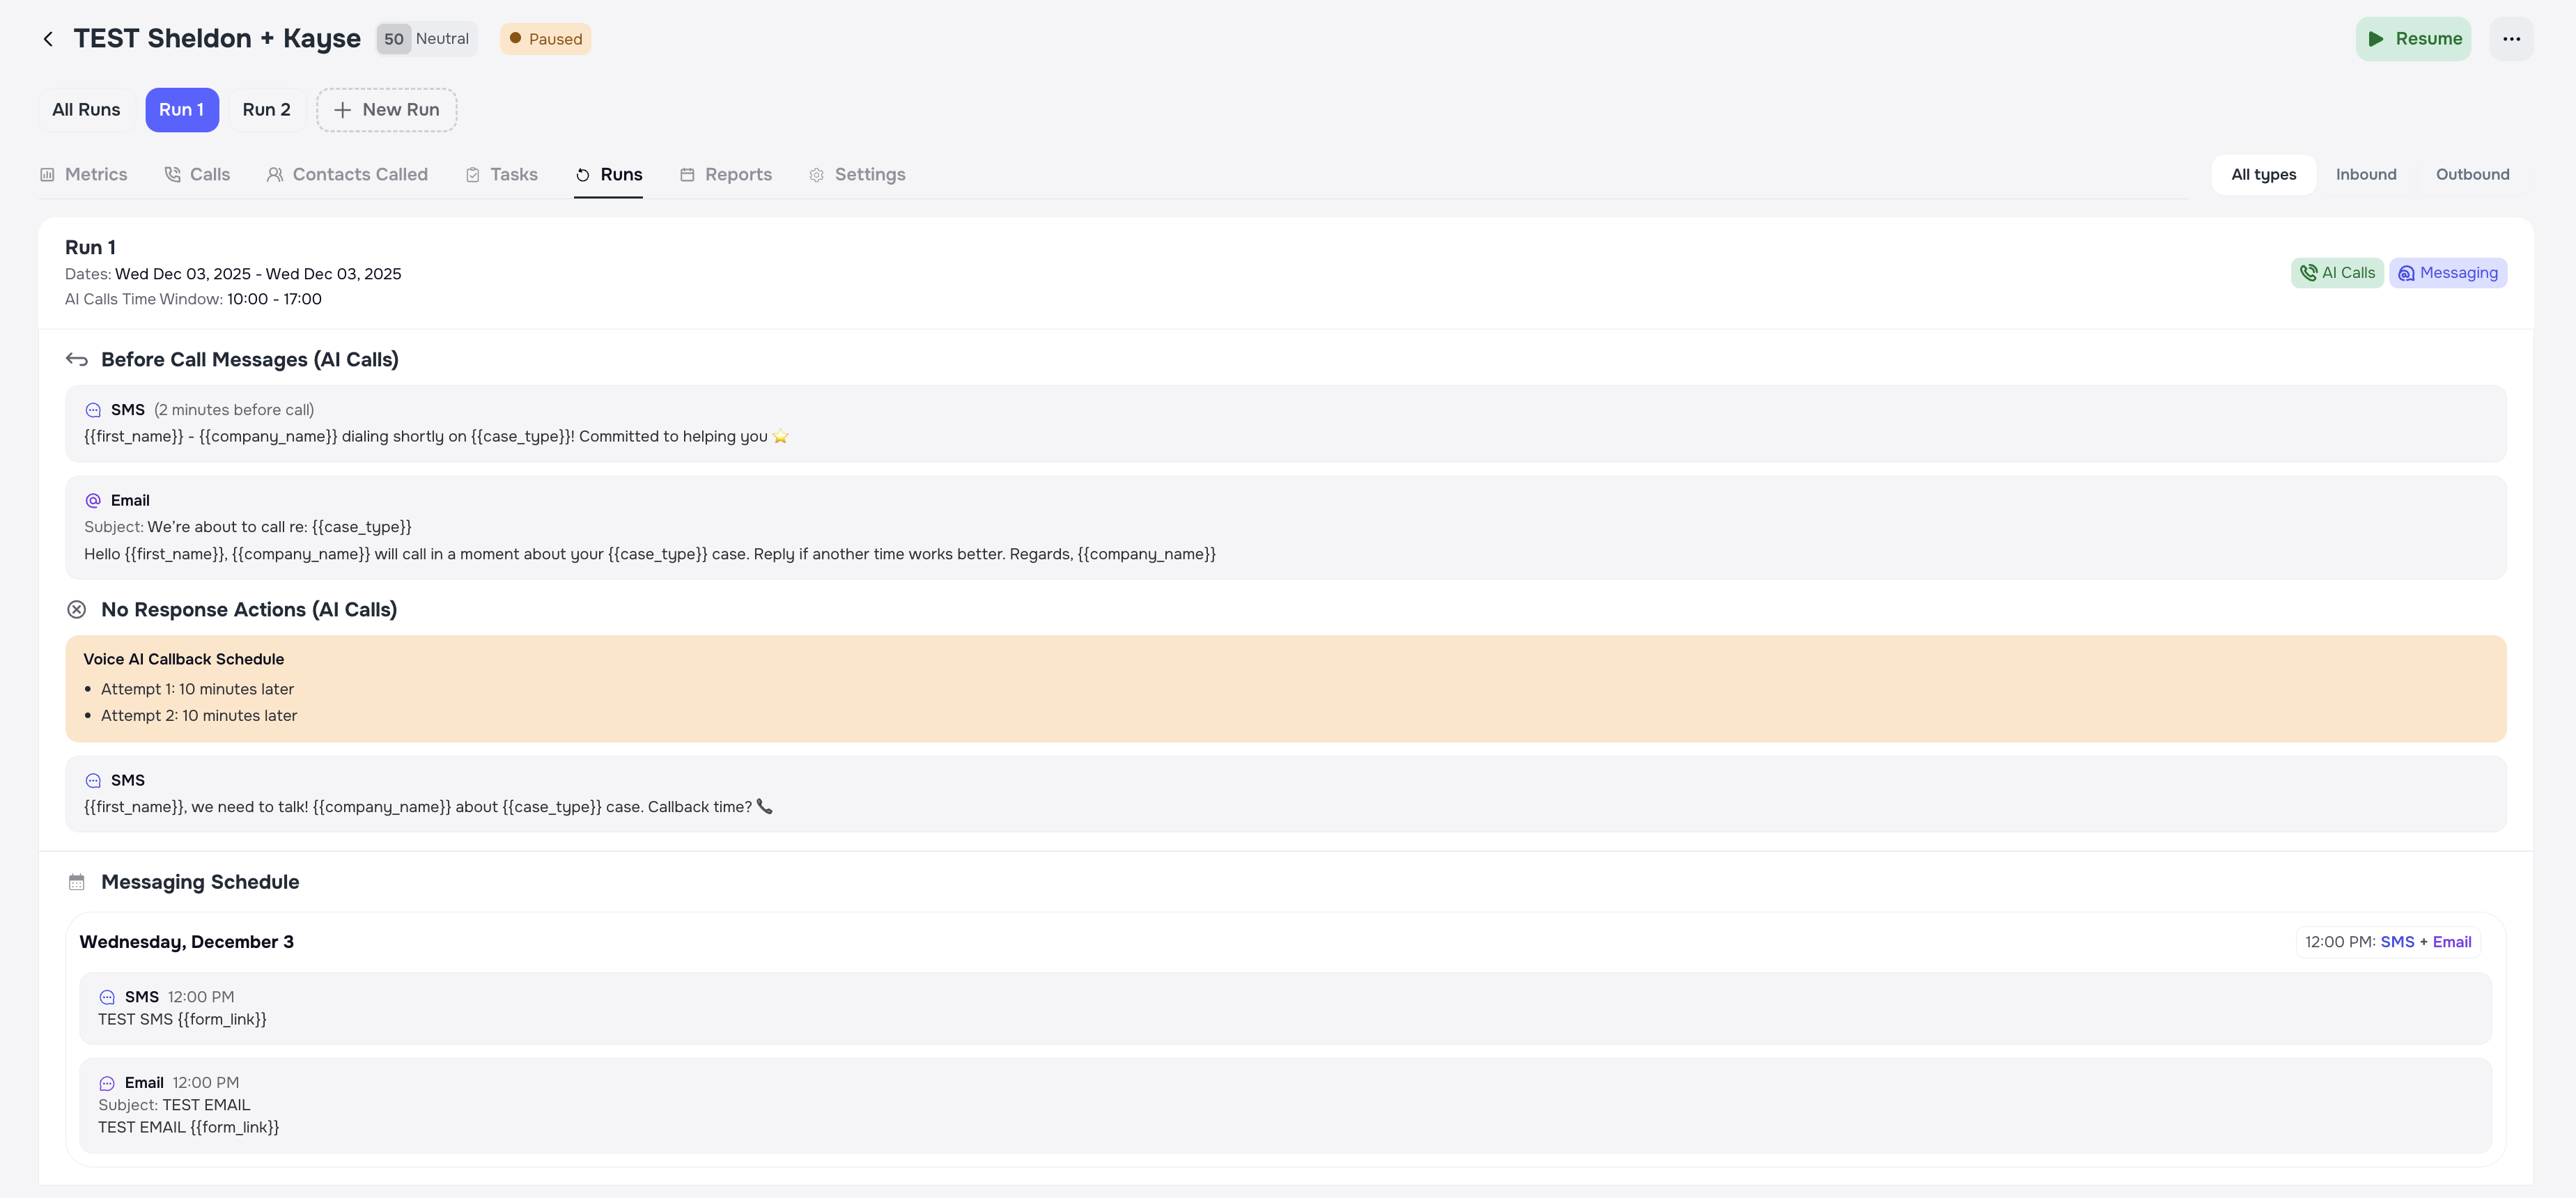
4.4 Messaging schedule (SMS/Email)
For each Run you can configure:
- when SMS messages should be sent,
- when emails should be sent.
Examples:
- SMS shortly before a call (if AI Calls selected)
- SMS after a missed call (if AI Calls selected)
- Email after a completed call (if AI Calls selected)
- SMS-only run for clients who never answered calls
You can have multiple messages per Run, at different times.
4.5 Retries and callbacks
Runs also control:
- how many times the system retries calls,
Examples:
- Retry a “No answer” call later in the same window.
🧱 Step 4 — Select an AI Agent
(only if the AI Calls channel was selected on the previous step)
At this step, you should select an AI Agent that will work with your list of cases and form

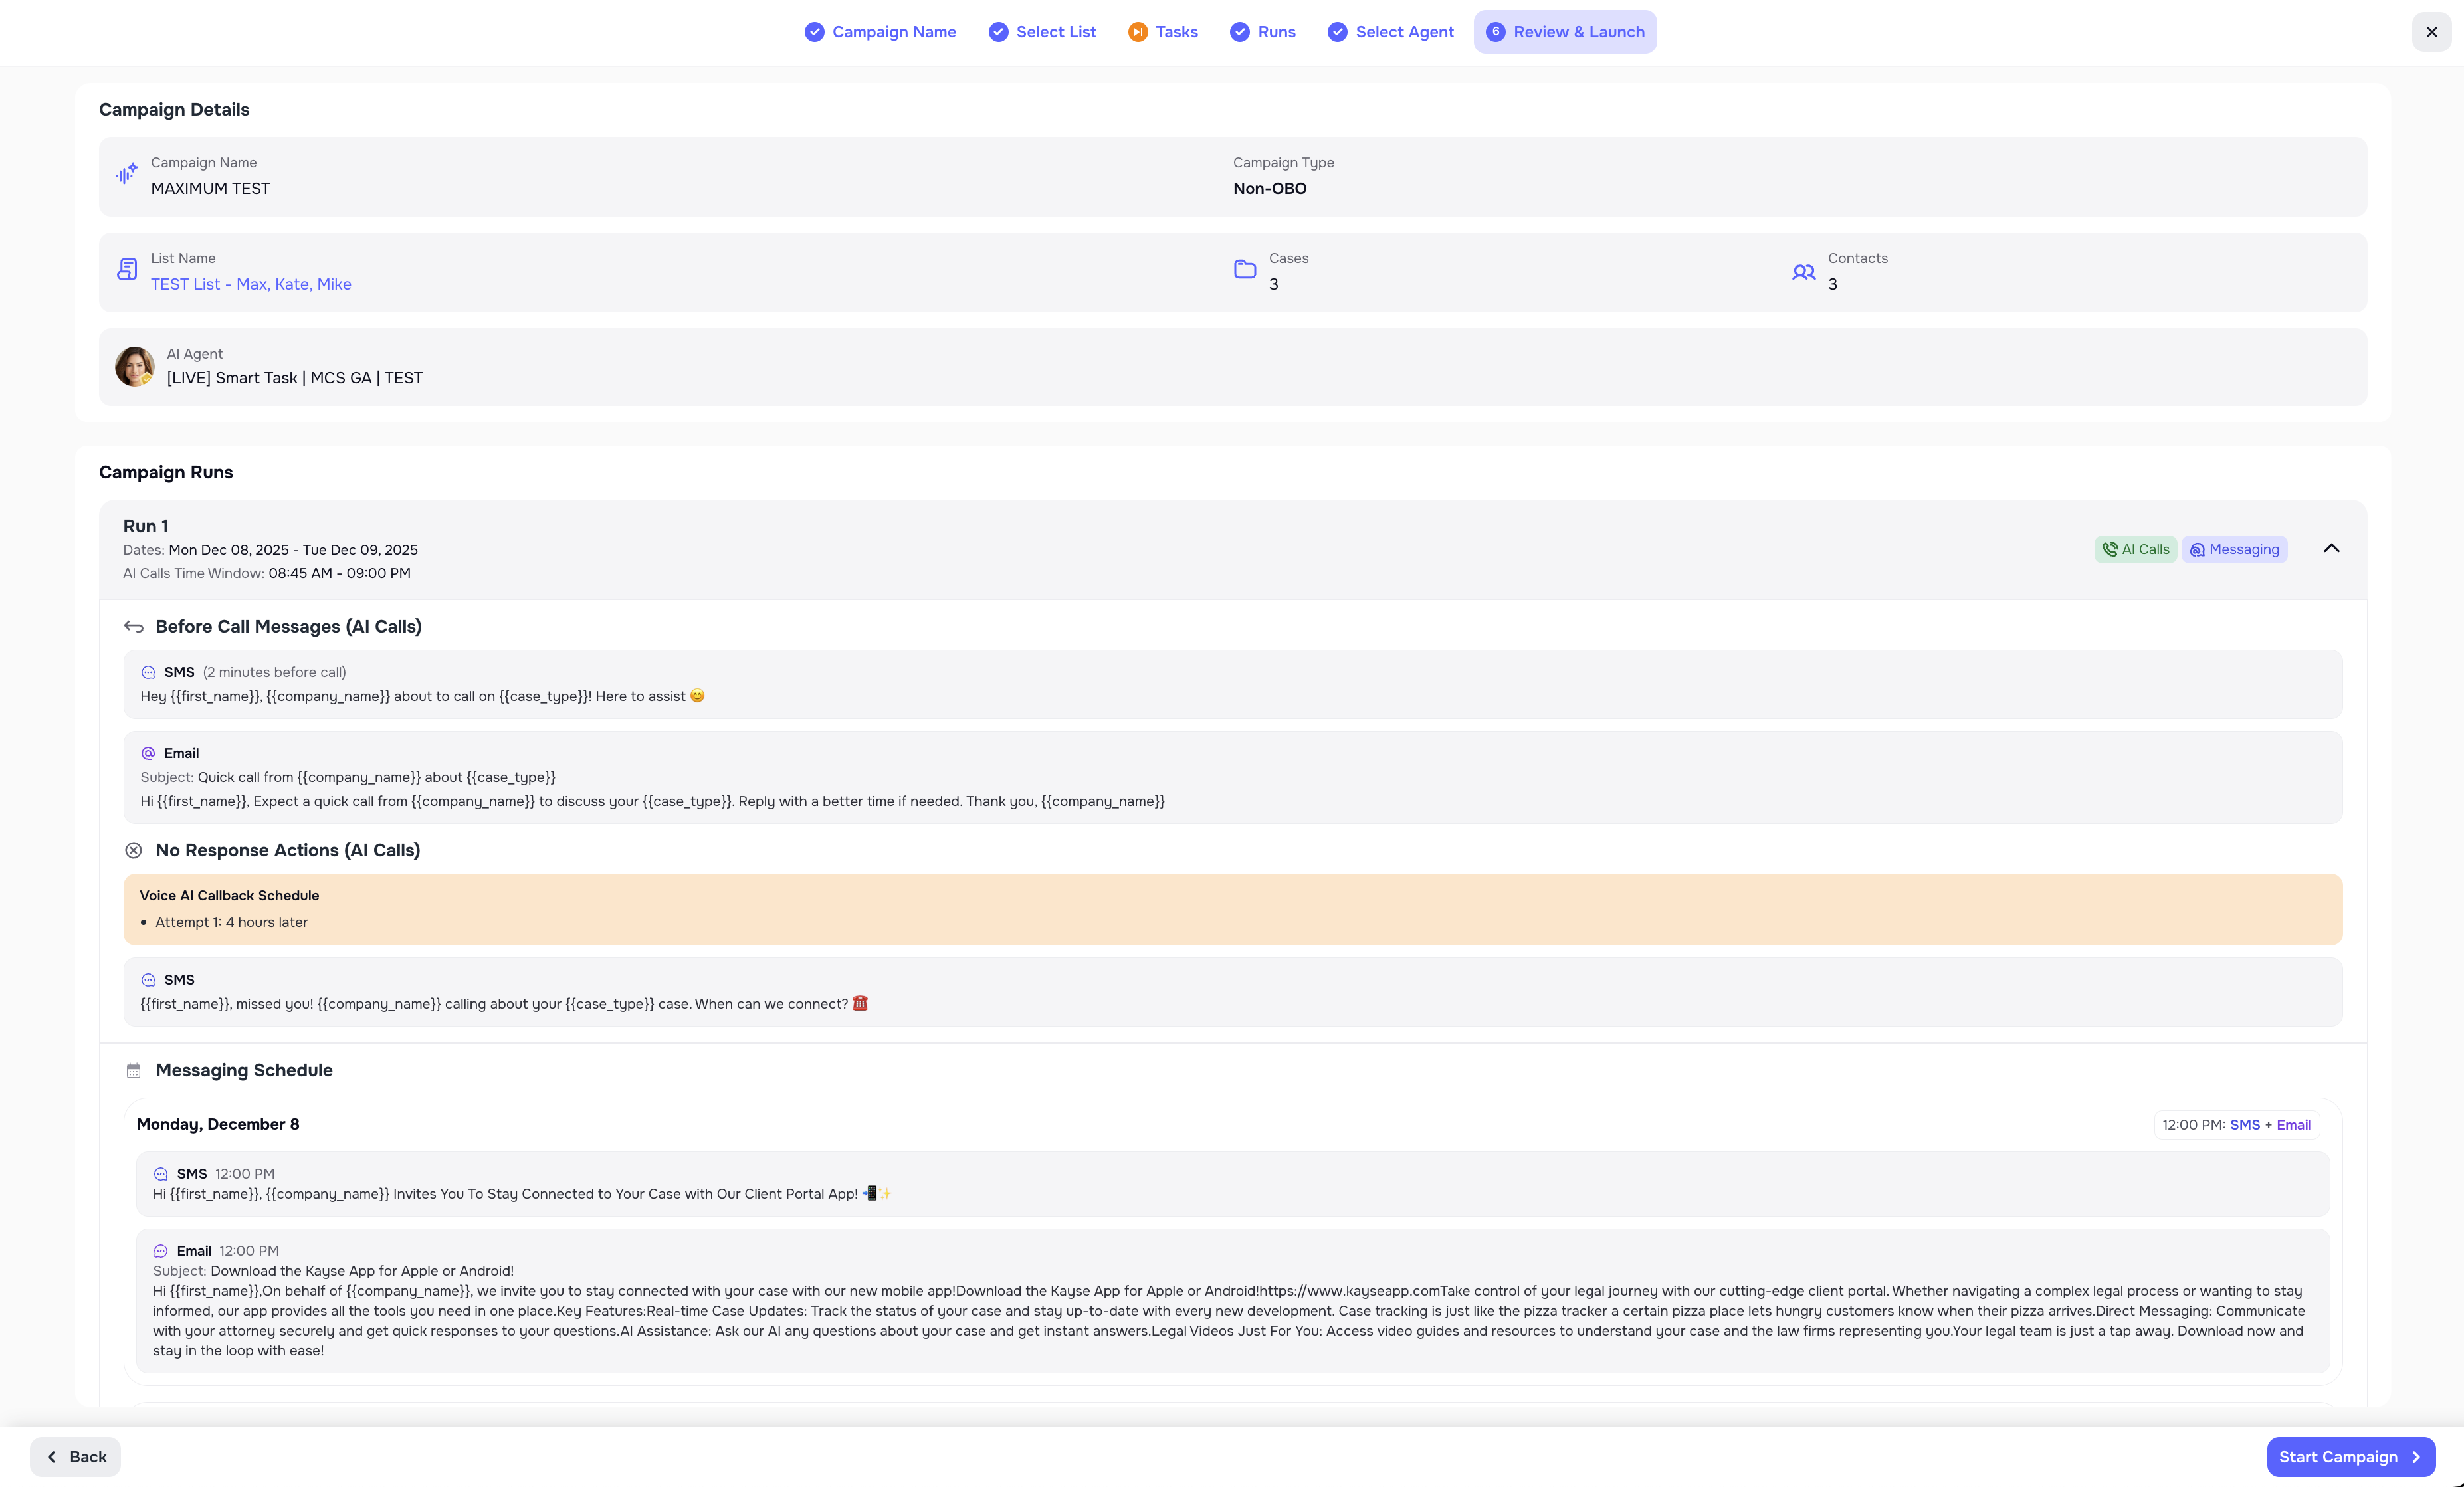
🧱 Step 5 — Review and launch
Before launching, you will see a summary:
- Campaign name and OBO flag
- Selected List and number of cases
- Whether a form is attached or tasks are skipped
- All Runs with their:
- days,
- time windows,
- channels,
- messaging schedule.
If everything looks good, click Start Campaign.
Your campaign is now active 🎉
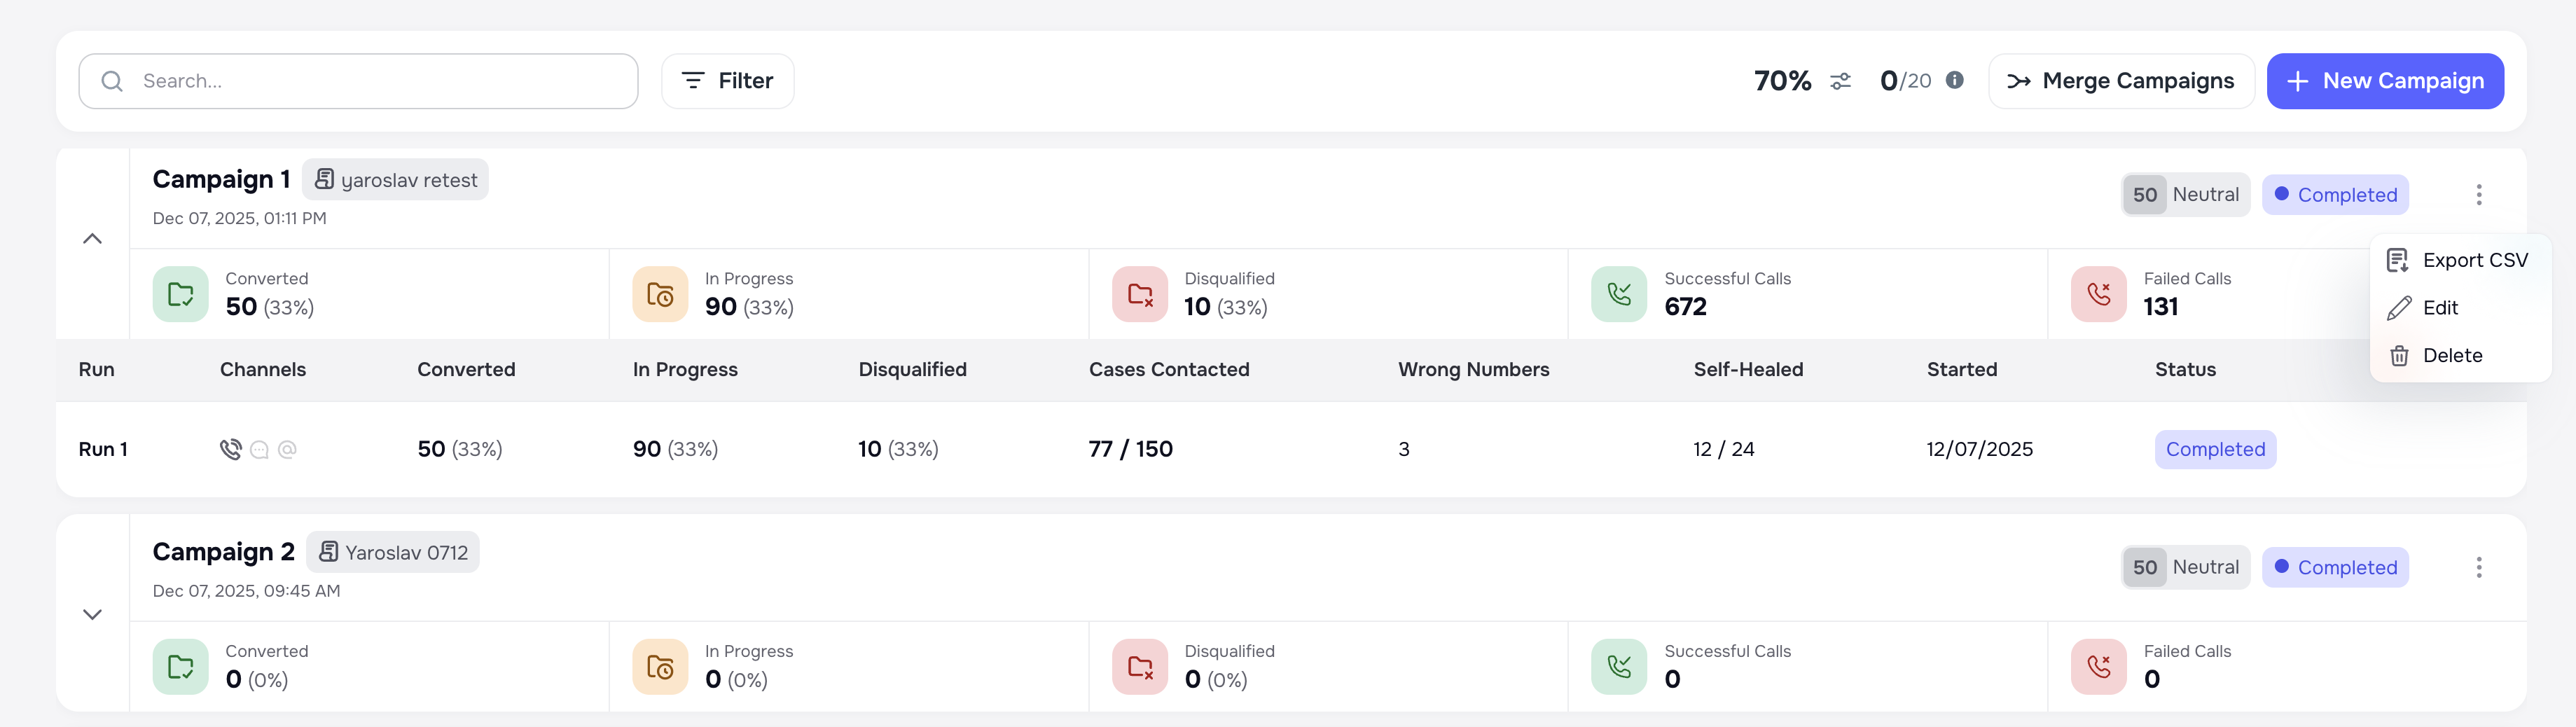
3. Campaigns list page
On the Campaigns list you can see:
- Campaign name
- Status (In Progress, Paused, Completed)
- Linked List
- Main metrics per campaign, such as:
- Converted
- In Progress
- Disqualified
- Wrong number
- Self-healed
- Successful calls
- Failed calls
You can also:
- open a campaign
- pause or resume it
- sometimes merge compatible campaigns (depending on configuration)
- export CSV report from a Campaign
- export CSV report from a Run under a Campaign
- edit/delete Campaign
🧭 4. Inside a campaign — tabs overview
When you open a specific campaign, you’ll see several tabs.
They help you understand performance and manage the campaign.

4.1 Metrics tab
This tab shows high-level performance of the campaign and may include:
- Total cases in the campaign
- Converted
- In Progress
- Disqualified
- Total tasks and task completion rate
- Successful calls
- Failed calls
- Wrong numbers
- Self-healed numbers
- Numbers of SMS and email messages
This is the best place to quickly see if the campaign is working as expected.
Metric definitions with tooltips
In the Metrics tab, metric labels include an info icon. Hover the icon to see a tooltip that explains how each metric is defined (for example, what is counted as successful, failed, or disqualified).
Use these tooltips when reviewing campaign performance with your team to keep metric interpretation consistent.

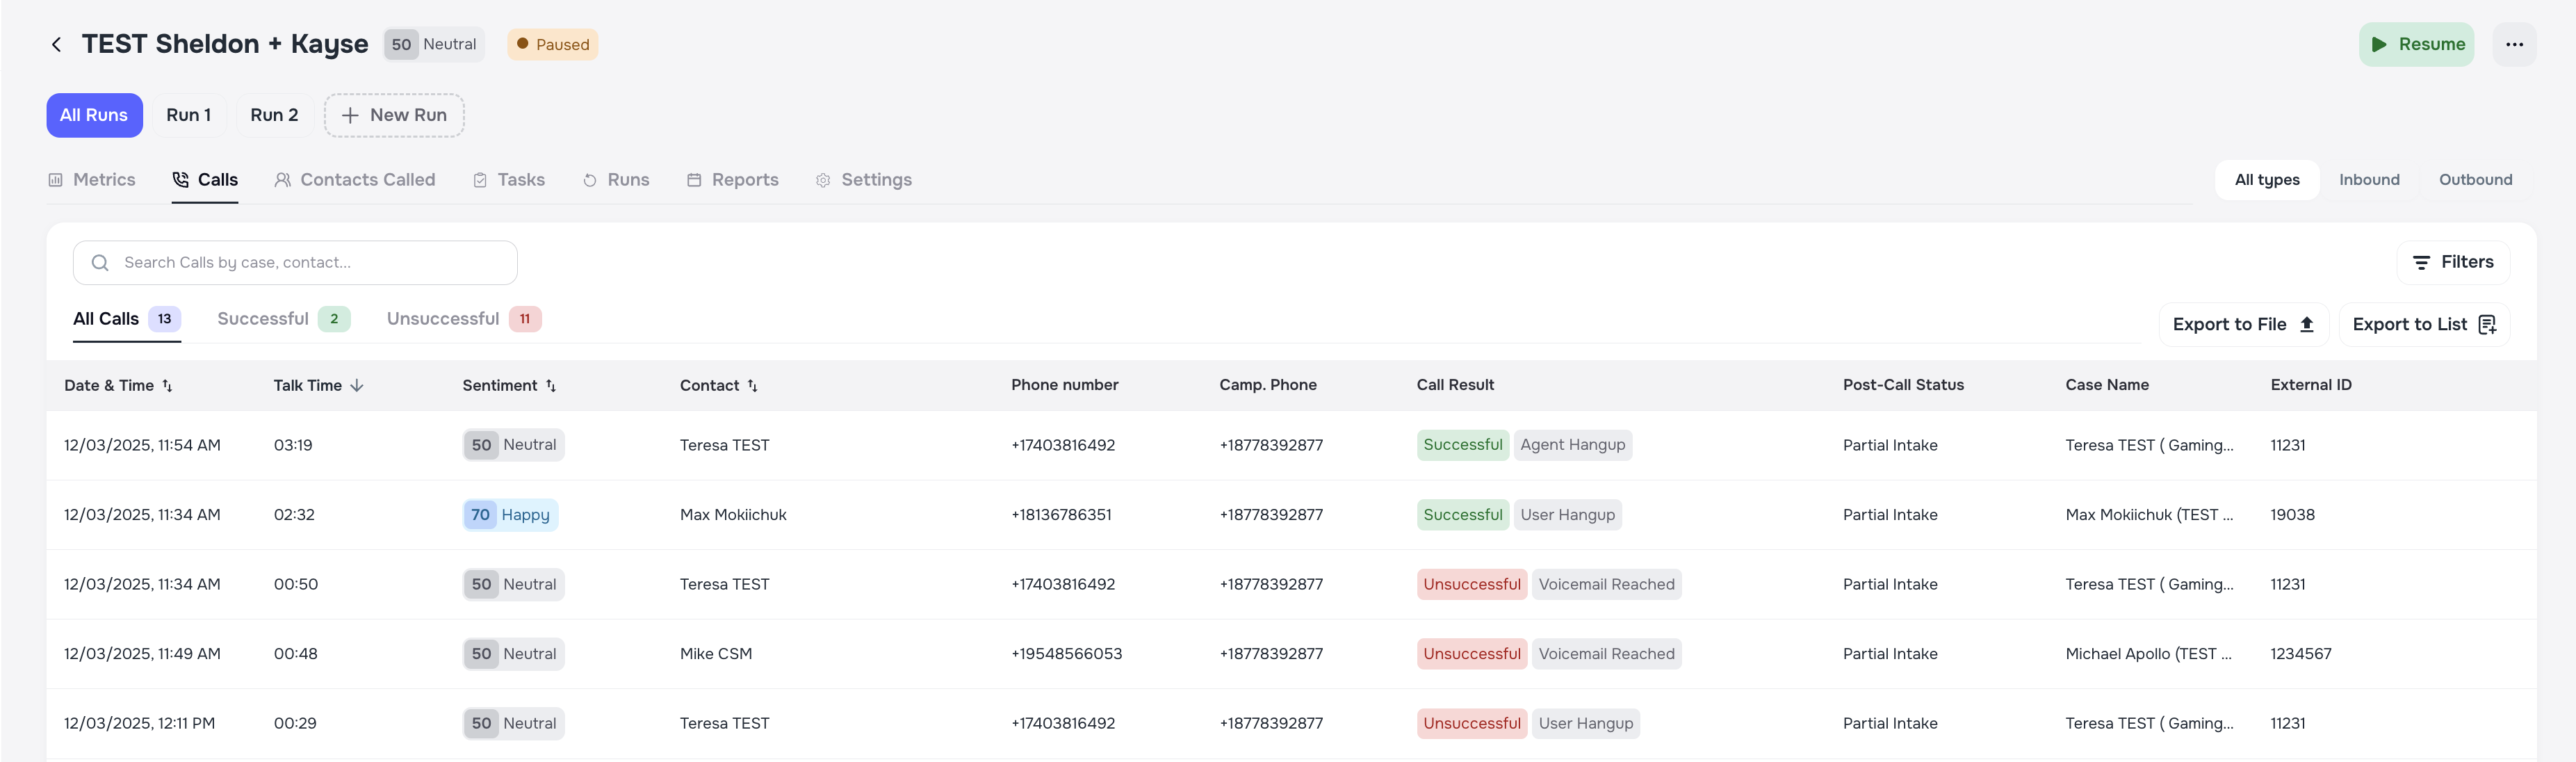
4.2 Calls tab
This tab shows every call made by the campaign.
For each call you can see:
- case / contact
- Run (which run triggered it)
- call duration
- call status
- disconnection reason
- post-call status
You can also:
- filter by Run, status, or disconnection reason,
- export calls,
- use filters to create new Lists for follow-up.
Disconnection reasons & post-call statuses
For every call, the system saves:
- a disconnection reason — why the call ended,
- a post-call status — what is the result for that contact.
Examples of disconnection reasons:
- Dial No Answer – The client did not answer the call.
- Marked as Spam – The call was flagged as spam by the recipient or carrier.
- User Declined – The client manually rejected the incoming call.
- Max Duration Reached – The call was automatically disconnected after reaching the maximum allowed duration (default: 1 hour).
- Telephony Provider Unavailable – The telephony carrier was temporarily unavailable or unresponsive.
- Empty Phone – The phone number field was empty or missing.
- Dial Failed – The system failed to initiate the outbound call.
- Voice Calls Opted Out – The user has opted out of receiving voice calls.
- Dial Busy – The number was dialed but was already engaged on another call.
- Inactivity – The call ended automatically due to extended silence.
- Voicemail Reached – The call was redirected to voicemail.
- 🛠 When detected, the AI agent ends the call without leaving a message.
- ⚠️ This now avoids setting a Post-Call Reason and prevents unnecessary transcript clutter.
- Error No Audio Received – No audio was detected from the client’s side after the call was connected.
- Invalid Timezone – The timezone could not be resolved or was missing.
- Telephony Provider Permission Denied – The provider rejected the call due to permission or policy settings.
- Invalid Phone Number – The call could not be completed because the number appears to be invalid, no longer in service, or incorrectly entered.
- 💡 If this happens repeatedly, our smart contact recovery may automatically update the number to help restore connectivity.
- Call Transfer – The call was successfully transferred to another destination by the AI agent.
- Concurrency Limit Reached – Your organization has reached the maximum number of simultaneous calls.
- User Hangup – The client ended the call before it was completed.
- Agent Hangup – The AI agent ended the call due to technical or operational reasons.
Examples of post-call status:
- CB Needed - In Process – The client answered, but additional confirmation or a callback is required.
- Signed – All necessary information was collected, and the client was qualified.
- Already Signed – The client has already signed and does not require further follow-up.
- If the client is already signed, the agent will not call such a client again.
- DQ - Rejected – The call was completed, but the client was not eligible.
- Qualified - Intake Completed – This indicates that the client provided all necessary information, and they are considered a qualified lead.
- CB Needed - Partial Intake – The client responded to the call, but some details are still missing to finalize the intake process.
- DQ - Intake Completed – The conversation was completed, but it was concluded that the client does not meet the eligibility criteria.
These values explain why a call was not completed and help you understand how many clients are not reachable.
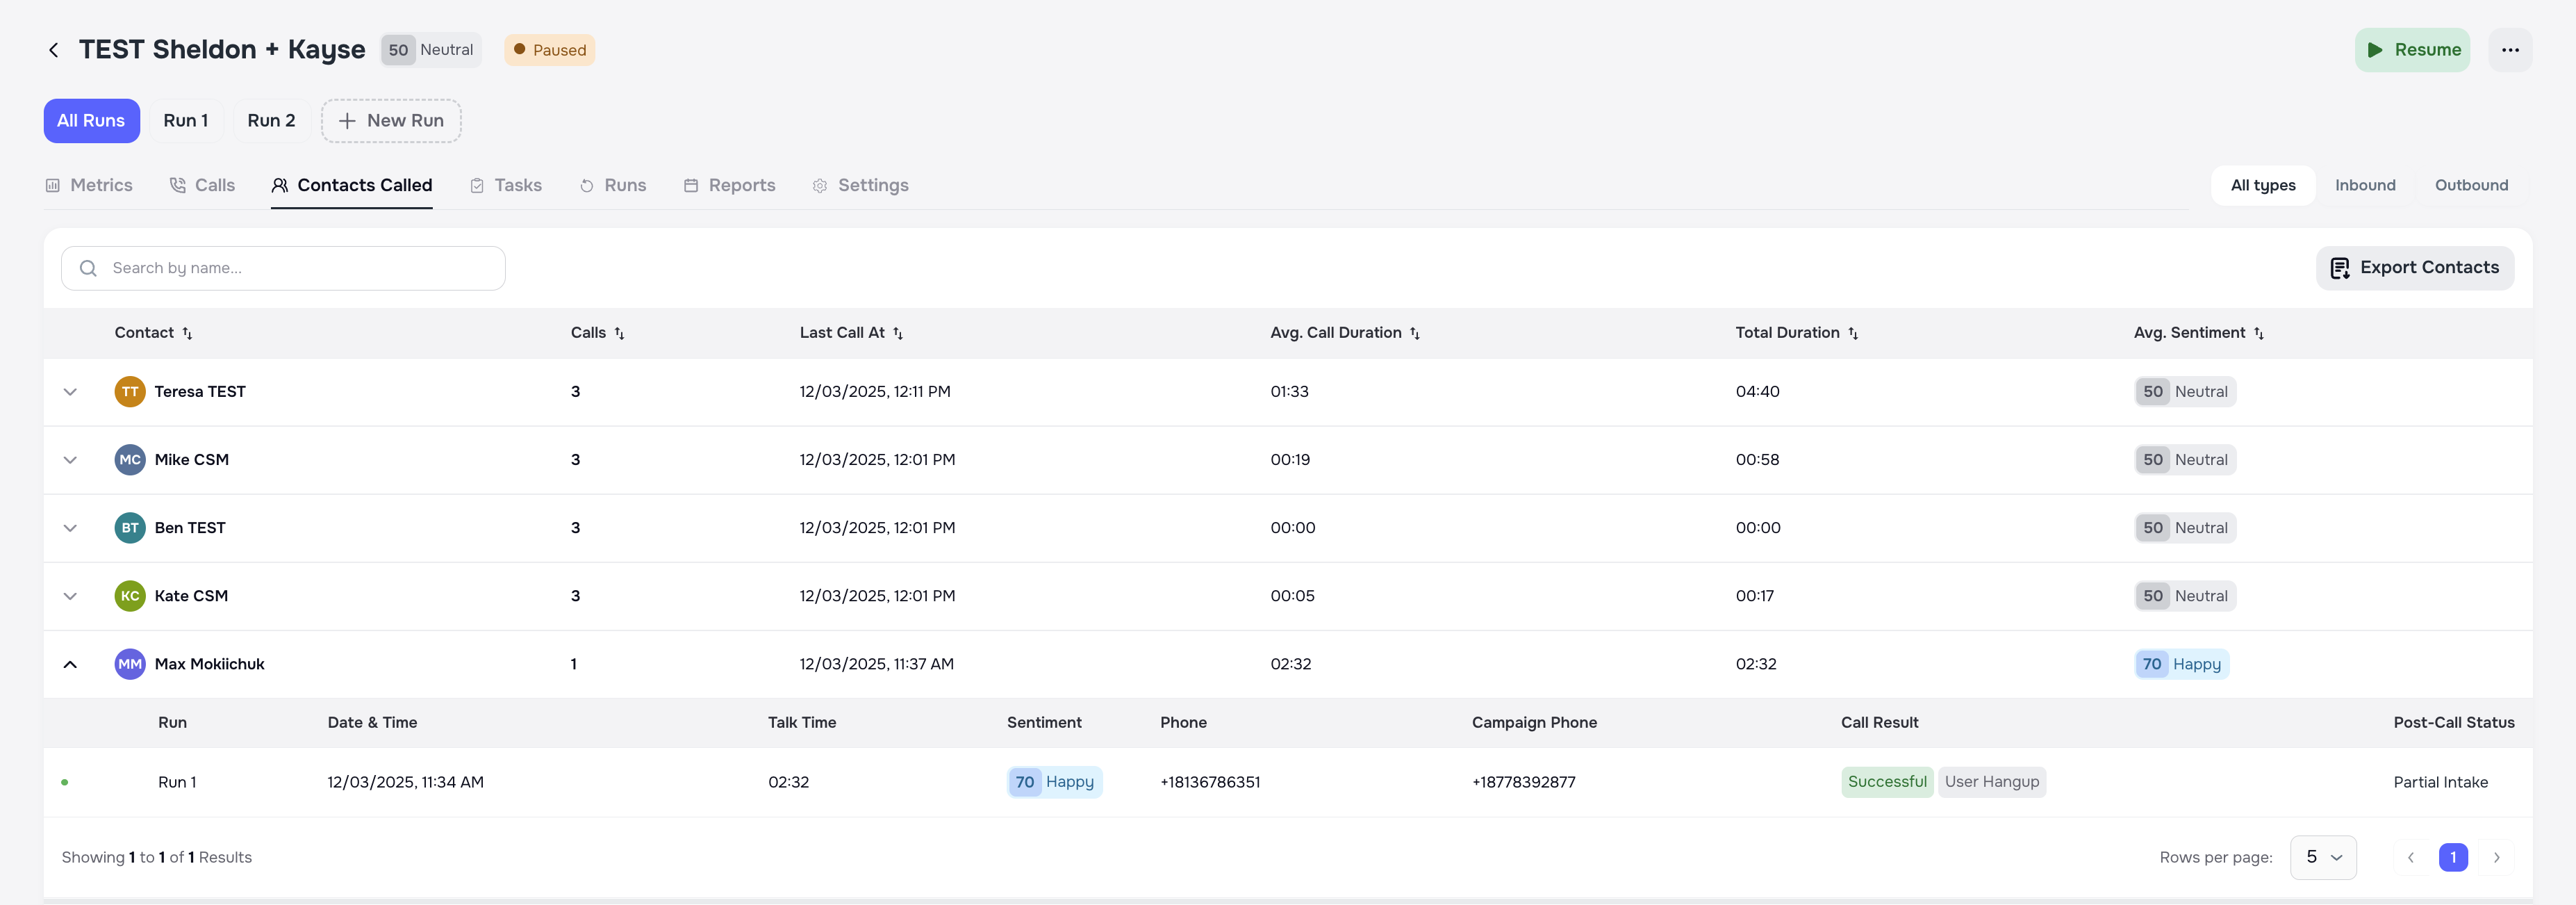
4.3 Contact calls tab
This tab groups calls by contact.
- Each row represents a single contact.
- Expanding a row shows all call attempts for that contact.
- You can filter and export this data.
It’s useful for QA, or when you want to manually review cases with many attempts.
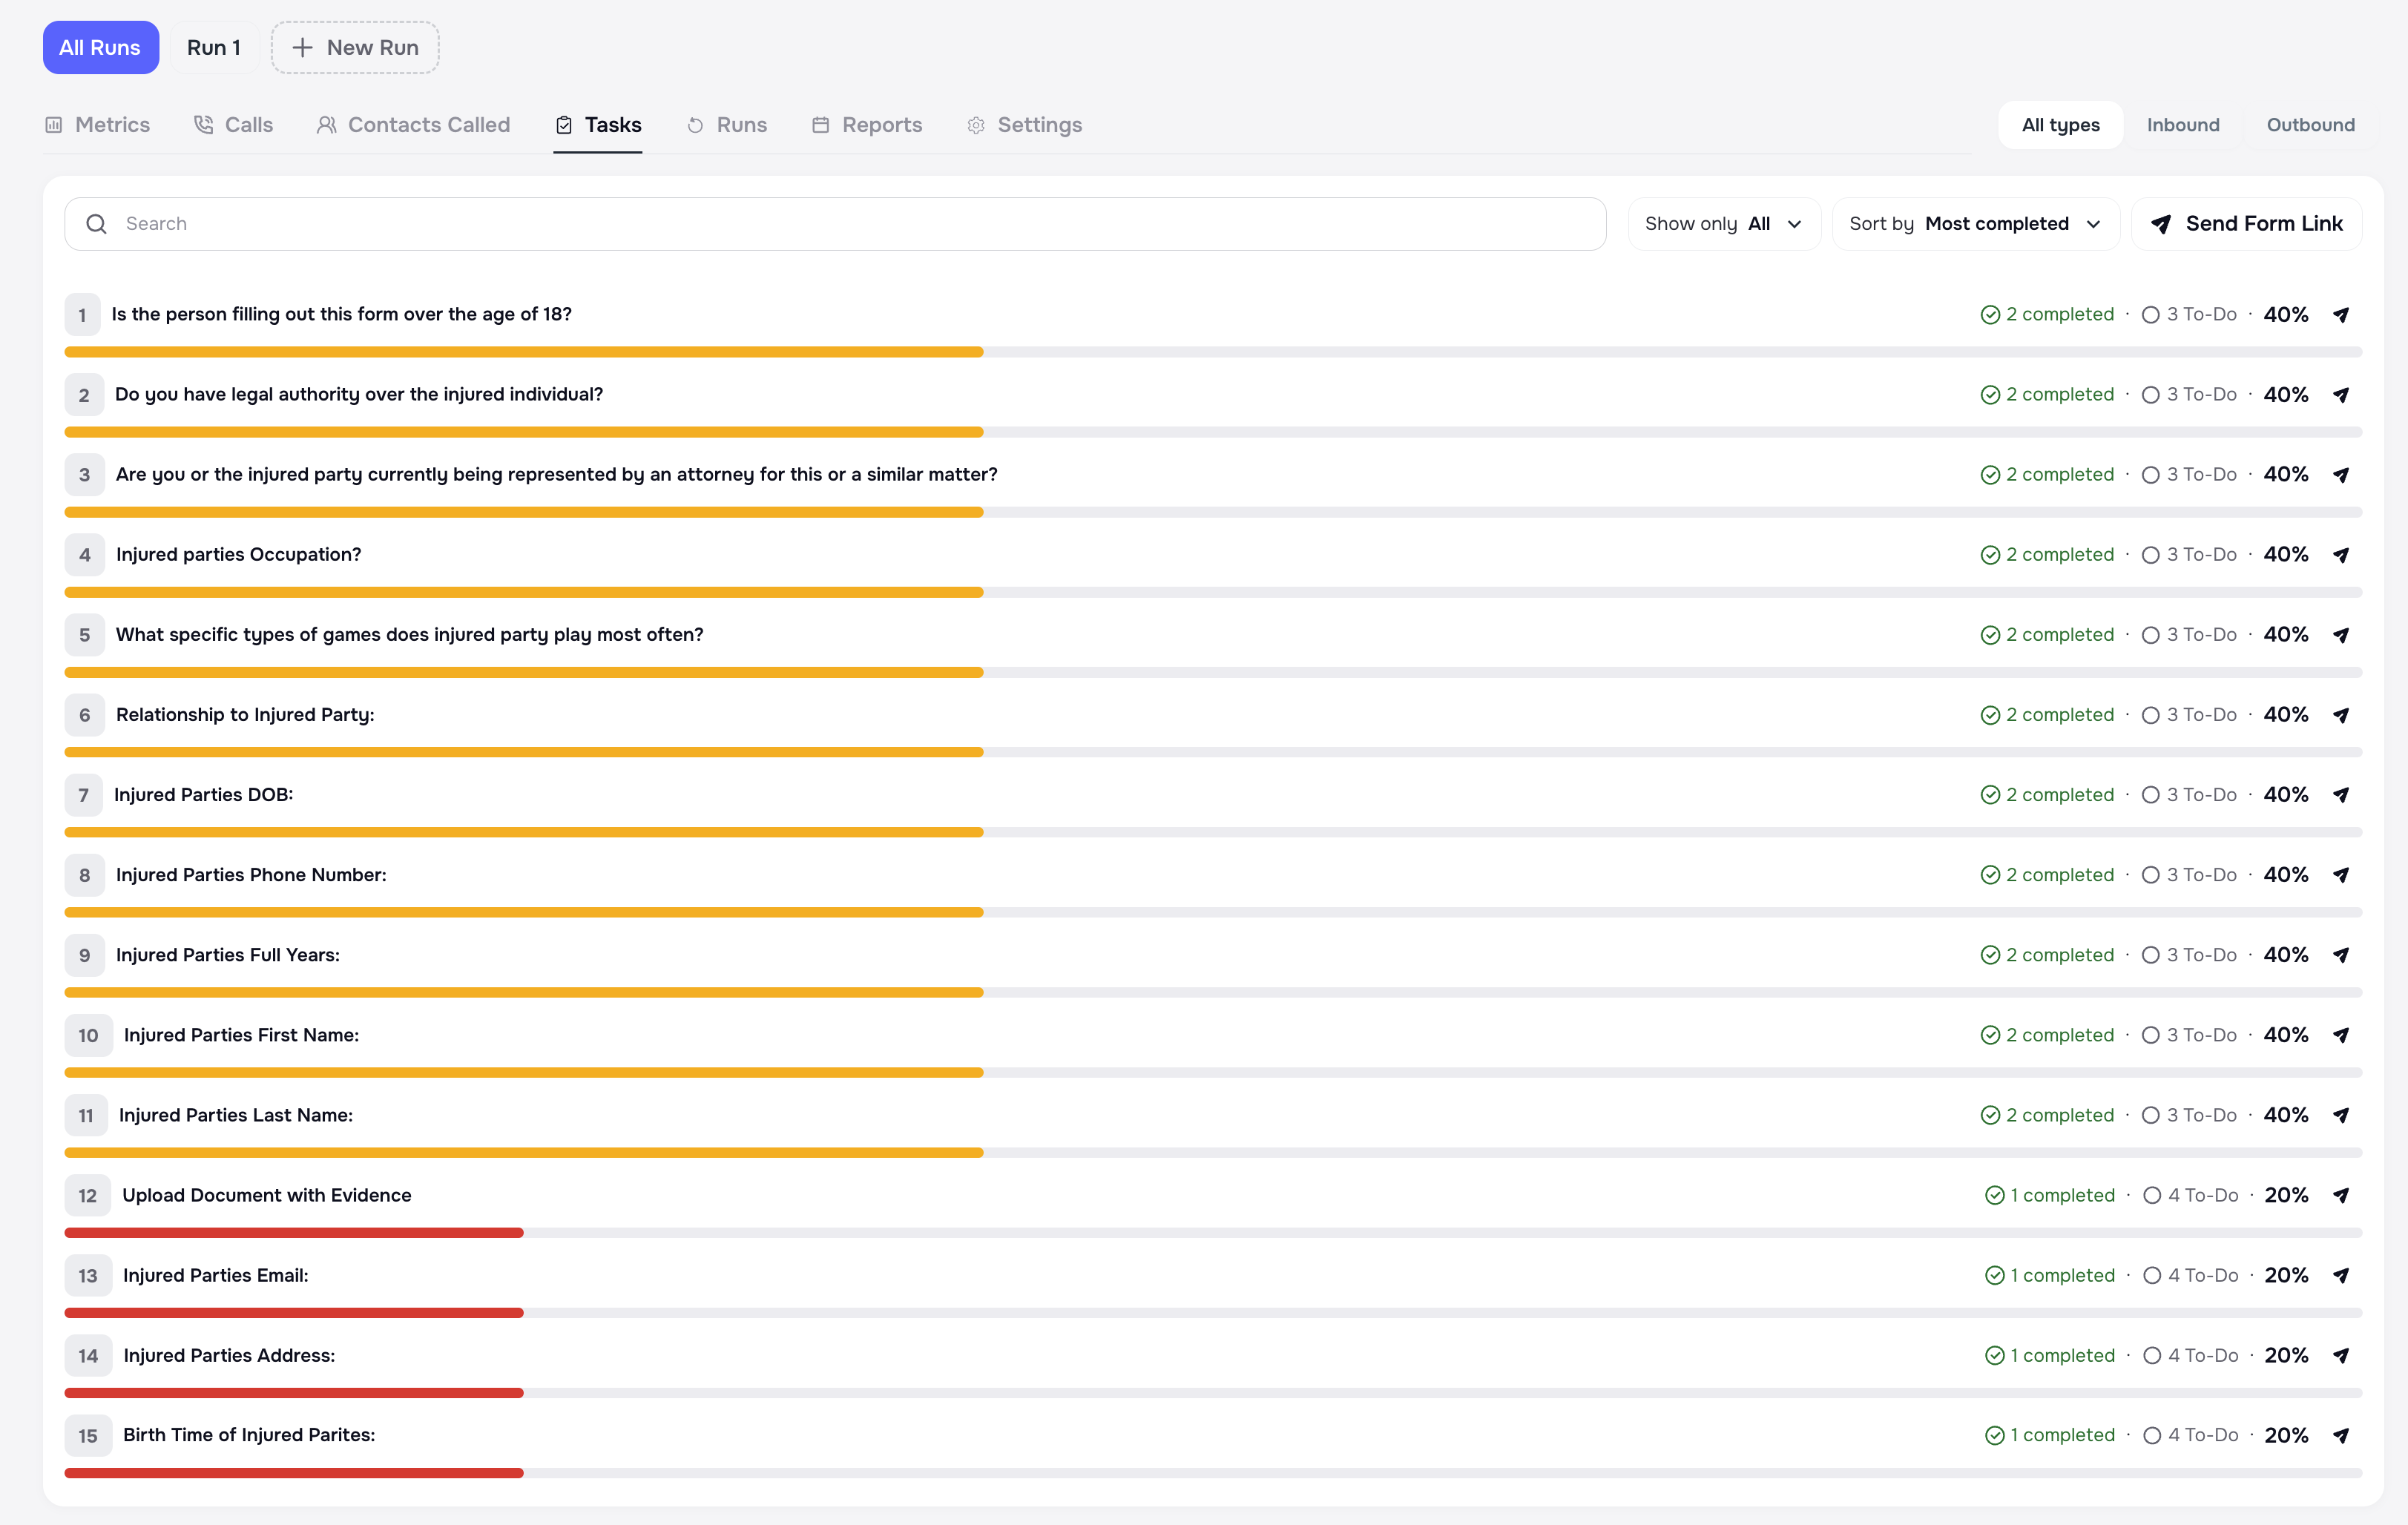
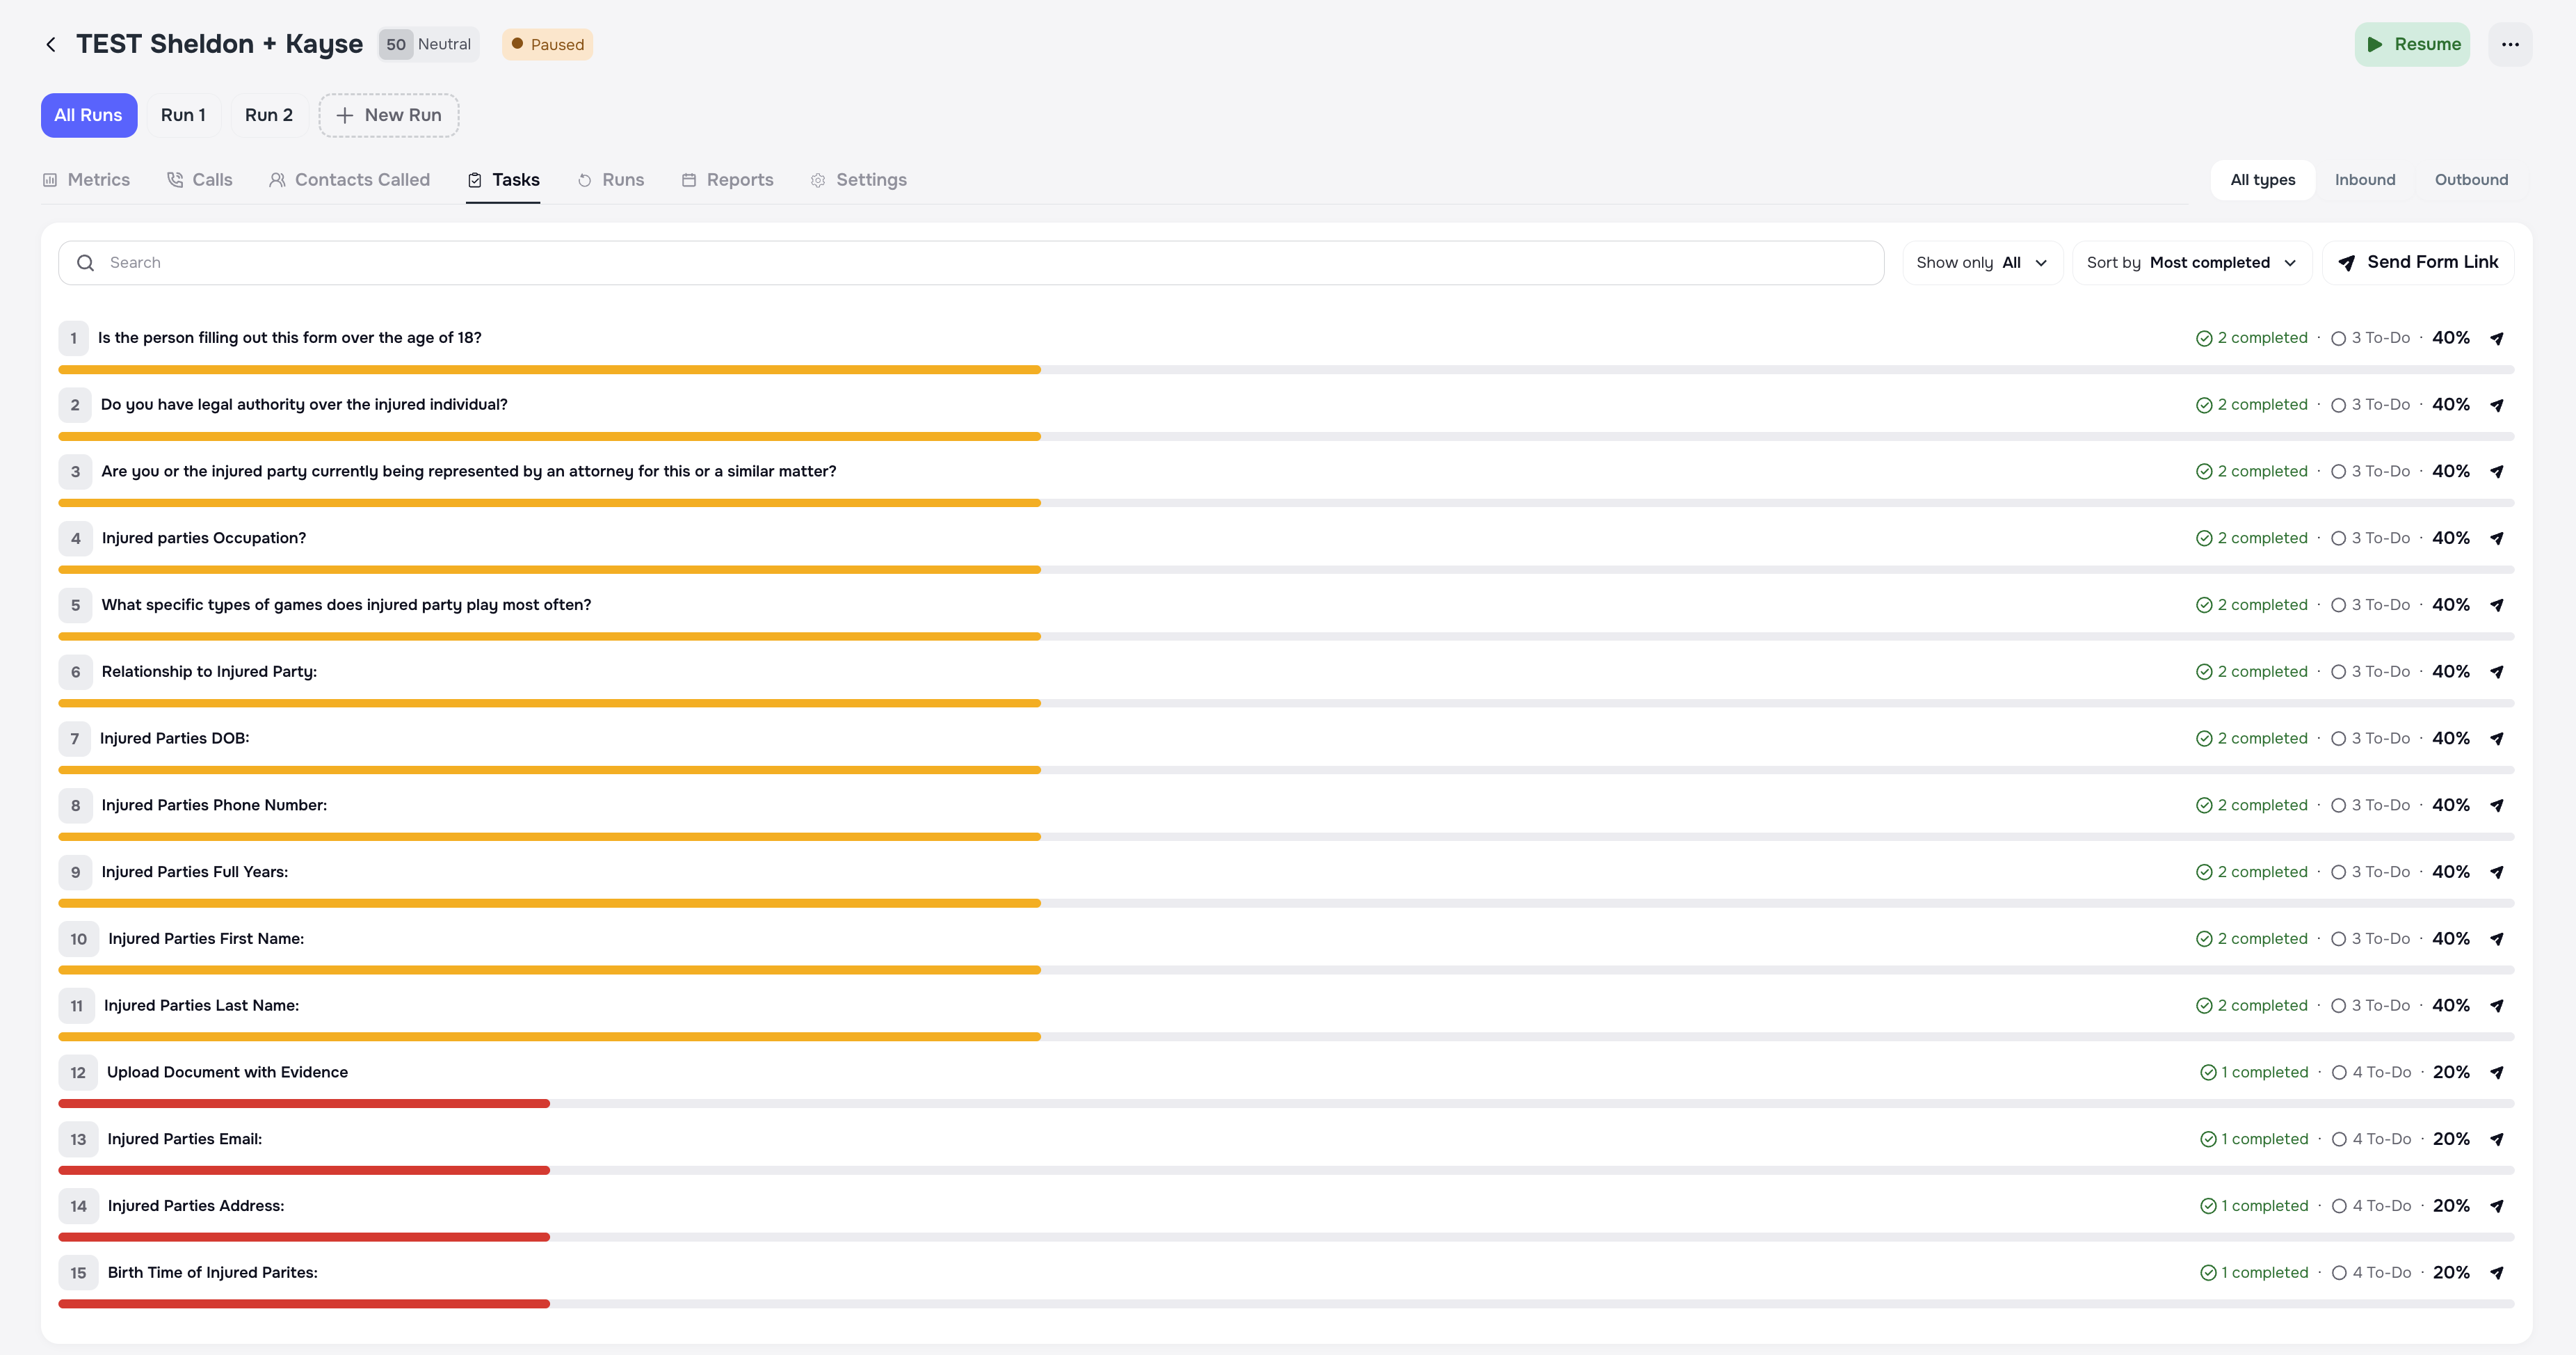
4.4 Tasks tab (when a form is attached)
If you attached a form, this tab shows:
- all tasks across all cases in the campaign,
- how many tasks are completed,
- completion rate per task or per form.
You can use filters to:
- focus on incomplete tasks,
- check which pages / questions clients struggle with.
Completion rate is calculated based on Smart Tasks inside the form. Page-level progress is not displayed.
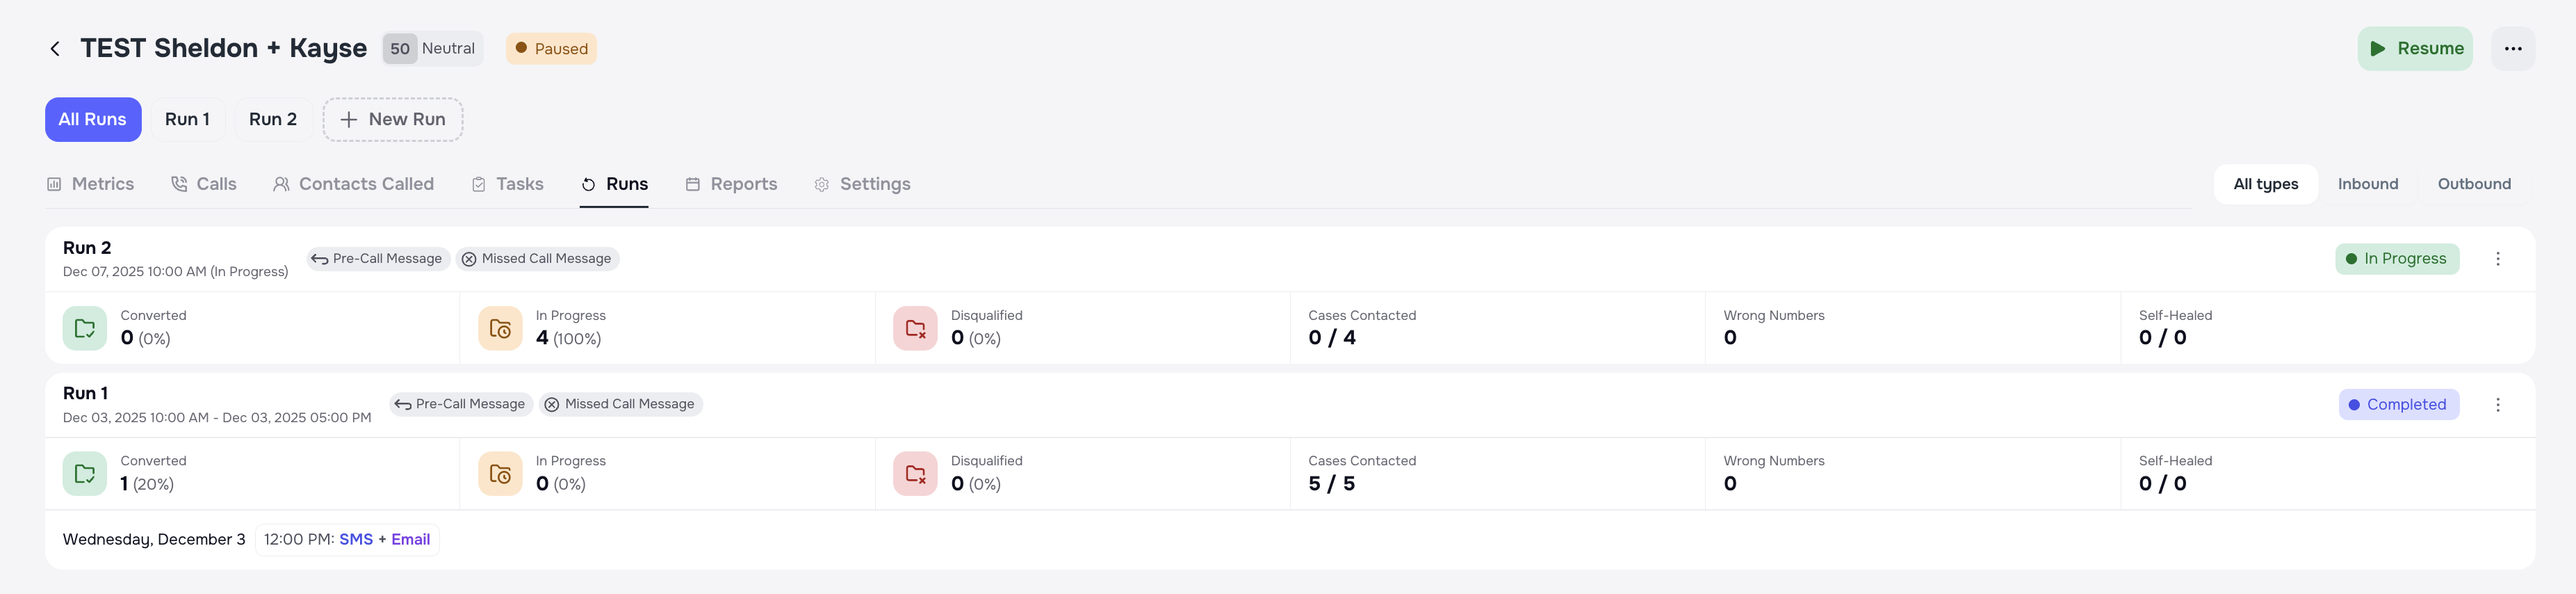
️ 4.5 Runs tab
The Runs tab shows:
- all Runs configured for this campaign,
- which Runs are active or completed,
- each Run’s days, channels, and windows,
- statistics per Run.
You can open a specific Run to see its detailed behavior and performance.
A single day can belong to only one Run. Days cannot be reused or overlap across different Runs in the same campaign.
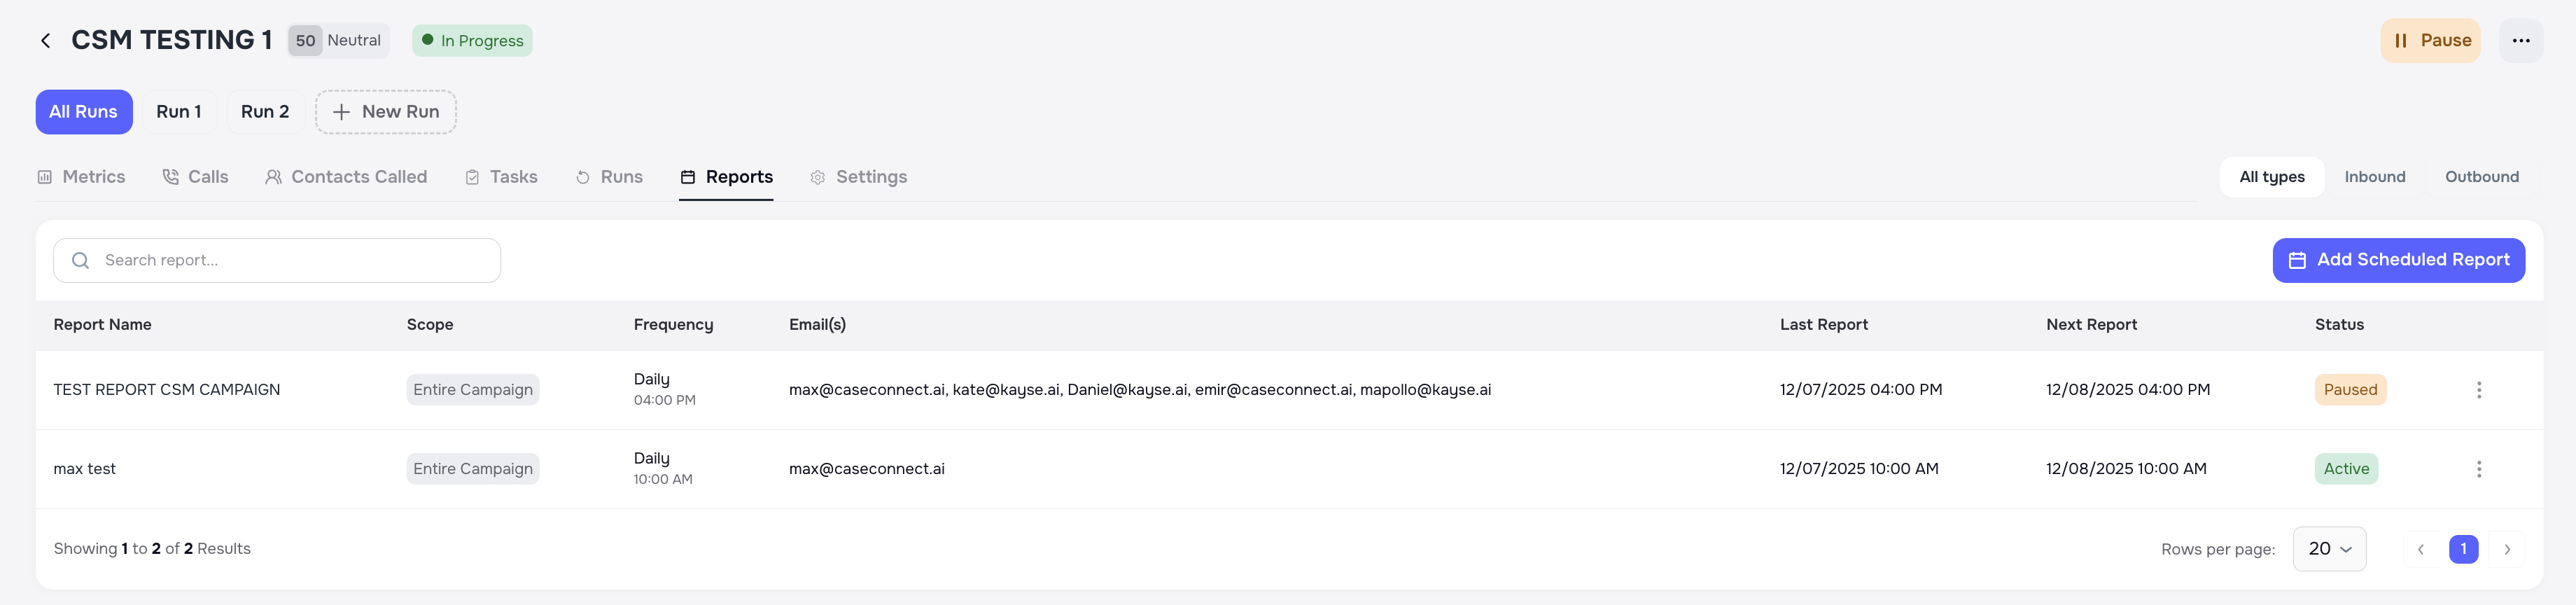
4.6 Reports tab
This tab is used for reporting and exports.
From here you can:
- configure scheduled reports
- or download your scheduled reports

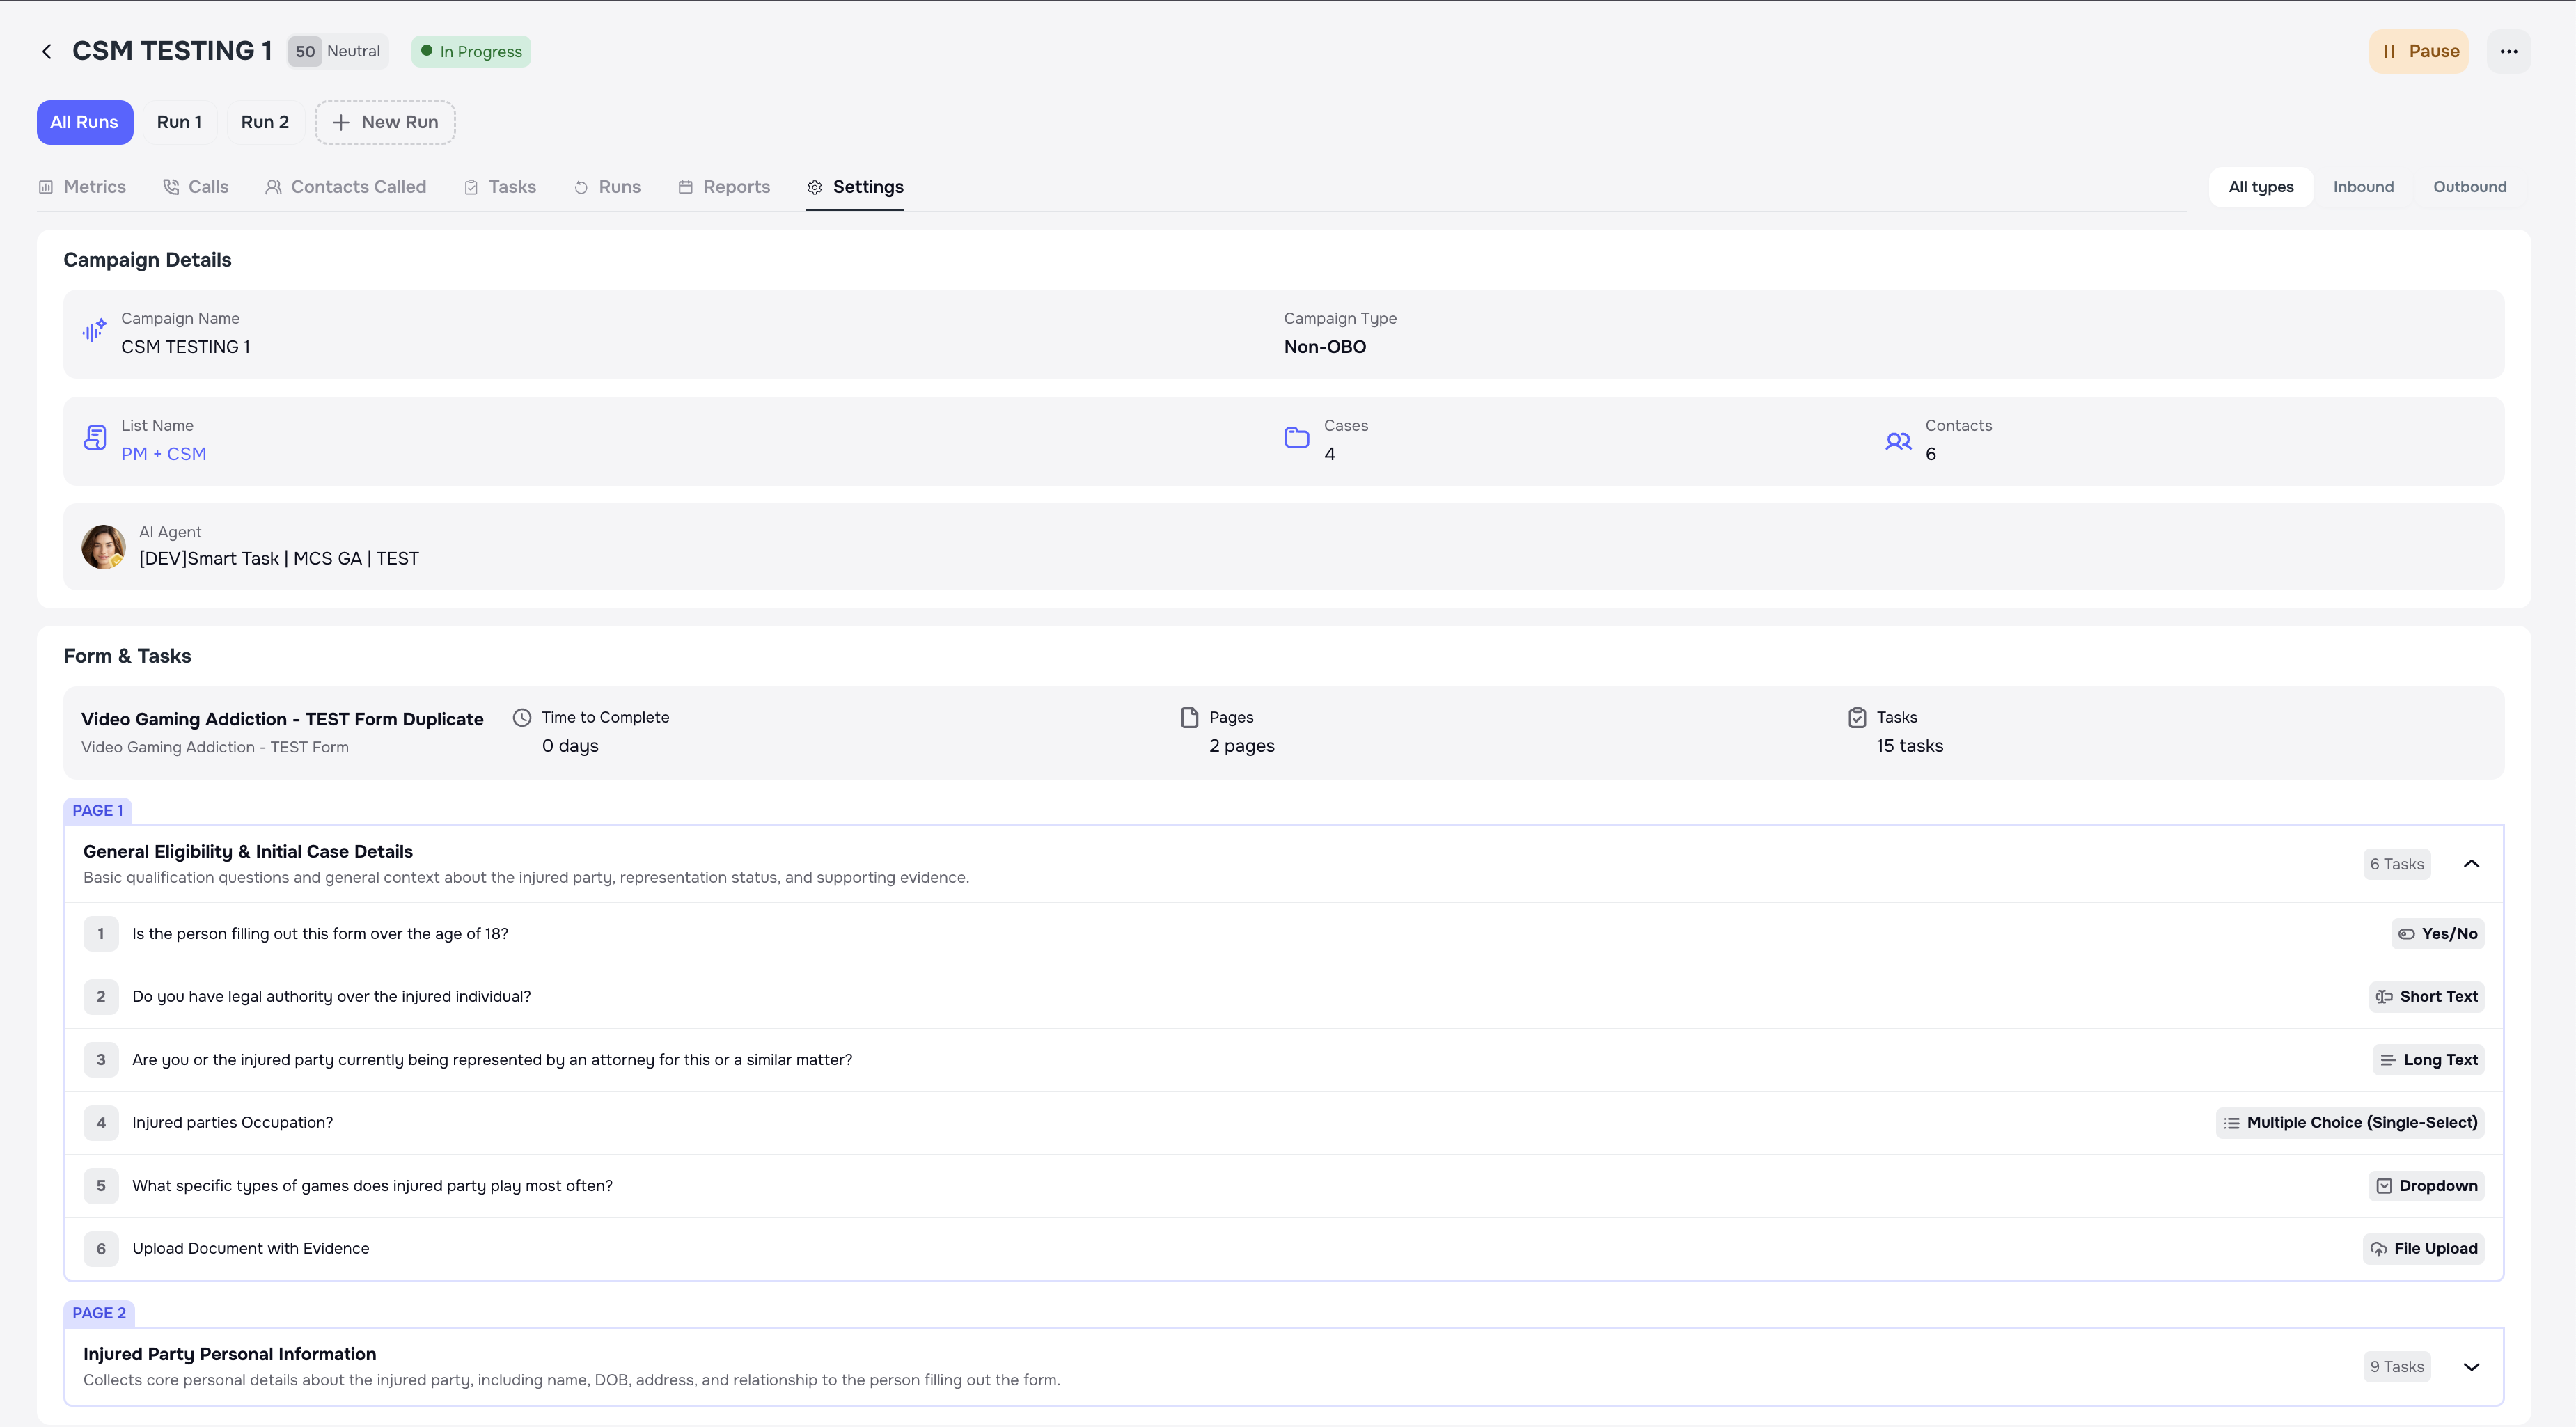
️ 4.7 Settings tab
This tab shows the full configuration of the campaign, including:
- name and OBO flag
- connected List
- whether a form is attached
- Runs
- channels and messaging rules
Here you can also:
- pause or resume the campaign,
- add new Runs (depending on state),
- export configuration for review.
5. How Forms & Smart Tasks work with AI Campaigns
When a campaign has a form attached:
- each case from the List gets its own copy of the tasks;
- clients can complete tasks through:
- Voice Calls,
- Mobile Client Portal App,
- secure web links;
- completion status is visible both:
- in the Tasks tab of the campaign, and
- in each individual case.
Tasks and forms allow campaigns to not only contact clients, but also collect structured information (documents, answers, confirmations) automatically.
Smart Tasks assigned through a campaign follow the same reminder and expiration logic as regular Smart Tasks. Tasks can only be marked as completed, not partially completed.
For a detailed breakdown of all task types and form behavior, see the 🧩 Smart Tasks & Forms in Kayse article.
6. Best practices
- ✅ Always start with a clean List (valid phones, no obvious duplicates).
- ✅ Use clear List and Campaign names so the team understands the goal.
- ✅ Attach a form when you need to collect information, not just notify.
- ✅ Use multiple Runs instead of one huge run for long outreach periods.
- ✅ Review Metrics and Calls regularly to fine-tune your strategy.
- ✅ Pay attention to disconnection reasons — they explain why some clients are not reachable.
- ✅ Avoid adding the same case to multiple active campaigns unless intentionally coordinating outreach.
️ 7. Troubleshooting
The campaign does not start
- Check if at least one Run is configured with valid days and channels.
- Make sure the List is not empty.
No calls are being made
- Check Run time windows and the current time.
- Verify that voice is enabled for that Run.
- Check the client's time zone.
No SMS or emails are being sent
- Check messaging schedule in the Run.
- Verify that SMS / email is enabled as a channel.
Form is not showing in the campaign
- Make sure you selected “Attach form” and chose a form during campaign creation.
Many calls show “Invalid number” or “Out of service”
- Review your List data and fix phone numbers.
- Consider re-importing with corrected data.
The campaign does not start
- Make sure the List is not empty.
- If a form is attached, verify that at least one client still has incomplete tasks — fully completed cases will not be contacted again.